
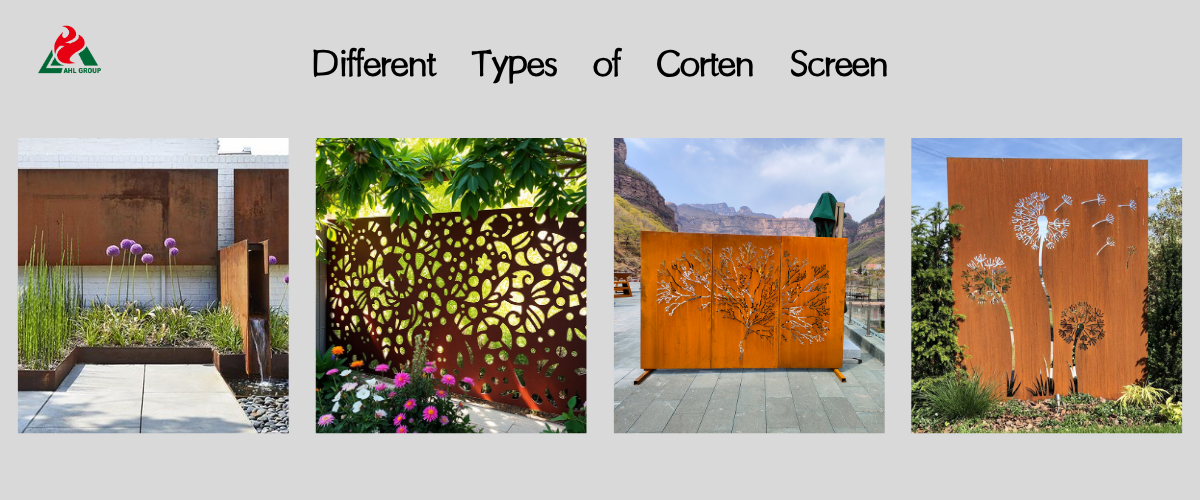
Corten steel screens are one of the best solutions for infusing modern design and practical privacy into garden or patio spaces. This steel material, with its robust properties and striking self-sealing patina, serves as a low-maintenance, high-impact visual element in landscaping.
Although installing weathering steel screens may seem complex, many homeowners have completed DIY installations of these metal screens using a simple post-and-panel system.
As the specialist team at AHL Group, we meticulously design screen kits that balance stability with ease of assembly. This guide details how to correctly install freestanding privacy screens, ensuring they remain sturdy and durable while achieving a professional-grade finish.
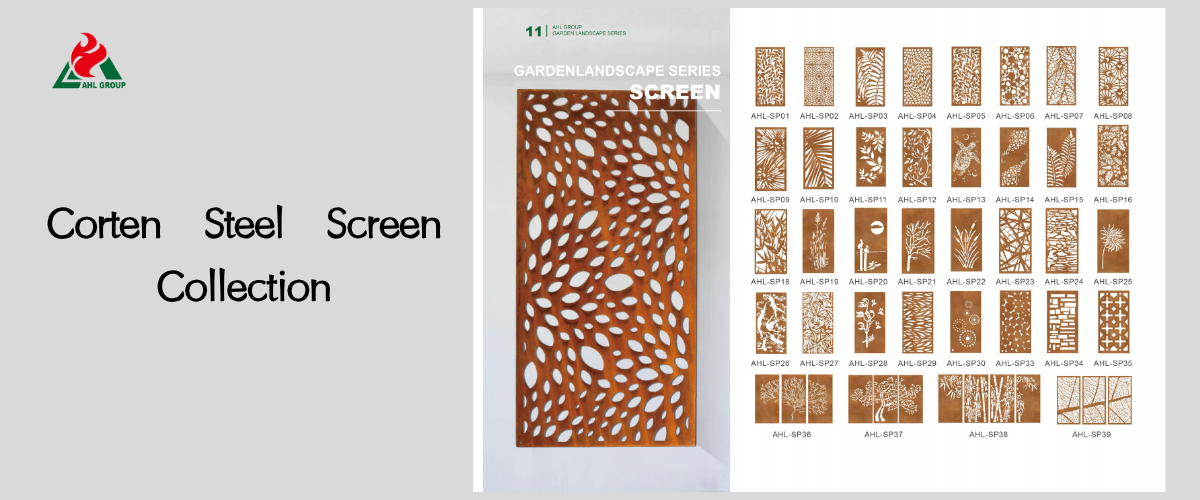
Introduction to Corten Steel Screen Kits
Understanding the components of a Corten steel screen kit is the first step toward achieving a flawless installation.
What Is Included in a Standard Kit?
The AHL Group standard Corten steel screen kit typically includes:
• Laser-cut Panels: The decorative Corten steel panels themselves.
• Weathering steel columns: Structural support posts (square or rectangular cross-section).
• Mounting brackets/clips: Pre-welded or bolted connectors for securing panels to columns.
• Fasteners: Stainless steel bolts, nuts, and washers (typically stainless steel to prevent seizing).
Freestanding vs. Wall-Mounted Designs
Installation methods primarily depend on screen type:
• Freestanding Screens: Structural support columns must be embedded in the ground (typically within concrete footings). Suitable for space division or standalone backdrop construction.
• Wall-Mounted Screens: Screen panels are directly affixed to existing structures (e.g., brick walls or solid fences). This method requires heavy-duty anchor bolts, eliminating the need for excavation or concrete pouring. This guide primarily focuses on freestanding installation methods.
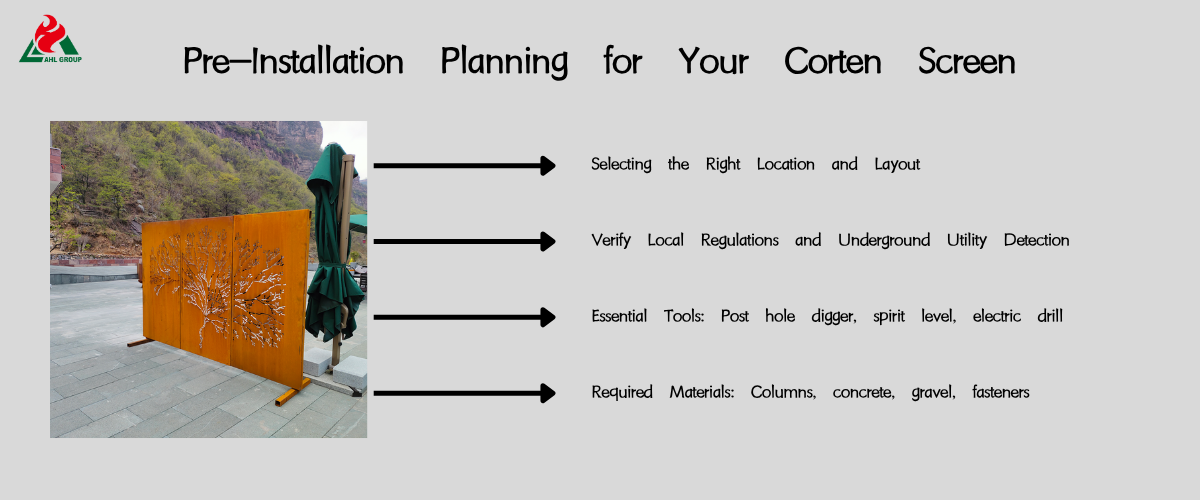
Pre-Installation Planning for Your Corten Screen
Careful planning prevents construction errors—especially when installing permanent systems like Corten steel panels.
Selecting the Right Location and Layout
Before starting, clarify the screen's function:
• Privacy Protection: Ensure the screen's position and dimensions block unwanted views (verify both seated and standing heights).
• Aesthetic Harmony: Confirm the screen complements existing landscapes and allows ample surrounding space.
Verify Local Regulations and Underground Utility Detection
This is a critical safety step:
• Call Before Digging: Contact your local utility locating service (e.g., dial 811 in the U.S.) to mark underground cables, pipes, and lines. Never skip this step.
• Permit Approval: Confirm whether your city or local council requires permits for installing fences/screens exceeding specific height or depth thresholds.
Materials and Tools You Will Need
Having all necessary equipment ready will ensure a swift and efficient installation process for the Corten metal screen.
Essential Tools: Post Hole Digger, Spirit Level, Electric Drill
• Post Hole Digger: Used to precisely excavate holes for Corten steel posts.
• Measuring Tools: Tape measure, chalk line, and wooden stakes for layout marking.
• Level: Large spirit level (or laser level) to ensure columns are perfectly vertical.
• Electric Drill: Equipped with metal drill bits (for mounting brackets) and masonry drill bits (if drilling for base plates).
• Wrench/Socket Set: For securely tightening anchor bolts.
Required Materials: Columns, Concrete, Gravel, Fasteners
• Columns: AHL Group Corten steel columns.
• Concrete mix: Quick-setting concrete is recommended to accelerate curing. Standard concrete mix may be used if an extended support time for the column is feasible.
• Gravel/ Aggregate: Used to form a drainable base within the column hole.
• Fasteners: Matching stainless steel bolts, nuts, and washers (critical components to prevent material corrosion incompatibility).
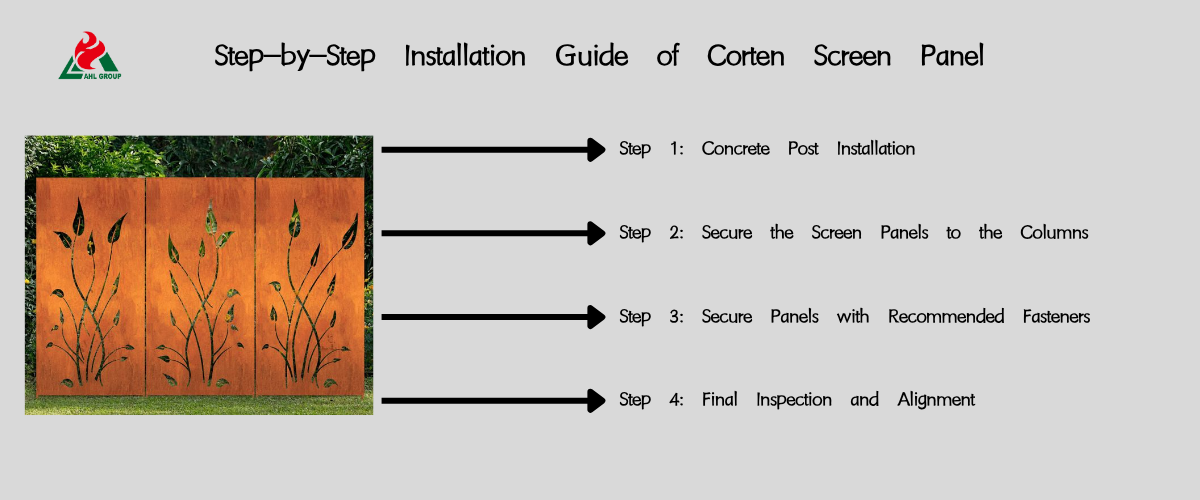
Step-by-Step Installation Guide of Corten Screen Panel
Follow these steps for the safe installation and long-term maintenance of Corten steel screen panels:
Step 1: Concrete Post Installation
The stability of the screen depends entirely on the posts.
• Mark Hole Locations: Use chalk lines and measuring tools to mark the center point for each post hole. Ensure the center-to-center distance between posts equals the panel width plus space for brackets.
• Excavation: Dig foundation pits. Standard depth is 18 to 24 inches (45-60 cm), width 8 to 10 inches (20-25 cm), with dimensions adjusted based on screen height and local frost line depth.
• Base Layer: Place 2 to 3 inches of crushed stone at the pit bottom for drainage.
• Posts: Position weathering steel posts at the pit center. Use a level to ensure perfect vertical alignment.
• Concrete Pour: Fill holes with concrete mix. Ensure the concrete surface slopes slightly away from the post base for drainage.
• Curing: Brace posts if necessary. Install heavy panels only after concrete has fully cured (typically 24-48 hours for quick-set mixes; 7 days for full strength).
Step 2: Secure the Screen Panels to the Columns
Once the concrete has fully cured, proceed with installing the decorative weathering steel panels.
• Lifting and Positioning: Two people should collaborate to lift the first panel and place it between the front two columns.
• Align Brackets: Align the panel's pre-drilled holes with the brackets or fixing points on the columns. Insert small wedges or shims beneath the panel to ensure an even gap above the ground for drainage.
Step 3: Secure Panels with Recommended Fasteners
Use matching stainless steel hardware to ensure durability and prevent rust transfer.
• Initial Fastening: Manually tighten all bolts, washers, and nuts to connect the panel to the column brackets.
• Level Verification: Before final tightening, use a level to check the top edge of the panel, ensuring it is perfectly level.
Step 4: Final Inspection and Alignment
After securing the first panel, install subsequent panels following the same procedure, aligning and verifying each panel against the previous one during installation.
• Gap Consistency: Verify that panel-to-panel gaps (where applicable) and ground clearance remain uniform throughout installation.
• Final Tightening: Use a wrench or socket set to fully tighten all fasteners. Avoid over-tightening to prevent thread damage while ensuring panels are securely locked and do not sway in the wind.
Finishing and Maintenance
Final steps ensure a professional appearance and maximize the service life of Corten steel fencing.
Final Inspection and Fastener Tightening
Walk the entire length of the installed screen for a final inspection:
• Ensure all concrete debris and tools are cleared from the site.
• If concrete splatter occurs, wipe panels with a damp cloth.
• Confirm all bolts are fully tightened.
Long-Term Maintenance and Stability Testing
Corten steel requires minimal maintenance due to its self-sealing rust layer, but the following checks are recommended:
• Stability Testing: Inspect post stability within weeks of installation, as minor settlement of ground or concrete may occur.
• Rust Runoff: Monitor for rust runoff during the first 6-9 months. Ensure screen bases do not directly contact light-colored patio pavers to prevent residue staining surrounding surfaces.
Conclusion: Frame Your Space with Corten Steel Screens
Installing AHL Group's Corten steel screens is an easy DIY project that delivers a premium, long-lasting landscape decoration. By precisely positioning the posts and selecting the correct stainless steel fasteners, you can ensure your decorative metal screens remain vertically stable and aesthetically pleasing for decades to come, infusing your outdoor space with modern industrial elegance.
