


To clean a Corten steel grill, first allow it to cool completely, remove ashes and food residue, clean the cooking surface according to the material’s characteristics, and wash the Corten steel exterior with warm water, mild soap, and a soft nylon brush. Avoid using bleach, acidic cleaners, pressure washers, or abrasive wire brushes on the exterior if rust has formed.
This brief answer highlights an important distinction: a Corten steel grill is not made of a single material. The main body, cooking grates, grill rack, and ash tray—all made of weathering steel—each serve a specific purpose and may require different cleaning tools. Treating every component as if it were a rusted steel shell may damage surfaces that come into contact with food; treating the protective patina on the weathering steel as if it were the cooking surface may cause it to flake off or become contaminated.
The following seven-step process distinguishes between these areas, removes the residue that is actually causing the problem, and prepares the grill for its next use without compromising the surface finish.
.png)
This brief answer highlights an important distinction: a Corten steel grill is not made of a single material. The main body, cooking grates, grill rack, and ash tray—all made of weathering steel—each serve a specific purpose and may require different cleaning tools. Treating every component as if it were a rusted steel shell may damage surfaces that come into contact with food; treating the protective patina on the weathering steel as if it were the cooking surface may cause it to flake off or become contaminated.
The following seven-step process distinguishes between these areas, removes the residue that is actually causing the problem, and prepares the grill for its next use without compromising the surface finish.
1. Before You Start: Identify the Cleaning Zones
Professional cleaning begins with identifying the material of each surface. The term “weathering steel grill” typically refers to the main body or base, not all components. Other parts of your grill may be made of stainless steel, cast iron, or enamel, so please consult the user manual before selecting a brush or cleaning agent.
| Cleaning zone |
Possible material | Main contaminant | Correct starting point |
| Exterior body |
Corten/weathering steel | Dust, grease, salt and organic debris | Mild soap and a soft nylon brush |
| Cooking plate/plancha |
Carbon steel, stainless steel or cast iron | Carbonised food and grease | Scrape, clean and season only if required |
| Grill grate |
Stainless steel, cast iron or enamel-coated steel | Burnt food residue | Use a material-compatible brush and cleaner |
| Ash pan/fire bowl |
Weathering or carbon steel | Ash and trapped moisture | Empty dry and keep drainage open |
How to Identify Cooking Surfaces
Please review the product specifications, maintenance manual, or parts list. Color alone is not a reliable indicator: treated carbon steel may appear black, cast iron may have an enamel coating, and stainless steel may change color when heated. If the relevant documentation is missing, consult the manufacturer before using acidic cleaners, abrasives, or maintenance oils. This simple check can prevent most avoidable cleaning damage.
Tools and Supplies
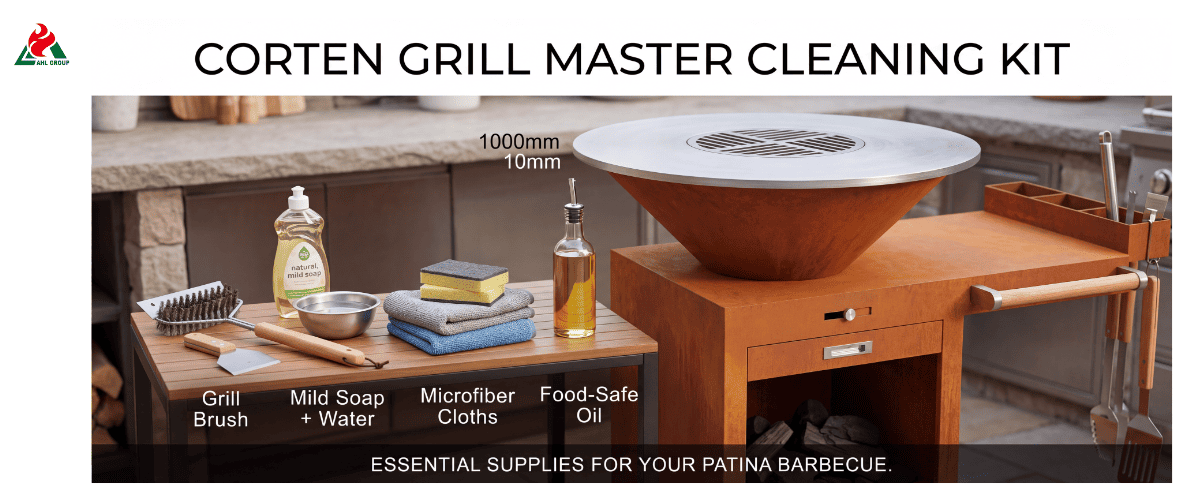
Prepare heat-resistant gloves, a lidded metal trash can, a scraper suitable for the cooking surface, a soft nylon brush, a microfiber or lint-free cloth, warm water, mild dish soap, and clean rinse water. Add a neutral, high-smoke-point cooking oil only when the cooking surface requires seasoning. For carbon steel, suitable seasoning oils are those with a high smoke point and neutral properties, such as grapeseed oil or canola oil.
2. Step 1 — Let the BBQ Cool to a Safe Temperature
Never pour cold water onto a scorching-hot Corten BBQ grill. Sudden cooling can produce dangerous steam, causing welds to crack and warping the large grilling grates. The manufacturer’s cleaning instructions may call for scraping while the grates are still warm, but “warm enough to loosen residue” does not mean “safe to touch.” Please use the tools and temperatures specified in the instruction manual.
The firebox, ash compartment, and weathering steel body must be cool before removing parts, clearing ashes, or beginning wet cleaning. We recommend allowing the grill surface to cool completely before scraping off residue and applying oil, and note that the unit must be cool before installing the lid. If your model’s instructions differ, follow those instructions.
A practical sequence of steps is as follows: Clean the cooking grate after cooking is complete—using a long-handled scraper if permitted by the manual—and then allow the entire unit to cool before cleaning the exterior. Never judge the condition of the ashes based on appearance alone. Even long after the visible flames have gone out, high-temperature embers may remain beneath the gray surface.
3. Step 2 — Remove Ash, Charcoal and Loose Debris
Once the appliance has cooled, scoop the ashes and charcoal into a metal container with a lid. Fire safety guidelines recommend waiting until the charcoal has cooled completely before transferring it to a metal container (rather than a flammable one) for disposal. Please follow local disposal regulations and the manufacturer’s instructions; never assume that ashes that appear to have cooled are safe to place in a plastic trash can.
Brush loose residue toward the ash outlet or removable tray, then inspect the gap between the fire bowl and the base. Never allow compacted ashes to accumulate for long periods in the rain. Note that wet ashes form a corrosive mixture that erodes steel, accelerates rusting, and may damage the bottom of the fire bowl. The maintenance guide recommends removing ashes immediately after use and allowing the fire bowl to dry thoroughly before replacing the lid.
Check the Drainage Holes and Ash Tray
Locate the designated air inlets, drainage holes, or ash discharge openings and clean them thoroughly. Never enlarge the openings or scrape away the surrounding rust layer. Check low-lying areas and weld seams for accumulated residue. If water accumulates inside the fire bowl, clear the blockage first before cleaning other components. Weathering steel performs best when subjected to cycles of drying and wetting; prolonged dampness in hard-to-reach areas and poor drainage increase the risk of corrosion.
4. Step 3 — Clean the Plancha or Cooking Plate Separately
The plancha grill pan is the surface that comes into direct contact with food. Do not clean it as if it were decorative weathering steel, and do not oil the entire grill just because the pan needs to be seasoned.
First, use a certified scraper to scrape food residue and grease toward the drip tray. For carbon steel grates, follow this method: first, use a spatula to push the residue into the fire, then wipe with a damp paper towel, and finally apply a light coat of oil to the grate. This method is suitable for the specified material but does not imply that every weathering steel grill should be treated in the same way.
Carbon Steel or Cast Iron Grates
Once the grates have cooled to the safe temperature specified in the manual, remove any carbonized residue. Use as little water as possible, then wipe the grates thoroughly dry. If the surface is designed to require seasoning, apply an extremely thin layer of neutral, high-smoke-point cooking oil. The surface of the grates should have a satin-smooth finish, not a wet or greasy one. An excessively thick layer of oil will attract dust, become sticky, and produce smoke the next time the grill is heated.
Stainless Steel Cooking Surface
Unless otherwise specified by the manufacturer, clean with warm water, a mild detergent, and a non-abrasive cleaning pad. When cleaning, work in the direction of the visible metal grain rather than wiping across it. Rinse thoroughly to ensure no detergent residue remains on food-contact surfaces, and dry the surface to minimize water spots.
Avoid using chlorine bleach, strong acids, unapproved oven cleaners, and weathering steel sealants intended for decorative purposes on surfaces that come into contact with food. Do not use electric wire brushes unless the manufacturer has explicitly approved their use on this component.
5. Step 4 — Clean the Grill Grate According to Its Material
If the design allows, remove the BBQ grill grate and clean its top and bottom surfaces, as well as the gaps between the crossbars. The safest cleaning tools depend on whether the grate is made of stainless steel, bare cast iron, or enamel-coated material. Cleaning methods suitable for bare cast iron may scratch the enamel coating, while prolonged soaking—which is appropriate for some stainless steel parts—may cause unprotected cast iron to rust.
Stainless Steel Grates
Use an approved scraper or grill brush to loosen residue, then deep-clean with warm water and a mild detergent. One stainless steel grate manufacturer recommends using a carbon steel scrubber, chain mail, or a stiff-bristled scrubber to clean its grates—and specifically advises against using steel wool—which illustrates why model-specific guidance is crucial. Rinse thoroughly and let dry completely before reinstalling the grates.
Cast Iron Grates
Minimize soaking time, avoid excessive abrasion of the protective patina when removing residue, dry immediately, and apply a thin layer of cooking oil as directed by the manufacturer. Carefully inspect rough areas: a peeling patina can usually be restored, but if there is significant metal loss or cracking, consult the manufacturer for replacement recommendations.
Enamel-Coated Grills
Please use nylon-bristled tools or other tools approved by the manufacturer that will not scratch the surface. Hard metal edges and coarse wire brushes may cause the coating to peel, exposing the underlying metal. If the enamel coating is damaged, follow the manufacturer’s replacement or repair policy; never cover defects with oil.
After scrubbing any grill, inspect it before cooking. Loose bristles, metal shavings, and coating debris should not be present on surfaces that come into contact with food.
6. Step 5 — Wash the Corten Exterior Without Stripping the Patina
Clean the weathering steel finish with warm water, a small amount of mild detergent, and a soft nylon brush or sponge. Start cleaning from the top and work your way down to prevent dirty water from running over the same area twice. Focus on removing oil splatters, food residue, bird droppings, and salt stains, rather than vigorously scrubbing the entire surface to achieve uniform color.
Rinse thoroughly with clean water, wipe horizontal surfaces dry, and then place the outdoor grill in a well-ventilated area until it is completely dry. When wet, rust stains may temporarily appear darker; after spot cleaning, the surface may appear uneven. However, this does not warrant sanding. Weathering steel forms a protective oxide layer through exposure to the environment; newly exposed areas require additional wet-wipe and drying cycles to reintegrate with the surrounding surface.
Can Wire Brushes Be Used on Weathering Steel
Powered wire wheels or coarse wire brushes will cut through the stable oxide layer, leaving shiny scratches that will re-oxidize at varying rates. For routine exterior cleaning, use a soft nylon brush. If the manufacturer specifies the use of particular abrasive materials to repair localized defects, strictly follow the documented operating procedures.
Can I Use a High-Pressure Washer on a Corten Steel Grill
Do not make high-pressure washing a routine practice. It is strongly recommended that you avoid doing so, as the high-pressure water stream may damage the steel or its coating and allow water to seep into cracks, thereby accelerating rust formation. If other manufacturers permit high-pressure washing, follow their specified limits for water pressure, distance, and nozzle angle; never operate the equipment arbitrarily on your own.
Unless explicitly specified by the manufacturer, do not apply oil or clear coatings to the weathering steel body. The weathering steel user guide states that the rust layer should be preserved; oil should be applied only to the grill grate, and never to the grill pan or base.

7. Step 6 — Remove Grease Without Harsh Chemicals
Before a fresh oil stain spreads, blot it dry with oil-absorbing paper. Dip a soft cloth in warm water and mild soapy water, let it sit on the stain briefly, then wipe it clean; repeat this process. Gentle, repeated wiping is safer than a single vigorous chemical treatment. Before using any unfamiliar cleaning agent, test it on an inconspicuous area first; wait until it dries before applying it to visible areas.
Avoid using chlorine-based bleach, acidic descalers, strong rust removers, oven cleaners, and abrasive polishes on exterior surfaces where rust has already formed. These products may alter the patina, causing light-colored spots or leaving residues that accelerate uneven corrosion. Unless the manufacturer explicitly approves such treatments for a specific model, do not apply cooking oil, wax, or decorative sealants to the weathering steel exterior.
Regarding Exposure to Salt or Pool Water
Immediately rinse off salt spray, pool splashes, and de-icing agent residue with fresh water, then allow the barbecue grill to dry completely. Chlorides can destabilize the rust layer and accelerate corrosion, especially in areas where water pools. Structural guidelines for weathering steel recommend cleaning when chlorides compromise the stability of the rust layer and ensuring proper drainage.
The correct rinsing frequency depends on distance from the coast, prevailing wind direction, pool usage, drainage conditions, and local humidity. There is no one-size-fits-all schedule. Inspect the equipment after it comes into contact with the substances mentioned above; if salt crystals, persistent dampness, or localized pitting corrosion are present, shorten the rinsing intervals.
8. Step 7 — Dry, Inspect and Prepare the BBQ for Its Next Use
Drying is a step in the cleaning process, not an optional final step. Wipe down the shelves, make sure the drain is clear, and keep the grill open until the cooking chamber, baking pans, racks, and seams are completely dry. Only cover the grill with a properly sized, breathable lid once it has completely cooled and dried. Covering the Corten grill while it is still warm or damp will cause condensation to accumulate in the last places you want it.
Please use the following post-cleaning checklist:
► Drainage and air vents are clear.
► No wet ash residue remains in the bowl, base, or ash tray.
► The cooking grate is clean, dry, and has been properly maintained as needed.
► The grill grate is clean, and its coating is intact.
► There are no salt stains on the exterior.
► There are no deep pits or flaking on the welds, legs, or bowl base.
► The lid and stored tools are dry.
When Is Rust Considered Normal
A uniform orange to brown color that gradually darkens is a normal, natural weathering phenomenon. If you notice deep pits, flaking, visible metal loss, recurring wet spots, or localized corrosion around drain holes, seams, or areas where debris accumulates, please inspect the unit. These signs indicate that the surface has been exposed to prolonged moisture or chloride corrosion, rather than undergoing normal wet-to-dry cycles. If the metal thickness or structural integrity may be compromised, stop using the grill and contact the manufacturer or a qualified metal fabricator for inspection.
9. How Often Should You Clean a Corten Steel BBQ Grill
The frequency of maintenance should be determined based on usage and the operating environment, rather than following a fixed schedule. After each cooking session, clean all surfaces that come into contact with food; remove accumulated ash after several firings (or after every use, if specified by the manufacturer); and rinse the exterior of the unit after it has been exposed to salt or pool water for an extended period. Perform a thorough cleaning and inspection at the end of the cooking season and before long-term storage.
| Timing |
Task | Reason |
| After each cook |
Scrape and clean the plate or grate | Prevent carbon and grease buildup |
| Every few fires or as specified |
Empty accumulated ash | Prevent moisture retention |
| After salt exposure |
Rinse the Corten shell with fresh water | Limit chloride concentration |
| End of season |
Full cleaning and inspection | Prepare for dry storage |
Frequent commercial use, high-fat foods, damp fuel, and coastal climates will shorten the intervals mentioned above. A grill used once a month and located inland in a sheltered area requires a different maintenance routine than a plancha at a restaurant near the coast. Please document any issues found during inspections—especially clogged drains, grease buildup in seams, and salt crystals—and adjust your maintenance schedule accordingly.
10. Frequently Asked Questions
Q1: Can I Use Soap on a Weathering Steel Grill?
It is acceptable to use mild soap on the exterior surface of weathering steel, but it must be rinsed with clean water and thoroughly dried afterward. For cooking plates and grates—which come into direct contact with food and may have a seasoned surface or enamel coating—follow the specific instructions for that material. Unless explicitly approved by the manufacturer, avoid using strong acids, bleach, and harsh degreasers.
Q2: Should I Oil a Weathering Steel Grill After Cleaning?
Oil should only be applied to food-contact parts designed to be seasoned, such as carbon steel griddle plates. Apply a very thin layer of food-safe cooking oil with a high smoke point. As a general rule, do not oil weathering steel grates, the outer casing, or the base; oil will interfere with the natural weathering process and attract dirt.
Q3: Can I Use a Wire Brush to Clean Weathering Steel?
For routine cleaning of exterior surfaces that have already developed a rust patina, use a soft nylon brush. Coarse wire brushes or power grinders will strip away the oxide layer and leave scratches that cause uneven weathering. Grill brushes approved by the manufacturer may be suitable for individual stainless steel or cast iron cooking components, but they are not necessarily suitable for weathering steel enclosures.
Q4: How Do I Remove Grease Stains from Corten Steel?
First, blot the grease with a paper towel, then clean the area with warm water, mild soap, and a soft cloth or nylon brush. Rinse and dry the area. Repeat this gentle cleaning process; never use acids, bleach, oven cleaners, or abrasive polishes immediately. The freshly cleaned area will gradually reform its rust layer.
Q5: Why Does My Weathering Steel Grill Still Look Orange After Cleaning?
A bright orange oxide layer typically indicates an early or renewed stage of weathering, rather than dirt. The color will change as the surface undergoes repeated wet-to-dry cycles. If the orange areas remain damp, develop deep pits, or appear only around salt deposits and clogged drains, check the grill’s exposure environment rather than simply trying to remove the color by cleaning.
Q6: How Should I Store My Weathering Steel Grill During the Winter?
Remove food residue and ashes, clear the drainage holes, clean each component according to its material, and allow all parts to dry thoroughly. Apply a thin, designated protective oil film to seasonal grates, but the weathering steel frame does not require oiling. Once the outdoor grill has cooled and dried completely, cover it with a breathable, snug-fitting cover or place it in a well-ventilated, sheltered area.
Conclusion: Professional Cleaning Can Protect Two Different Types of Surfaces
The professional cleaning process is simple: once the Corten barbecue grill has cooled, empty the ash tray, clean the cooking pan, clean the grates, wash the weathering steel exterior, rinse and air-dry, and finally perform a final inspection. The key to a professional approach is not to mix up these tasks. The seasoning oil used to protect carbon steel cooking pans should not be applied to the weathering steel base; a soft-bristled brush suitable for treating rust may not be effective at removing carbon buildup from the grates.
Please refer to the user manual for your specific model, particularly regarding cooking surface materials, approved tools, and seasoning procedures. Then, turn this process into a repeatable checklist rather than waiting until grease, damp ash, or salt have caused corrosion before taking action. Date each seasonal inspection and take photos of any pitting, clogged drains, or coating damage so you can objectively compare changes over time.

