


Corten steel planters are designed to rust, so you should not attempt to prevent the formation of the protective rust layer (patina). To prevent rust perforation, keep drainage holes clear, avoid prolonged contact with wet soil, remove accumulated debris, limit exposure to chlorides, and direct rust runoff away from surfaces prone to staining.
This orange-brown surface is not a decorative imitation of damage. Under suitable conditions, weathering steel forms an oxide layer with stronger adhesion and lower porosity, thereby slowing further corrosion. Problems begin to arise when certain areas of the planter cannot dry out, or when salts and other contaminants continuously accumulate on the steel’s surface. Therefore, factors such as clogged drainage holes, saturated growing media, damp foliage, irrigation failures, and exposure to salts are more significant than mere surface color.
This guide explains how to distinguish between normal patina and harmful corrosion, how to address potential moisture issues, and how to determine whether improving the drainage system, installing a liner, or adopting other protective measures is the most appropriate solution.
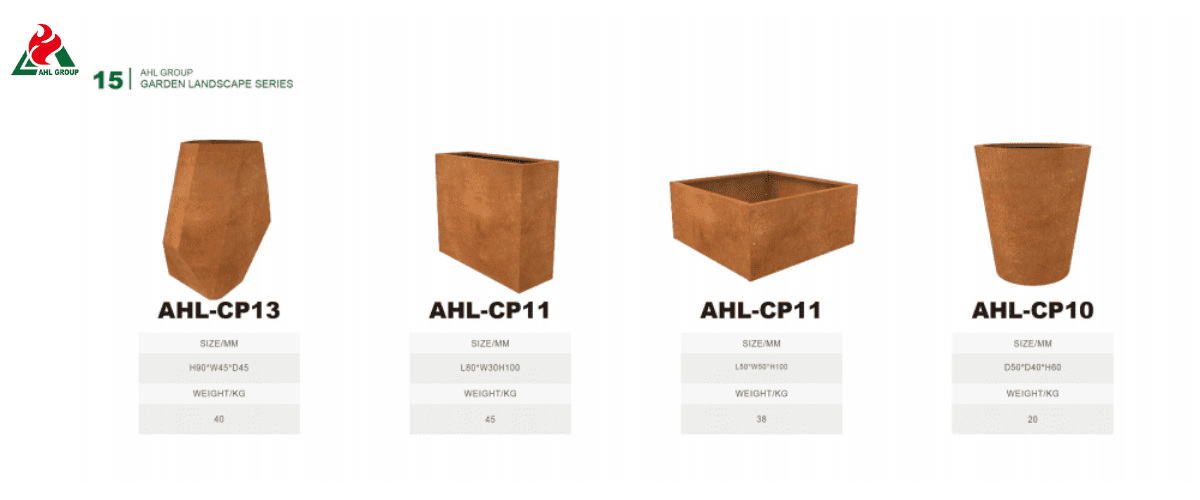
This orange-brown surface is not a decorative imitation of damage. Under suitable conditions, weathering steel forms an oxide layer with stronger adhesion and lower porosity, thereby slowing further corrosion. Problems begin to arise when certain areas of the planter cannot dry out, or when salts and other contaminants continuously accumulate on the steel’s surface. Therefore, factors such as clogged drainage holes, saturated growing media, damp foliage, irrigation failures, and exposure to salts are more significant than mere surface color.
This guide explains how to distinguish between normal patina and harmful corrosion, how to address potential moisture issues, and how to determine whether improving the drainage system, installing a liner, or adopting other protective measures is the most appropriate solution.
1. Is Rust on a Corten Steel Planter Normal
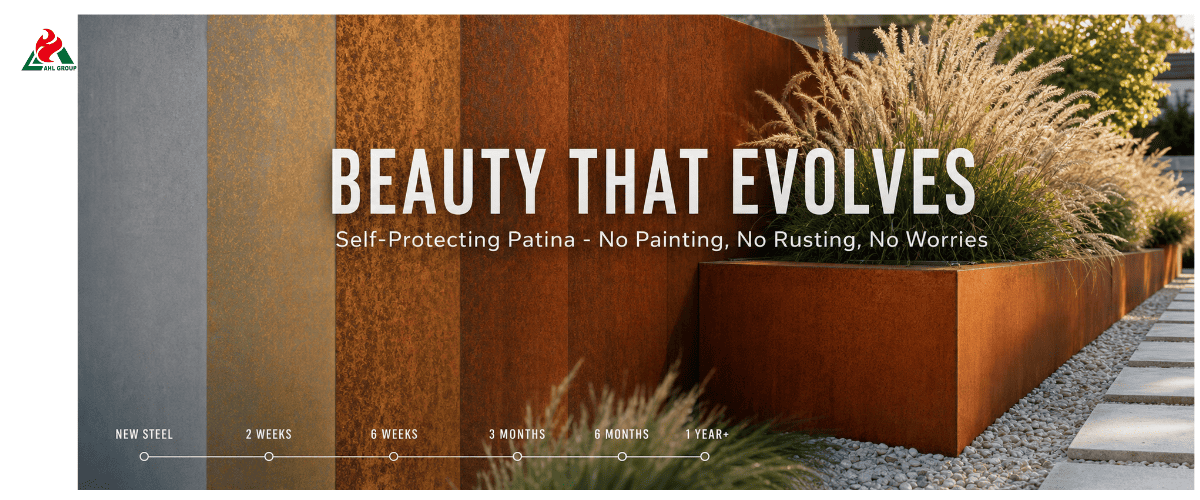
Yes. Surface oxidation is an expected characteristic of weathering steel. Like ordinary carbon steel, it begins to rust when exposed to air and moisture. The difference is that its alloying elements help form a stable rust layer that adheres more firmly to the base metal. In environments where conditions alternate between wet and dry, this rust layer acts as a barrier, slowing the penetration of oxygen, moisture, and contaminants into the underlying steel.
A metal planter might gradually change from exposed dark gray steel to a bright orange, mottled reddish-brown, and then to a deeper, more uniform brown. This color change does not indicate a defect in the metal. Instead, focus on observing changes in its texture, thickness, and drainage performance.
| Observation |
Usually normal | Needs investigation |
| Even orange-to-brown colour |
Yes, especially during early weathering | Only if accompanied by metal loss |
| Gradual darkening |
Typical patina development | — |
| Loose, thick scale |
No | May indicate unstable corrosion |
| Deep isolated pits |
No | Check drainage, salts and trapped moisture |
| Soft or perforated base |
No | Possible rust-through |
| Persistent wet band at soil level |
No | Constant moisture exposure |
| Rust runoff on paving |
Common during early weathering | Manage drainage and surface protection |
When Does the Rust Layer Begin to Provide Protection
There is no set timeline. Rainfall, humidity, drying speed, shade, orientation, surface treatment, and salt content in the air all influence this process. A planter that gets wet from rain and then dries in moving air may rust differently than an identical planter placed under dense foliage or near an irrigation sprinkler.
Never judge performance based solely on your memory of the color. During each seasonal inspection, take photos of the same base corners, welds, drainage holes, and soil contact lines, and date them for reference. A series of close-up photos will reveal whether a mark in a particular spot is merely discoloration or has developed into a deeper pit.
2. What Makes a Corten Planter Rust Through
Rust-through occurs when corrosion continues to erode the steel rather than slowing to a lower rate. For outdoor planters, the primary risks stem from conditions that prevent drying or lead to the accumulation of corrosive contaminants:
► Clogged drainage holes and standing water.
► Soil or growing medium in close contact with the inner walls that remains saturated for extended periods.
► Leaves, roots, mulch, or fine particles clogging corners and drainage holes.
► Salt spray, de-icing salt, chlorinated pool splash, or saline irrigation water.
► Drip emitters and sprinkler heads repeatedly wetting a specific seam or side.
► The outer wall buried in soil or covered by vegetation.
► Improperly executed welded details, folded bases, supports, or linings, leading to the formation of hidden pockets of water.
Weathering steel is not entirely immune to corrosion. Its performance depends on the environment and the quality of construction details. Technical guidelines indicate that the formation of a durable rust layer requires alternating wet and dry cycles; however, steel that is continuously exposed to moisture, buried in soil, or covered by vegetation may exhibit corrosion levels closer to those of ordinary structural steel.
Why the Alternation Between Wet and Dry Conditions Is Critical
Occasional rainfall is not the same as prolonged saturation. When surface runoff drains away and the surface subsequently dries, rainfall can promote normal weathering processes. However, clogged substrate, standing water, or damp debris can eliminate this drying phase. Oxygen and dissolved contaminants remain active on the steel surface, while the owner sees only a dark, damp band or residue above the drainage hole.
Therefore, the actual goal is not to keep every drop of water out of the Corten planter, but to prevent water from pooling and ensure that no part of the steel remains persistently damp after the exposed surface has dried.
High-Risk Areas on Planters
Inspect the interior bottom panel, lower corners, welds, drainage holes, legs, and the soil contact line. These areas are prone to water accumulation or debris buildup, which can be difficult to detect once plants have been added. Also check behind the liner: although the liner separates the soil from the steel, it may still channel water into hidden pools.
Outdoors, observe where the planter base contacts the paved surface. If a planter is placed directly on an uneven base, a thin film of water may accumulate at the bottom. Rust seeping from seams, wet spots that reappear during dry weather, or swelling and softening at the base are all more cause for concern than an even orange discoloration on a dry wall.
3. Step 1 — Improve Drainage Before Applying Any Treatment
Drainage is the top priority. If the flower pot's drainage holes are clogged or water is pooling at the bottom, paint, clear sealant, or liners will not help. Check whether the flower pot is designed with drainage holes, drainage channels, or removable plugs, and compare the installation to the manufacturer's instructions. Do not drill additional holes until you understand the impact of the base structure, reinforcement measures, waterproofing treatments, and warranty terms.
Clear any visible drainage holes, but never enlarge the hole diameter or damage the internal protection system. If the bottom of the planter is in direct contact with surface runoff, elevate it onto its designed feet or compatible spacers. This gap should allow water and air to circulate beneath the base without compromising stability.
Position the drainage holes so that water flows out smoothly, rather than striking railings, protective pads, or floor flanges. After planting, ensure that the drainage holes remain easily accessible for maintenance. If surface runoff must be collected, use gutters or trays specifically designed for safe drainage; trays that retain standing water for extended periods will only shift the water accumulation problem elsewhere.
Creating a Drainage Layer That Does Not Block Drainage Holes
A single layer of gravel cannot solve problems caused by blocked drainage holes or insufficient drainage capacity. While coarse-grained materials can temporarily create voids, fine-grained growing media may seep into these voids and obstruct drainage unless the planting system includes appropriate separation measures. The drainage layer should be constructed according to the specific requirements of the pot, plant, and growing medium, rather than simply following generic standards for gravel thickness.
The growing medium must also be suitable for container gardening. Dense garden soil may remain saturated due to compaction, even if the drainage holes are unobstructed. The growing medium, irrigation rate, and drainage hole capacity should be coordinated as an integrated system.
Testing Drainage Pathways
Conduct a test before planting. Gradually add water and observe how quickly water emerges from each drainage hole, whether it pools in any corners, and the path it takes across the surface. While the internal structure is still clearly visible, promptly correct any issues with slope, obstructions, or drainage paths prone to causing stains.
Repeat these tests after planting and during maintenance. Over time, root systems, fine particles, and fallen leaves may alter the drainage paths. A simple inspection after heavy watering can reveal that certain drainage holes—though they appear unobstructed when dry—are no longer able to discharge the influx of water in a timely manner.
4. Step 2 — Decide Whether the Planter Needs a Liner
Not every weathering steel planter requires a liner. Some products are designed to come into direct contact with the growing medium, while others rely on internal liners, coatings, or separate planting containers. The correct choice depends on the planter’s structure, drainage design, plant requirements, irrigation methods, winter environmental conditions, and the manufacturer’s guidelines.
A liner reduces prolonged contact between damp growing medium and the steel. It also simplifies the soil replacement process and makes the planting assembly removable. However, if installed improperly, a liner can create hidden pockets of standing water between the liner and the container wall, masking developing corrosion or blocking drainage holes.
Before adding a liner, first identify the specific problem you hope it will solve. If the actual issue is clogged drainage holes, overwatering, or the base being stuck against the ground, correct these conditions first.
The Role of Liner
A suitable liner separates damp growing media and fertilizer residues from the inner walls of the pot. A removable inner pot creates an air gap, facilitating inspection. In cold climates, specially designed liners or insulation layers can also serve as part of a broader strategy to protect the root zone from freeze-thaw cycles.
These benefits depend on specific design details. The liner must have independent drainage holes aligned with the pot’s drainage holes, and water must never pool beneath the liner. The upper edge of the liner should not direct rainwater behind the liner.
Limitations of Liners
A liner cannot make moisture disappear. If moisture becomes trapped between the liner and the pot, the liner cannot protect the steel, nor can it replace structural waterproofing measures or repair perforated bases. Furthermore, the service life of the liner cannot be guaranteed to be permanent.
Never seal sheets of unknown material directly onto a damp, unstable oxide layer and assume that the underlying steel is protected. Any coating or liner system requires compatible surface preparation, detailing at edges, drainage measures, and a maintenance plan.
Lining Design Principles
Retain all designed outlet openings. Avoid creating fold-over pockets at corners, and provide access for maintenance where possible. Select lining materials based on soil type, humidity, temperature, UV exposure, and expected service life. Prevent sharp steel edges from puncturing the lining, but do not install spacers that could trap water.
For food crops, never make general safety claims based solely on the term “Corten.” Request documentation specific to the planting containers, inner coatings or liners, sealants, and other materials that come into contact with soil and water. Follow applicable local guidelines for food-grade planting containers as well as the manufacturer’s specified intended use.
A useful comparison is:
| Configuration |
Potential benefit | Main risk to manage |
| Direct soil contact |
Simple; may match original design | Constant moisture at the inner wall |
| Fitted removable liner |
Separates media and supports inspection | Water trapped behind or below liner |
| Separate inner planting pot |
Clear separation and easy replacement | Hidden overflow and limited air gap |
5. Step 3 — Keep Wet Soil, Mulch and Debris Away From Vulnerable Areas
The fill height of the planter should reach only the water level specified in the design. Soil piled above the design line may cause water to pool along the planter’s rim, flanges, and any exposed, untreated details. Furthermore, this may obscure specific areas where corrosion may be accelerating.
On the exterior of the garden planter, mulch and mounded soil should be kept away from walls and the base. Partially buried weathering steel planters behave differently from freestanding planters that can dry on all four sides. The weathering steel usage guidelines explicitly state that being buried underground, covered by vegetation, and exposed to persistently damp conditions are limiting factors for uncoated materials.
Fallen leaves are another common source of water accumulation. They pile up behind the base, beneath the flanges, and between groups of planters, retaining moisture even after the exposed panels have dried. During repotting or periods of vigorous plant growth, fine roots and soil particles may enter the drainage holes.
Monitoring the Soil Level
If indicated, please adhere to the manufacturer’s specified maximum fill level. Ensure that a sufficient portion of the inner rim remains visible to inspect the joints between the pot walls and the liner. During maintenance, check for any persistent dark bands or deep depressions at the soil level.
If the planter uses a separate inner pot, check whether overflowing water is repeatedly striking a specific point on the Corten steel shell. If planting directly in the planter, manage watering appropriately to keep the growing medium sufficiently moist for plant growth, but avoid prolonged waterlogging.
Prevent Debris from Blocking Ventilation and Drainage
Inspect the planter after storms, during the fall leaf-fall season, and following pruning or repotting. Remove debris by hand or with a tool that will not damage the pot. Do not insert sharp objects into the drainage holes, as they may puncture the liner or scratch the internal protection system.
Check not only the inside of the pot, but also underneath it and between pots. Even if drainage is unobstructed, runoff may still flow into piles of wet leaves, causing moisture to accumulate at the base.
6. Step 4 — Manage Irrigation, Salt and Pool Exposure
Irrigation should be directed at the root zone, rather than repeatedly wetting a specific weld seam or exterior wall. Aim the drippers at the growing medium, and adjust the flow rate based on plant needs, container volume, weather, and drainage capacity. Fix any drippers spraying water onto steel surfaces, and be mindful of drippers obscured by branches and foliage.
Overwatering can overload properly functioning emitters and wash fertilizer salts down to the base of the plant. Conversely, even in pots that drain quickly, it is still necessary to select a growing medium that supports plant growth and to develop an appropriate irrigation plan. The goal is to control moisture levels, not simply to maximize drainage.
Is Weathering Steel Suitable for Coastal Areas
It is not suitable for all coastal microclimates. Chlorides in sea spray and salt fog are hygroscopic, meaning they keep the steel surface moist, thereby interfering with the formation of a stable rust layer. Engineering guidelines consider high chloride exposure a limiting factor for the material and emphasize the importance of local topography, wind direction, and actual exposure levels.
Never apply bridge distance guidelines directly to residential projects. Even at similar distances, the salt load on a leeward courtyard may differ drastically from that on a seaside terrace exposed to sea breezes. Assess prevailing wind directions, splash conditions, drainage conditions, ease of rinsing, and the consequences of failed planters. If the exposure environment is severe, seek professional advice tailored to the specific project.
About Pool Water and De-icing Salt
As water evaporates, the concentration of pool splash and de-icing salt will gradually increase. Move landscape planters as far away as possible from areas frequently exposed to pool splash. If significant contamination occurs, rinse with clean water and let them dry thoroughly to reduce salt buildup, but ensure that runoff is safely directed away.
Avoid allowing chlorinated or salt-containing runoff to enter sensitive growing media. When placing planters near a pool, carefully consider material durability, slip resistance, stain resistance, electrical installations, and local barrier requirements.
Fertilizers and Soil Chemistry
While fertilizers benefit plants, they increase the concentration of dissolved salts in runoff. Follow your planting plan and never apply additional fertilizer “just in case.” Flush or replace the growing medium only as required for horticultural purposes, and ensure that this does not result in uncontrolled runoff.
Chemical compatibility varies depending on fertilizers, soil pH, coatings, liners, and alloys. Do not assume that Corten steel possesses universal corrosion resistance based on general marketing claims. For high-value installations, corrosive media, or specialized treatment schemes, request technical data for specific products.
7. Step 5 — Control Rust Runoff and Protect Surrounding Surfaces
During the weathering process, rainwater and irrigation water may carry iron oxide from the planters onto concrete, stone, stucco, wood, and light-colored paving surfaces. This staining is primarily a matter of construction detail; it does not in itself indicate that the planter has rusted through. While it is true that reddish-brown runoff may stain surrounding surfaces, this effect can be controlled through proper detailing.
Plan drainage paths before installation. Position drainage outlets over a sacrificial gravel bed, compatible drainage channels, or stain-resistant surfaces. Use sturdy feet or spacers to create a visible dry gap, and position planters away from light-colored walls. Never direct contaminated runoff directly into ponds.
Practical Runoff Control Solutions
► Gravel bed: Absorbs early-stage oxides while preventing water pooling.
► Drainage: Easy to clean and accessible.
► Legs or spacers that keep the base and paving dry.
► Maintain a distance from stucco or stone walls.
► Install a protective underlayment beneath the drain outlet.
► Position the drain outlet away from building facades, doors, and pedestrian walkways.
The support system must be able to safely bear the weight of the planter pots when they are wet and fully planted. Never improvise narrow blockwork to avoid creating unstable concentrated loads.
Can Pre-Weathering Completely Prevent Stains
No. Although a documented pre-weathering process may remove some of the loose initial oxide layer and make the appearance more predictable, the material will continue to be exposed to the outdoor environment after installation. Rainfall, irrigation, handling, and local pollutants may still cause runoff.
Ask the manufacturer what “pre-weathering” specifically entails: all stages—including surface treatment, chemical treatment, rinsing, drying, and final inspection—should be documented. Exercise caution regarding claims that Corten steel is permanently immune to staining.
How to Treat Existing Rust Stains
Before selecting a cleaner, identify the affected substrate. Concrete, natural stone, tile, wood, and stucco react differently to cleaning agents. Test any approved method in an inconspicuous area, and protect plants, drainage systems, and adjacent metal components.
Never use strong acids indiscriminately near flower pots. Strong acids can damage the substrate, plants, sealants, or the rust layer, and may produce harmful runoff. First, correct any drainage outlets or pathways; otherwise, the stains will reappear after cleaning.
8. Should You Seal, Paint, or Oil a Corten Steel Planter
Never apply a coating simply to prevent normal rusting. Coatings alter the appearance and transform an uncoated weathering steel system into a surface treatment that requires maintenance. If the coating fails in certain areas, moisture may accumulate beneath or adjacent to it, causing uneven corrosion.
The correct course of action depends on the product specifications. Some planters are made of uncoated Corten steel, while others feature a factory-applied primer, a complete coating system, or a liner. Follow the manufacturer’s maintenance instructions and use compatible repair materials.
When to Use a Coating
Specifying a coating may be appropriate in the following situations: when harsh environmental conditions render uncoated weathering steel unsuitable; when interior design requirements call for a protective system; or when a qualified designer specifies localized protection for vulnerable areas. Repair work may also require coating application following proper assessment and surface preparation.
Never select a coating based solely on color. Careful consideration must be given to the coating’s adhesion to weathering steel, surface cleanliness, humidity, contact with soil, UV exposure, flexibility, and future maintenance requirements.
Why Clear Sealants Are Not a “Set-It-and-Forget-It” Solution
Clear sealants can cause surfaces to darken, alter gloss levels, and weather unevenly. They require proper surface preparation and may need to be reapplied. Applying them to damp steel or loose oxide layers can result in poor adhesion and moisture retention.
If minimizing stains or preserving color is critical, request a complete, specification-approved system—including test samples and maintenance schedules—rather than relying on generic aerosol products.
Never Assume That Exterior Walls Should Be Oil-treated
Oil attracts dirt, causes uneven coloring, and interferes with the natural weathering process. The practice of oil-treating carbon steel cooking grates is not suitable for planter walls. Use only treatment solutions specifically designated for that particular planter and its intended exposure environment.
9. Seasonal Corten Planter Maintenance Checklist
Maintenance of Corten outdoor planters should be based on inspection rather than excessive concern about color. Check areas where moisture, salt, and debris tend to accumulate, and compare changes in these areas over time.
| Timing |
Inspection or action | Purpose |
| Monthly during wet seasons |
Check drain holes and standing water | Maintain drying cycles |
| After storms or leaf fall |
Clear leaves and debris | Prevent moisture traps |
| After salt or pool splash |
Rinse appropriately and let dry | Reduce chloride concentration |
| During irrigation checks |
Inspect emitters and wet zones | Prevent local saturation |
| At season change |
Photograph seams, base and soil line | Track pitting or metal loss |
| Before winter |
Confirm drainage and freeze-safe setup | Reduce trapped-water damage |
Warning Signs to Investigate
Pay close attention to the following conditions: deep pits, loose thick layers of rust, perforations, softened areas at the bottom, standing water that does not drain, corrosion concentrated at the edges of the liner or along welds, and damp areas that persist even after dry weather. Displacement, bulging, or loss of rigidity may indicate more than just cosmetic surface issues.
Before assessing a damaged planter, stop moving it or applying any load to it. Large planting containers hold a significant amount of wet soil, and careless handling or repair may pose safety hazards. If you suspect metal material is missing, contact the manufacturer or a qualified metalworker.
Record the inspection results, any changes made, and the date. Maintenance records help determine whether clearing the drainage holes resolved the issue or whether corrosion is continuing despite the corrections.
10. Frequently Asked Questions
Q1: Should You Seal a Corten Steel Planter?
As a general rule, do not seal uncoated weathering steel planters. Sealants may alter the color, cause uneven weathering, and require periodic reapplication. In harsh outdoor environments or protected indoor settings, the use of a specified coating may be appropriate, but this should be part of a compatible and documented system, rather than a temporary treatment intended to completely prevent rust.
Q2: How Do You Stop a Corten Planter Staining a Patio?
Control the flow of rainwater. Place the Corten planters on sturdy legs, keep the drainage holes clear, and direct rainwater toward gravel, gutters, or stain-resistant, protected surfaces. Keep them away from light-colored walls and paved surfaces. Pre-weathering treatment can reduce initial residue, but it does not guarantee that staining will never occur.
Q3: Can Corten Planters Be Used Near a Pool?
They may be suitable only after evaluating chloride or salt splashes, drying conditions, runoff, planting requirements, and local pool regulations. Ensure that drainage holes do not discharge water into the pool, and avoid areas subject to constant splashing. If chloride exposure is severe, it may be necessary to select alternative materials or implement a specialized protective system tailored to the project.
Q4: How Long Does a Corten Planter Take to Develop Patina?
There is no set timeline. The frequency of wetting and drying, temperature, humidity, shade, orientation, surface condition, and salt content all influence the transition from orange to dark brown. Use dated photos of the planter to track the patina development process, and judge its performance based on texture and metal loss—rather than color alone.
Q5: Are Corten Planters Safe for Edible Plants?
Never assume that a material is suitable for growing all edible plants based solely on its name. Be sure to verify the specific alloy composition, internal coatings or linings, sealants, drainage components, and the manufacturer’s intended use. Use materials that are certified as safe for contact with soil and water, and follow local guidelines regarding containers used for growing edible crops.
Conclusion: Allow rust to form naturally—but eliminate factors that cause damage
Corten metal planters should be allowed to rust naturally. Preventing rust-through does not mean polishing away every orange stain, but rather helping the planter drain and stay dry. First, distinguish between normal surface weathering and pitting or metal loss. Then, clear drainage holes, adjust watering practices, limit soil and debris contact, assess the condition of the liner, and redirect surface runoff.
Conduct regular, long-term inspections of the same seams, bottom corners, soil contact lines, and drainage holes. Keep dated photographs and maintenance records to objectively compare subtle changes. When uncertainties arise due to coastal environments, swimming pools, highly corrosive growing media, or concealed liners, follow recommendations tailored to the specific product and site conditions rather than relying on general guarantees. Address drainage and exposure issues before considering coatings.

