
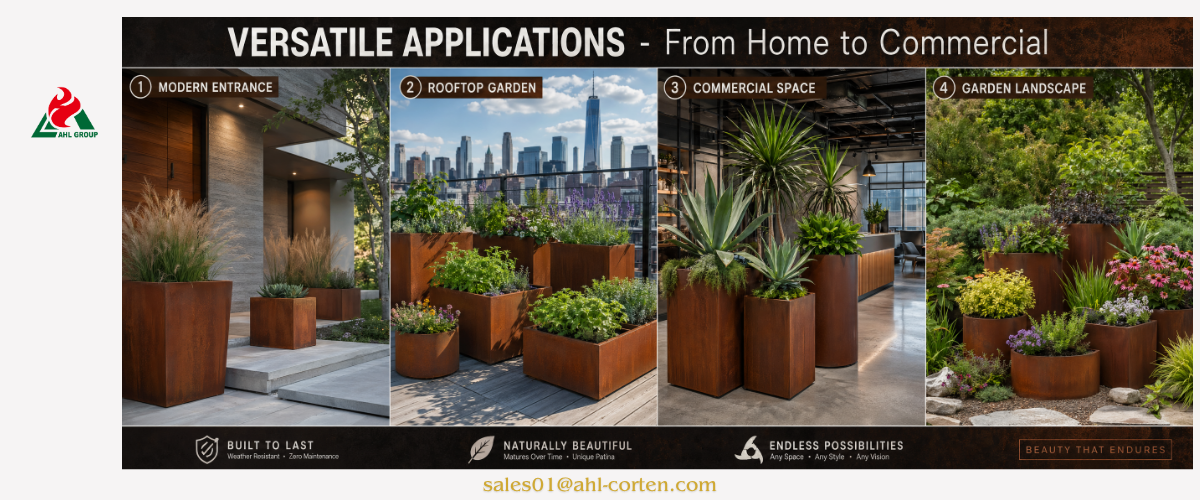
Corten steel planters are more than just gardening containers; they are architectural investments designed to evolve alongside your landscape. Although they are renowned for being “maintenance-free” thanks to their 50-year lifespan, the initial installation phase is critical. Improper preparation can lead to permanent structural damage, unsightly stains on expensive masonry, or the premature withering of your plants.
This comprehensive technical guide outlines the professional process for installing new Corten planters, ensuring a smooth and successful transformation from raw metal to a stable, chocolate-brown masterpiece.
This comprehensive technical guide outlines the professional process for installing new Corten planters, ensuring a smooth and successful transformation from raw metal to a stable, chocolate-brown masterpiece.
1. Why Preparation Matters
Weathering steel (a copper-chromium-nickel alloy) has unique chemical properties that require a specific environmental “curing” process. Initial preparation is not only about aesthetics but also about managing the structural and physical properties of this material—which changes over time—as well as the leaching of chemical substances.
Preventing Rust Leaching
During the first 6 to 18 months, weathering steel undergoes a “bleeding” phase. As a protective rust layer gradually forms, rainwater washes away loose iron oxide. If the site or planters have not been pretreated, this rust runoff will permanently stain concrete, light-colored stone, or wooden decks. Knowing how to collect or divert this rust runoff is key to ensuring the installation looks beautiful in the end, rather than turning into a costly cleanup project.
Drainage Setup for Tall Planters
In tall planters, the weight of a 36-inch column of wet soil can be staggering. Without a professional drainage system, a “water table” can easily form at the bottom of the planter. This leads to oxygen deprivation in the soil, root rot, and localized “dents” in the steel caused by water accumulation. Proper preparation ensures that water flows through the system at a controlled rate, thereby protecting both the plants and the steel.
Weight Management Before Filling
A medium-to-large Corten metal planter can easily exceed 800 pounds in weight once filled with soil and water. Without heavy-duty machinery, attempting to reposition a fully loaded planter is impossible and risks deforming the steel walls. Proper preparation means verifying every structural detail—from the deck’s load-bearing capacity to the levelness of the ground—before adding the first shovel of soil.
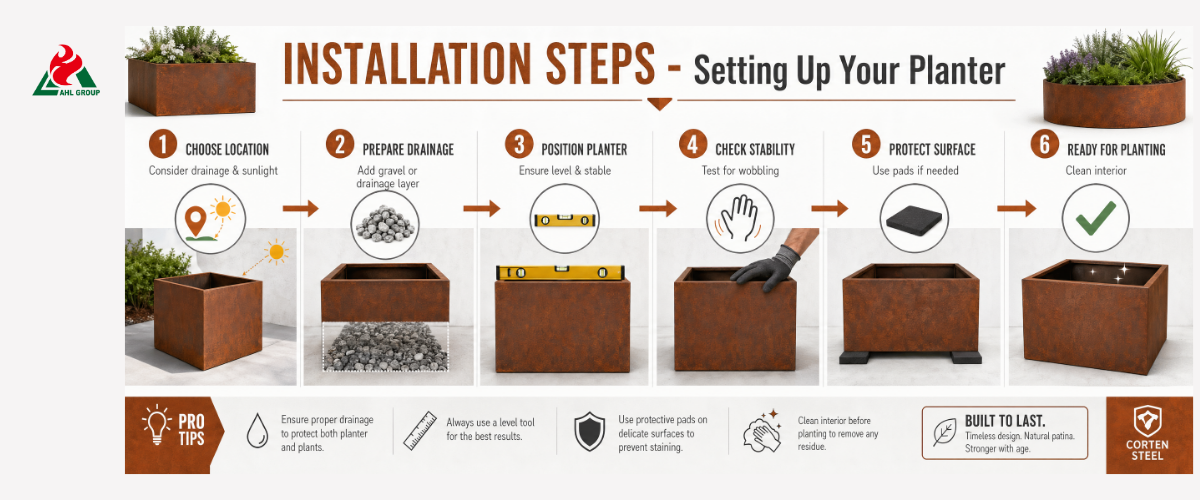
2. Step 1: Choose Final Location FIRST
The most common mistake in landscape installation is underestimating the final weight of the structure. A high-quality Corten planter is already quite heavy when empty; once installed, it becomes a permanent fixture.
Move EMPTY Planter (400-800+ lbs Filled)
A standard 100 cm × 40 cm × 40 cm flower pot made of 3 mm thick weathering steel weighs approximately 110 pounds when empty. However, once filled with moist potting soil and a mature plant, its weight can soar to over 600 pounds. If a “tall” style is used, the weight may even exceed 1,000 pounds. When the planter is empty, be sure to use a dolly or have two people work together to position it. Ensure the planter is perfectly level; if it is not level, water will pool in one corner, causing uneven rusting of the steel.
Check the Load-Bearing Capacity of Your Patio or Balcony
If you plan to place outdoor planters on a balcony or wooden patio, you must calculate the “concentrated load.” Most residential patios have a load-bearing capacity of 40–60 pounds per square foot. A large, water-filled planter can easily exceed this limit. It is usually necessary to place the planter over structural joists or use a “ballast board” (a thick piece of outdoor-grade plywood or custom steel plate) underneath the planter to distribute the load over a wider area.
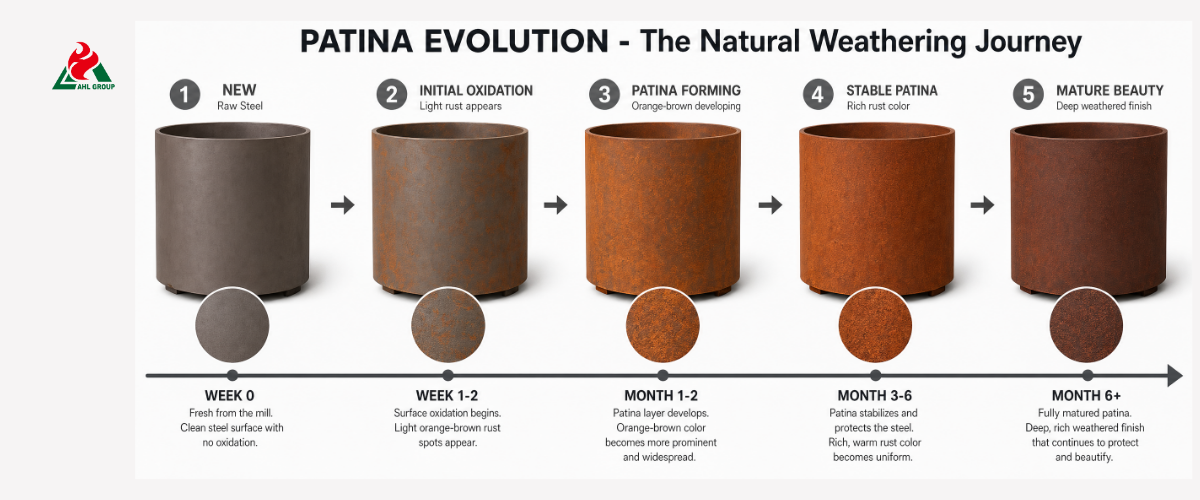
Allow 6–12 Months for Rust Bleeding
Never place a new weathering steel planter directly on a porous surface that you wish to keep clean. During the first year, the planter will actually continue to “bleed” rust. If your deck is made of white marble, you must use a tray, base, or drainage mat. Consider prevailing wind and rainfall directions; rust-stained water will flow along the path of least resistance and may spread several feet outward from the bottom of the planter.
3. Step 2: Initial Rust Acceleration (Optional)
Some homeowners prefer to let the steel oxidize naturally, while others want to achieve the “industrial orange” look right away. If you’d like to skip the initial gray phase, you can accelerate the oxidation process using chemical methods.
Saltwater Spray Method (2–3 weeks)
This is the safest method for steel. Dissolve 1 teaspoon of salt in 1 liter of water. Spray the garden planter once every evening. The salt absorbs moisture, accelerating the oxidation of copper and chromium. Key step: After 3 days of salt spray treatment, rinse the planter thoroughly with clean water to prevent deep “pitting” on the surface caused by salt residue. Repeat this cycle for 2–3 weeks to achieve a deep, even orange hue.
Vinegar Mist Method (Quick Version)
If you want to see results “the very next day,” mix 1 part white vinegar with 4 parts water and add a small amount of hydrogen peroxide. Spray the mixture onto the flower pot. The acidity of the vinegar removes the rust layer, while the hydrogen peroxide provides the iron with instant oxygen to catalyze the reaction. This produces a very bright, “fiery” orange color. But please note: This type of rust is typically less stable than naturally weathered rust and may be more prone to flaking off during the first few months.
Natural Weathering (6–12 Months)
This is the method of choice for architects. Natural weathering forms a denser, more cohesive rust layer. By allowing the steel to undergo natural wet-dry cycles without chemical intervention, the protective layer forms more “naturally,” resulting in a longer lifespan and ultimately a richer chocolate-brown color.
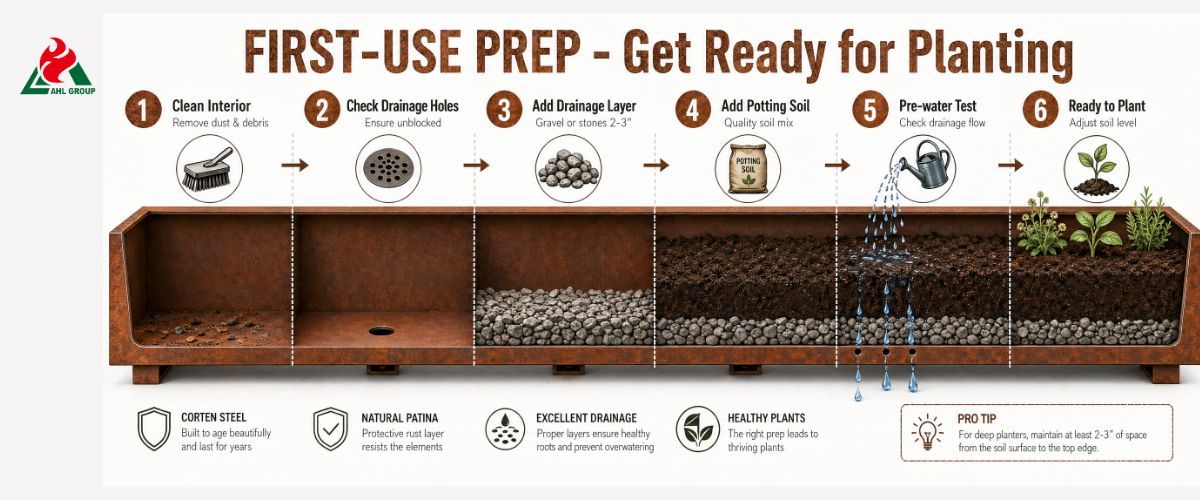
4. Step 3: Perfect Drainage Layer
In Corten outdoor planters, the drainage layer is the “engine” that keeps the entire system running smoothly. Since steel is impermeable, mechanical means must be used to facilitate the circulation of air and water.
Covering Drainage Holes: Gardening Fabric/Mesh
Before adding any stones, place a layer of fine-mesh stainless steel netting or high-quality non-woven gardening fabric over the drainage holes. This prevents the drainage material (gravel/stones) from spilling out and, more importantly, keeps the drainage holes from becoming clogged with fine soil particles over time.
4-6" Gravel/Volcanic Rock Layer
Never fill the bottom with soil alone. A 4- to 6-inch layer of volcanic rock (pumice) or crushed granite must be laid down. Volcanic rock is the preferred material because it is extremely lightweight, and its porous surface provides ample habitat for beneficial soil microorganisms. This layer forms a “water retention zone” where excess moisture can be temporarily stored away from the roots until it drains naturally.
Optional: Horticultural Charcoal
In humid climates or in indoor Corten steel planters, adding a 1-inch layer of horticultural charcoal between the gravel and the soil is an industry insider’s tip. Charcoal acts as a natural filter, absorbing impurities and preventing the “sour soil” odor that can develop in large, deep containers with limited ventilation.
5. Step 4: Protective Deck Liner
Controlling “staining” from weathering steel is the most critical aspect of the initial installation guidelines for residential projects.
Rubber Mat/Pond Liner Under Base
If your planter pot is placed on a patio, lay a heavy-duty rubber mat or a cut-to-size EPDM pond liner underneath it. Ensure the liner is slightly larger than the planter’s base. This will serve as a “collection layer” for the initial orange-colored leachate. After 12–18 months, once the rust has stabilized and the leaching has stopped, simply remove the rubber mat, and your patio will be restored to its original clean state.
6–12 Months of Rust Protection
Please consider this a temporary protective measure. For high-end stone patios, some professionals recommend laying a thin layer of “gravel bedding” beneath flower pots. This allows rust-colored water stains to seep into the soil or gravel rather than pooling on the stone surface.
Easy Cleanup During Patina Formation
If a small amount of seepage still reaches the stone, don’t panic. During the first year, keep a bottle of phosphate-based masonry cleaner or a simple solution of lemon juice and salt on hand. If treated promptly, these solutions can dissolve iron oxide stains. Once the patina has “matured,” it becomes insoluble in water and will no longer cause staining.
6. Step 5: Soil Selection
The soil in Corten metal planters serves two purposes: it provides nutrients for the plants and protects the steel walls by regulating temperature.
► Never Use Garden Soil: Garden soil is too heavy and lacks the drainage required for container gardening. It will compact into a “brick,” crushing the roots and causing water to linger against the steel walls for extended periods.
► “Soilless” Potting Mix: Choose a high-quality potting mix composed of peat moss or coconut coir, perlite, and vermiculite. This creates a light, well-aerated growing environment.
► Internal Insulation: For metal planters used in extreme climates, it is recommended to line the inner walls with a 1-inch-thick layer of rigid foam insulation before adding soil. This prevents the steel from directly conducting the heat of midday summer sun to the plant roots, thereby preventing the plants from being “cooked.”
7. Step 6: First Watering Protocol
Watering a new planter for the first time is a crucial test. It will tell you whether your initial preparations were successful.
Layering the Soil (to Avoid Air Pockets)
When adding soil, add about 15 centimeters at a time. Lightly water each layer and gently tamp it down (do not over-compact) to eliminate larger air pockets. If you fill the planter before watering, the soil will settle significantly, causing the plant to sit about 10 centimeters lower than expected.
Note the Orange-Colored Leachate (Weeks 1–8)
During the first few waterings, “rust-colored” water may drain out. This is a normal sign of the oxidation process. Please ensure the protective mat has been laid out correctly. If the water draining from the bottom is clear, check the drainage—this may indicate that water is pooling inside, which could lead to root rot.
Monitor Drainage Performance
Observe how long it takes for water to flow out of the drainage holes. It should take several minutes for the water to permeate through the soil and gravel layer. If it takes several hours, your soil mix is too compacted. If it takes only a few seconds, a “channeling effect” may be occurring, where water bypasses the roots and runs down the smooth inner walls of the steel container.
8. Tall Planter Special Considerations
Tall planters (30 to 48 inches) require special design considerations due to their high center of gravity and large size.
Wind Stability
Tall, narrow weathering steel planters act like sails in the wind. If placed in windy areas (such as rooftops or open-air terraces), their “base weight” ratio must be increased. Heavy river rocks should be used in place of lightweight fill material within the bottom 12 inches to stabilize the planter. In extreme cases, guy wires can be used, or the planter can be bolted directly to the base through the drainage holes.
Root Depth Requirements
Most ornamental plants require only 12 to 18 inches of soil. For a 40-inch-tall planter, filling the bottom 20 inches with soil is both a waste of money and adds unnecessary weight. We recommend using fillers such as inverted plastic planters or sealed gallon-sized water jugs to occupy the bottom space, then laying down a layer of garden fabric and filling with soil.
Heavy Equipment for Soil Filling
Never underestimate the physical demands of this task. A tall planter may require 10–15 bags of large-particle potting soil. If you are undertaking a large-scale project, consider hiring a “soil blow-in” service or using a small tractor equipped with a bucket to avoid back injuries.
9. First 3 Months Care Timeline
► Week 1: Check daily for water seepage. Since the weight of the water will cause the soil to settle, make sure the landscape planter remains level.
► Month 1: The planter should display a vibrant, velvety orange color. This is the peak of the “bleeding” phase. Do not wipe the steel surface, as this will damage the developing rust.
► Month 3: The orange will gradually deepen, turning into a richer ochre hue. Check the drainage holes to ensure that “fine soil” (tiny soil particles) has not begun to clog the mesh.
10. Common First-Use Mistakes
Moving the Planter After Filling
As mentioned earlier, the weight is considerable. Attempting to move a planter that has already been filled will typically cause the bottom panel to warp or result in “stress cracks” along the side seams. Please plan the placement carefully before filling the planter.
Poor Drainage (Root Rot)
If you omit the gravel layer or garden fabric, the soil will eventually clog the drainage holes. Waterlogging leads to oxygen deprivation in the soil (producing a sulfuric odor), and the plants will eventually die. To maintain the integrity of the weathering steel, allow it to dry thoroughly after each watering.
Failure to Prevent Leaching (Patio Stains)
Assuming “it won’t be that bad” is the most costly mistake you can make. Iron oxide leachate is highly staining. Protect your surfaces from day one.
Conclusion: Long-lasting and Durable
Corten steel planter pots are built to last a lifetime. While careful management of surface runoff and drainage is required during the first 12 months, they require virtually no maintenance for the next 40 years. Each spring, when planting, inspect the drainage holes from the outside and use a thin wire to ensure they are not blocked by debris. Every 3 to 5 years, we recommend removing the top 6 inches of soil and replacing it with fresh compost to maintain soil fertility. Do not attempt to “clean” or “polish” the rust. The charm of Corten steel lies in its rugged, weathered appearance, shaped by wind and rain. If scratches appear, let them be—the steel will heal itself after the next downpour. By properly preparing your planter today, you lay the foundation for a garden landscape that will grow more beautiful, textured, and valuable as the years go by.
At AHL Group, we manufacture professional-grade weathering steel planters designed to withstand the harshest environments. From large-scale commercial projects to custom residential installations, our engineering team provides the technical support you need to ensure your landscape’s beauty endures. Contact us today for a custom quote or technical solution.
