


Corten steel privacy screens have become a popular choice for residential gardens, patios, balconies, commercial landscapes, and architectural projects due to their combination of privacy protection, durability, and unique visual appeal. Unlike traditional privacy screen materials such as wood, plastic, or painted metal, Corten steel develops a natural rust patina that changes over time. This weathered surface not only creates a warm, natural appearance but also effectively protects the steel from further atmospheric corrosion. However, installing weathering steel privacy screens on walls requires careful planning. While the screens themselves are sturdy and durable, the installation method, wall structure, fasteners, and drainage details will determine whether the installation remains secure and aesthetically pleasing for years to come.
1. Introduction
Why Corten Steel Privacy Screens Are So Popular for Wall Applications
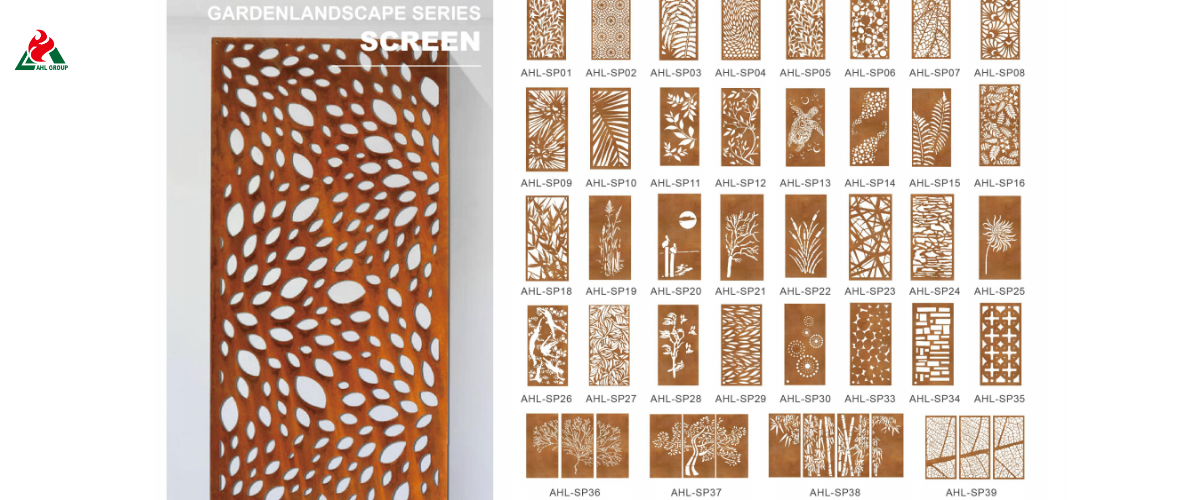
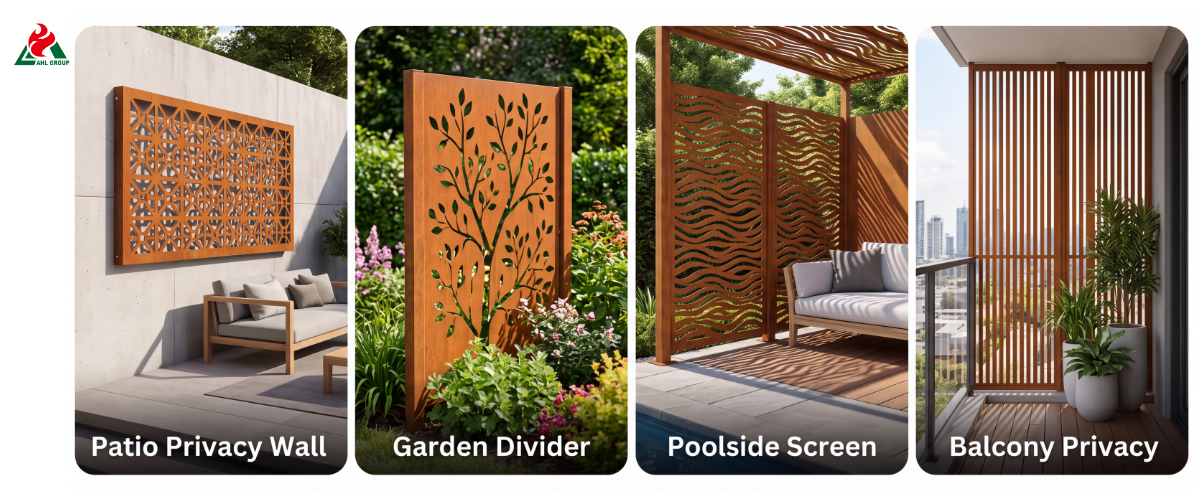
Corten steel—commonly known as weathering steel—has seen a surge in popularity among landscape architects, facade designers, and property owners looking to elevate the aesthetic of modern architectural spaces. Corten steel privacy screens are far more than mere decorative partitions; as sculptural and low-maintenance architectural elements, they infuse the exterior walls of residential and commercial buildings with rich natural textures, geometric patterns, and warm metallic tones. Wall-mounted laser-cut screen panels can transform bare plaster walls, exposed brick walls, or monotonous cast-in-place concrete into eye-catching focal points, while concealing unsightly utility lines, enhancing privacy, and softening the harshness of structural surfaces.
This Guide Will Walk You Through the Following Installation
This engineering-grade installation guide provides complete, step-by-step instructions for installing laser-cut weathering steel privacy screens directly onto various vertical structural walls. Whether you are installing a single decorative main panel on a residential garden patio or a continuous privacy screen composed of multiple panels on a commercial perimeter wall, this manual covers the structural mechanics, thermal expansion gaps, bracket anchoring systems, and anti-soiling techniques required to achieve a safe, durable, and visually flawless installation.
Overview of Safety and Preparation
Installing heavy-duty steel architectural panels on vertical masonry or wooden surfaces poses specific physical and mechanical risks. A standard-sized laser-cut Corten screen measuring 1,800 mm × 900 mm (6 ft × 3 ft) and 3 mm thick (11-gauge) weighs approximately 25 kg to 35 kg (55 lbs to 77 lbs), with the exact weight depending on the density of the pattern. When handling steel panels, it is essential to wear appropriate personal protective equipment (PPE), conduct a thorough assessment of the wall structure, select the correct drill bit specifications, and follow two-person lifting procedures to prevent personal injury or surface damage during installation.
2. Understanding Corten Privacy Screens
What Is Weathering Steel (Corten Steel)
Weathering steel is a specialized high-strength, low-alloy structural steel produced in accordance with standardized specifications such as ASTM A588, ASTM A242, or A606-4. Unlike traditional low-carbon steel, which continues to rust until the structure fails, weathering steel contains precise proportions of copper, chromium, nickel, and phosphorus. When exposed to outdoor atmospheric cycles of wet and dry conditions, these alloying elements catalyze the formation of a dense, highly stable protective crystalline iron oxide film known as ferrite. This dense micro-layer acts as an impermeable barrier, significantly slowing the further penetration of oxygen and moisture into the underlying exposed steel core.
Impact of Rust Patina on Installation
During the first 6 to 12 months, the developing surface oxide layer will continuously shed minute particles of iron oxide upon contact with rainwater. If panels are installed flush against a wall without allowing for an appropriate gap or drainage channel, these liquid rust stains will seep into porous wall finishes (such as white stucco, limestone, or light-colored brick) and cause severe, permanent staining. Understanding this weathering cycle is critical for determining the proper spacing between the mounting brackets and the wall.
Common Partition Styles and Installation Systems
Corten steel screens primarily come in three structural forms:
► Flat Panels: 2mm or 3mm thick flat panels with mounting holes around the edges. These screen panels require the use of standalone offset brackets or perimeter box frames to maintain structural rigidity and ensure the proper offset distance.
► Folded-Edge Box/Tray-Style Panels: The back of the panel is folded 20mm to 50mm (edges folded back at a 90-degree angle). This box-type structure provides inherent structural rigidity, conceals mounting hardware, and automatically maintains a clean, consistent distance from the wall.
► Modular Screen Systems: These feature an interlocking multi-panel track design and are installed on horizontal aluminum or steel channel-shaped guide rails fixed across the wall.
Differences from Aluminum, Wood, and Composite Partitions
Unlike powder-coated aluminum, composite plastic, or wood partitions, weathering steel offers significantly higher thermal capacity, greater tensile strength, and unique metallurgical properties:
► Aluminum: Lightweight and corrosion-resistant, but lacks the natural visual depth, structural rigidity, and high shear strength found in weathering steel.
► Wood: Prone to warping, rotting, cracking, and UV degradation; requires frequent repainting, whereas weathering steel requires virtually no maintenance once a patina has formed.
► Composite materials: Susceptible to thermal expansion, prone to sagging at high temperatures, and subject to permanent color fading over time due to UV exposure.
3. Planning the Installation
Selecting the Appropriate Wall Type
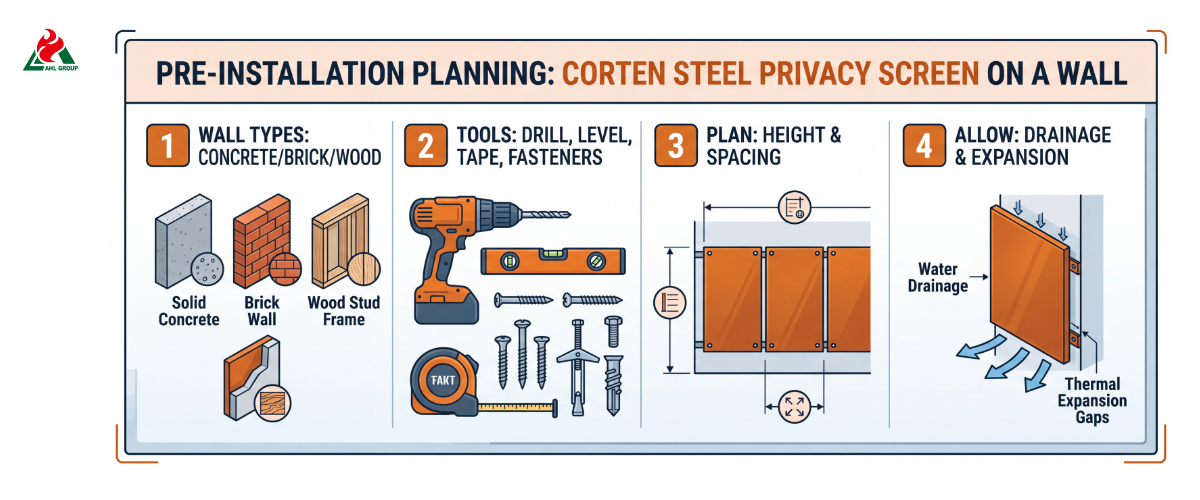
Before purchasing installation hardware, conduct a thorough assessment of the structural substrate. Suitable wall types include solid concrete, core-filled concrete masonry units (CMU), structural clay bricks, heavy-duty wood framing, and commercial steel studs. Avoid installing heavy-duty Corten steel panels directly onto non-structural single-layer panel curtain walls, deteriorated mortar walls, or lightweight plaster finishes, unless they can be secured directly through these materials to the underlying structural studs or solid masonry substrate.
Measure and Mark Panel Locations
Precise layout planning prevents costly installation errors:
► Measure the total wall area and calculate panel offsets to achieve visual balance. If installing multiple panels side by side, leave a 3-millimeter to 5-millimeter expansion joint between them.
► Metal expands in high summer temperatures; installing panels too closely together may cause them to warp when exposed to direct sunlight.
► Use a long spirit level or a digital cross-line laser level to mark a perfectly horizontal reference line on the wall. Never assume that existing patios, deck flooring, or wall copings are level.
Check for Pipes and Structural Elements
Before drilling into any vertical wall surface, use an electronic multi-function scanning stud finder and a pipe/wire detector. Confirm whether there are any electrical conduits (especially near exterior wall lights), water supply pipes, gas lines, or internal structural rebar cages embedded within the wall. Before installing brackets, clearly mark “No-Drill Zones” on the wall layout diagram.
Choosing Between Wall-Mounted and Freestanding Options
Direct installation on existing walls is both cost-effective and space-saving, allowing you to utilize the wall’s structural load-bearing capacity. However, if the wall structure is damaged, peeling, or made of thin decorative materials, you should opt for a freestanding steel column and panel system, secured to a concrete base directly in front of the wall.
Consider Wind Loads and Wind Exposure
Laser-cut screens act like sails when exposed to wind. Compared to screens with open patterns (over 50% open area), panels with dense decorative patterns (e.g., 20% open area) are subjected to much greater lateral wind shear forces. Please calculate lateral wind loads based on local wind zone parameters. In coastal areas with strong winds, higher-density mechanical anchor points, sturdier support specifications, and deeper anchor embedment depths are required.
4. Tools and Materials Needed
Drill Bits and Masonry Drill Bits
► Heavy-duty SDS-Plus rotary hammer drill bits (essential tools for concrete and brick walls).
► High-quality SDS carbide masonry drill bits, precisely matched to the diameter of the anchor bolts (8 mm, 10 mm, or 12 mm).
► High-speed steel cobalt alloy drill bits (for adjusting hole sizes in weather-resistant steel sheets or steel brackets).
Wrenches, Sockets, and Screwdrivers
► Torque wrench and matching metric socket set (to prevent excessive torque when installing expansion anchors in brick walls).
► Ratchet combination wrench set. Impact screwdriver bits (PZ2/PZ3, TX25/TX30 star bits, and magnetic hex screwdrivers).
Levels, Tape Measures, and Pencils
► A 1,200-millimeter precision box level or a dual-axis self-leveling green crosshair laser level.
► An 8-meter locking tape measure with millimeter graduations.
► A hard-graphite carpenter’s pencil or a fine-tip permanent silver marker for marking on dark masonry surfaces.
Anchors, Bolts, and Brackets
► Masonry Anchors: Heavy-duty 316 stainless steel sleeve expansion anchors or ETA-certified concrete anchors (such as AnkaScrew or Tapcon heavy-duty anchors).
► Fasteners: Grade 316 (marine-grade) stainless steel bolts, nuts, and flat washers. Never use galvanized, electrogalvanized, or untreated carbon steel fasteners; electrochemical reactions with weathering steel will cause rapid deterioration of the fasteners.
► Isolation Components: Use non-conductive EPDM rubber gaskets or heavy-duty neoprene isolation sleeves to isolate the stainless steel fasteners from untreated weathering steel.
► Spacer Brackets: 3-millimeter-thick heavy-duty stainless steel or powder-coated steel L-brackets, Z-brackets, or engineering-grade aluminum spacer shims (25 to 50 millimeters in length).
Safety Equipment and Protective Gear
► ANSI-certified impact-resistant safety glasses.
► Cut-resistant leather work gloves (laser-cut steel mesh edges may be sharp).
► NIOSH P100 or N95 dust masks (essential when drilling into masonry or concrete).
► Heavy-duty steel-toed work boots.
5. Preparing the Wall Surface
Clean the Wall Area
Use a stiff-bristled wire brush, a pressure washer, or a degreaser to remove loose debris, moss, ivy vines, peeling paint, or mortar dust from the surface of the installation area. Allow the wall to dry completely. A clean surface ensures that the brackets are installed flush with the wall and that the layout lines are clearly visible.
Mark the Bracket and Panel Positions
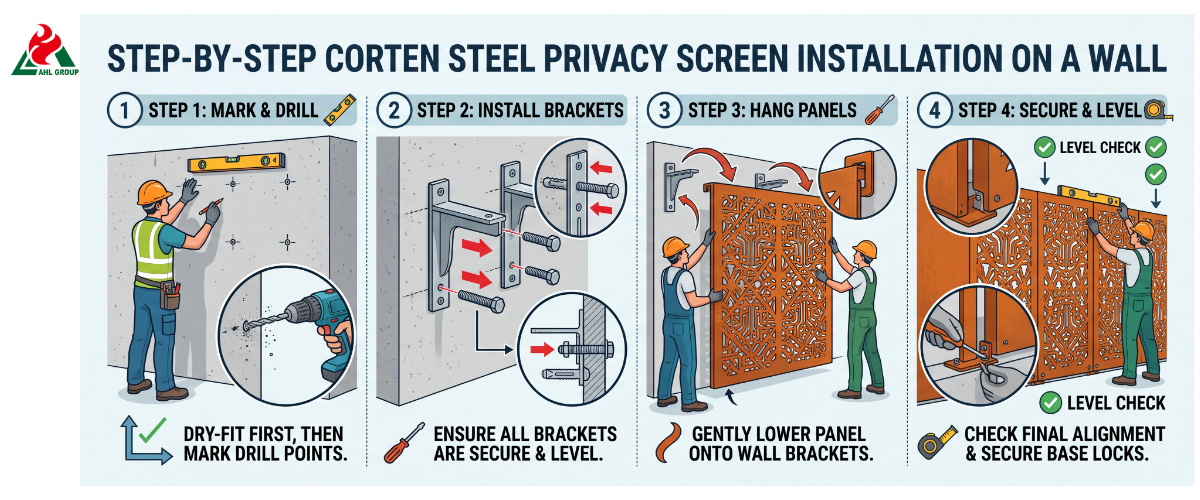
Place the corner of the first bracket frame or panel flush against the wall, ensuring it is perfectly aligned with the laser reference line. Then, using a center punch or a fine-tip marker, mark reference points directly on the wall through the factory-pre-drilled mounting slots.
Pre-drill Guide Holes
Select an appropriate drill bit based on the anchor specifications. Adjust the depth stop on the SDS hammer drill to match the exact length of the anchor, allowing an additional 10 mm of clearance to accommodate dust accumulation. Drill vertically (90°) into the wall; do not tilt the tool. Use a manual blow-out pump or compressed air nozzle to blow concrete dust out of the drill hole; residual dust in masonry holes can reduce the anchor’s load-bearing capacity by up to 50%.
Check Level and Alignment
Realign the mounting brackets with the pre-drilled holes and loosely insert the main anchor bolts. Before tightening the fasteners, place a level across the top of all brackets to verify alignment. Adjust the long slotted holes on the brackets as needed to compensate for minor wall irregularities.
Protecting Wall Finishes During Installation
If installing Corten steel panels on light-colored stucco walls, polished stone, or painted surfaces, apply wide masking tape to the wall directly below the installation area and lay down a thick plastic drop cloth. This will prevent scratches while adjusting the position of the steel panels and help contain dust and metal shavings generated during drilling.
6. Mounting Methods by Wall Type
Installation on Brick Walls
When anchoring into solid clay bricks or wire-cut bricks, drill directly into the brick body rather than into the mortar joint whenever possible. The mortar layer deteriorates over time and offers poor mechanical expansion anchoring capacity. Use marine-grade 316 stainless steel expansion sleeve anchors or heavy-duty masonry bolts. For old or loose brickwork, use a two-component epoxy grout chemical anchoring system in conjunction with stainless steel threaded rods.
Installation on Concrete Walls
Cast-in-place concrete walls and core-filled block walls offer excellent load-bearing capacity. Use an SDS hammer drill bit to drill precise holes, remove all dust, and then install heavy-duty stainless steel concrete anchors or insert-type wedge anchors. Concrete anchors cut deep threads into the concrete wall, providing excellent shear resistance to withstand strong wind loads.
Installation on Wood Frames or Stud Walls
When installing Corten metal screens on wood-framed structures, exterior structures, or residential walls:
► Use a stud finder or probe drill to determine the centerline of the structural wood studs. Never rely solely on exterior wall cladding or wood weatherboard to bear the load.
► Drive an 8-millimeter or 10-millimeter Grade 316 stainless steel hex-head lag screw through the mounting bracket and exterior wall cladding directly into the solid wood stud, to a depth of at least 50 millimeters.
► Apply a bead of non-acidic, neutral-curing exterior-grade silicone sealant around the entry point of each lag screw to seal the building envelope and prevent rainwater infiltration.
Installation on Metal or Steel Structures
When securing weathering steel panels to structural steel beams, square hollow section (SHS) columns, or metal framing systems:
► First, pre-drill through holes in the structural steel, then use 316-grade stainless steel mechanical bolts with lock nuts featuring nylon inserts (Nyloc nuts).
► Alternatively, use heavy-duty stainless steel self-tapping Tek screws equipped with EPDM sealing washers.
► Be sure to install plastic or EPDM rubber isolation washers between untreated structural steel/aluminum frames and weathering steel panels to prevent electrochemical corrosion caused by contact between dissimilar metals in humid environments.
Installation on Fences or Existing Screens
When installing Corten outdoor screens onto wooden lap-joint fences or metal panel fences, check that the existing fence posts are structurally sound, vertical, and anchored in a solid concrete foundation. Before securing the decorative weathering steel panels, reinforce any weak wooden fences by adding horizontal wooden cross-members (70 mm × 45 mm pressure-treated pine).
7. Step-by-Step Installation Process
Installing Mounting Brackets or Tracks
► Secure the main wall mounting brackets (L-brackets, Z-brackets, or heavy-duty aluminum spacers) into the pre-drilled and dust-free holes in the wall.
► Insert the stainless steel expansion bolts through the mounting slots on the brackets and screw them into the wall.
► During initial installation, slightly loosen the wall expansion bolts to allow for fine adjustments.
► Place a level across the top of the bracket and tap it gently with a rubber mallet to ensure it is level.
Securing the Weathering Steel Panel to the Bracket
► Work with an assistant to lift the heavy weathering steel privacy screen into position next to the installed wall bracket.
► Insert a temporary positioning pin or screwdriver into the mounting hole at the top corner to safely reduce the strain on your arms.
► Align the pre-drilled mounting holes around the perimeter of the panel with the mounting slots on the wall bracket.
Secure the Panels with Bolts or Screws
► Assemble the Fastener Assembly.
► Insert the bolt through the panel and the bracket assembly.
► On the back of the bracket, thread on the EPDM washer, stainless steel washer, and stainless steel nut in that order.
► The EPDM rubber washer cushions the panel, preventing direct friction between metal surfaces and thereby protecting the surrounding patina.
Check Alignment and Make Adjustments as Needed
Before fully tightening any fasteners, use a level to check the panels from multiple angles. Ensure that the gap between the wall and the back of the screen panel remains consistent across the entire surface of the screen. Correct for uneven walls or protrusions in the masonry by adjusting the guide slots on the slotted brackets forward or backward.
Final Tightening and Torque Check
Using a torque wrench and a socket wrench set, tighten all masonry anchors and stainless steel assembly bolts to the torque values specified by the manufacturer. When installing expansion anchors in older brick walls, avoid over-tightening to prevent cracking of the masonry substrate. Check that the EPDM isolation washers are in close contact and slightly compressed, but not flattened or cracked.
8. Special Considerations for Corten Steel
Ensure Drainage and Runoff
During heavy rain, rainwater flowing down the surface of weathering steel panels carries dissolved iron salts. Ensure that the lower edge of the steel panels remains at least 50-100 millimeters above the ground. Never allow the lower edge of Corten garden screens to come into direct contact with standing water, soil, a layer of fallen leaves, or damp coverings; prolonged exposure to moisture deprives the metal of oxygen, disrupts the wet-dry cycle, and can lead to severe pitting corrosion rather than the formation of stable rust patina.
Prevent Stains on Light-Colored Walls
To prevent rust water from running down walls and permanently staining light-colored plastered walls, light-colored sandstone, or white masonry surfaces: Use specialized spacers or L-shaped brackets to maintain a clearance of at least 20 to 50 millimeters from the wall. Install a sloped, concealed drip edge cover or an aluminum water deflector along the rear edge of the panel’s bottom to divert rainwater away from the wall and into the dark-colored gravel drainage layer or garden border below.
Use Spacers to Prevent Direct Contact
Never install flat Corten screen panels in tight contact with any wall surface. Tight installation causes moisture, fallen leaves, and airborne dust to become trapped in the narrow gap between the wall and the steel sheet. This trapped moisture and debris will keep both surfaces constantly damp, leading to rapid flake-like rust formation on the back of the steel sheet and causing the underlying wall to rot or develop mold. Be sure to use thick plastic, aluminum, or EPDM spacers to maintain an adequate air gap.
Protect Cut Edges and Drilled Holes
If you need to cut, trim, or drill new installation holes in the weathering steel sheet on-site:
► Deburr all newly cut edges and drilled holes using a metal file or a step drill.
► Rinse the metal surface with clean water to remove metal shavings and dust.
► Newly exposed steel edges will oxidize rapidly and, after several cycles of wet and dry weather, will blend seamlessly with the surrounding rust.
9. Common Mistakes to Avoid
Failure to Pre-Drill Holes Leads to Cracking
Attempting to drive masonry screws or expansion anchors into a brick wall without first drilling neat pilot holes—or using a worn drill bit that creates holes that are too large or irregular—can cause fasteners to loosen or the masonry surface to crack. Be sure to use a new carbide SDS drill bit and drill precise pilot holes according to the anchor specifications.
Using Anchors Incompatible with the Wall Type
Using lightweight plastic wall plugs, drywall anchors, or standard galvanized wood screws on exterior walls to support heavy metal screens poses a significant safety hazard. Be sure to select anchors whose strength, shear resistance rating, and embedment depth are appropriately matched to the total weight of the panels and the specific wall material.
Neglecting Wind Loads and Structural Support
Underestimating the wind forces acting on tall decorative walls often results in panels becoming loose or brackets deforming after severe storms. Be sure to use sturdy wall anchors, maintain the minimum spacing between mounting points (typically no more than 600 to 800 millimeters along the panel edges), and install central rear support brackets for wide or flexible panels.
Failure to Check Levelness During Installation
Once the project is complete, even a slight deviation from vertical or horizontal alignment during installation will be immediately apparent, especially when the garden screen is placed alongside straight architectural lines, window frames, or wall corners. Before drilling the main anchor holes, be sure to carefully recheck the horizontal alignment using a precision level or a cross-line laser level.
Failure to Allow for Rust Seepage
Failing to anticipate iron oxide runoff during the initial 6- to 12-month weathering process is the most common mistake in residential installations. If unweathered weathering steel panels are laid directly on top of light-colored travertine pavers, white stucco walls, or unsealed wooden deck flooring, they will leave deep orange rust stains that are difficult to remove without the use of strong chemical acids.
10. Alternative Installation Options
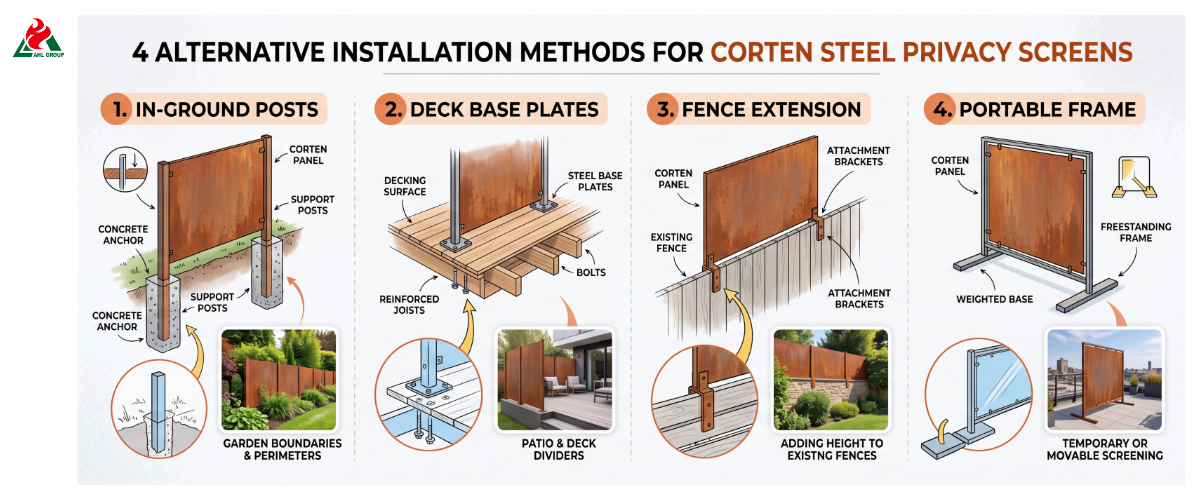
Freestanding Weathering Steel Screen Adjacent to a Wall
If the existing garden fence structure is weak, weathered, or owned by a neighbor, avoid attaching hardware to the wall entirely. Instead, use thick-gauge weathering steel or powder-coated steel posts embedded in a concrete foundation pit at least 600 millimeters deep, and construct a freestanding screen frame directly in front of the fence.
Post-and-Panel System
The modular post-and-panel system uses vertical side channels or slotted posts secured to the ground or wall foundation. Decorative weathering steel panels slide smoothly into the side channels and are locked into place with concealed security screws. This system simplifies installation, hides fasteners, and incorporates built-in thermal expansion pathways.
Integration with Existing Fencing
Weathering steel privacy screens can be integrated into existing wooden boundary fences, structural aluminum slat systems, or masonry retaining wall posts. Custom steel corner brackets are used to bridge the gaps between existing posts, creating an attractive combination of materials.
Temporary or Removable Installation Solutions
For rental properties or temporary trade shows, we recommend using keyhole-slot hanging brackets or French wedge wall tracks. These systems securely suspend heavy panels on the wall during the event and can be quickly dismantled for transport or seasonal storage without removing the main hardware from the wall.
When to Hire Professional Installers
While installing a small, single panel is a simple two-person DIY project, you should hire a licensed structural contractor, landscape contractor, or steel fabricator if your installation involves any of the following: installation at heights spanning multiple stories or in high-risk locations prone to strong winds; or securing panels to structurally complex insulated exterior walls (e.g., exterior thermal insulation composite systems or curtain wall systems). Installation of extremely large or heavy steel panels (>80 kilograms) that require mechanical crane lifting or the erection of specialized scaffolding.
11. Maintenance After Installation
Regularly Inspect Brackets and Fasteners
Inspect all wall anchor points, spacer brackets, and assembly hardware annually:
► Check that all stainless steel bolts are still tight and torqued to the correct value.
► Confirm that the EPDM rubber isolation washers are intact and have not deteriorated due to intense UV exposure.
► After a major storm, check the wall anchors for signs of displacement, loosening, or cracks in the masonry.
Clean the Screen Surface
Weathering steel requires very little daily maintenance, but regular cleaning helps maintain a healthy patina:
► Once or twice a year, rinse the privacy screen’s surface with clean, fresh water from a garden hose to remove accumulated bird droppings, sea salt spray, dirt, and fallen organic debris.
► Avoid using high-pressure washers held too close to the surface, chemical degreasers, bleach, or acidic cleaners; highly corrosive chemicals can strip away the protective hematite oxide layer, forcing the steel back into the weathering cycle.
► Use a soft-bristled nylon brush and plain water to scrub away stubborn dirt or organic deposits gently.
Check for Loose Connections After a Storm
After severe weather, high winds, or winter storms, perform a quick visual inspection of your protective netting components. Ensure that no debris blown by the wind is lodged behind the panels, check that the airflow gaps are unobstructed, and confirm that all mounting brackets remain securely fastened to the wall.
Reapply the Protective Coating as Needed
Once your weathering steel screen panels have developed an ideal deep reddish-brown patina (typically 12 to 18 months after installation), if you wish to permanently lock in this specific visual effect and prevent further rust runoff, you can use a specialized exterior polyurethane sealer or a penetrating rust-inhibiting sealer (such as Penetrol or a clear matte sealer designed for weathering steel).
Note: Once sealed, the screen should be reapplied every 3 to 5 years, depending on direct UV exposure and rain exposure.
Conclusion: Final Recommendations on Durability and Aesthetics
When properly planned and installed, wall-mounted laser-cut weathering steel privacy screens can serve as an extremely durable, maintenance-free architectural highlight, whose texture becomes richer and more captivating over time. By combining proper structural anchoring, stainless steel fasteners, EPDM spacer washers, and smart rainwater drainage management, your weathering steel screen will not only safely withstand intense sunlight, strong winds, and severe winter storms but also enhance your outdoor living space for decades to come.

