


Installing Corten steel outdoor lighting requires a combination of landscape design, weather-resistant materials, and electrical planning. Whether you’re installing path lights, bollard lights, wall lights, or accent lighting, you’ll achieve the best results by planning the project as a complete system rather than simply placing lights haphazardly around the garden.
This guide will explain in detail how to plan the layout, prepare the bases, run low-voltage cables, control voltage drops, prevent damage to Corten steel due to drainage issues, and test the installed system. Electrical work involving mains voltage must always comply with local electrical codes and, where necessary, be performed by a licensed electrician.
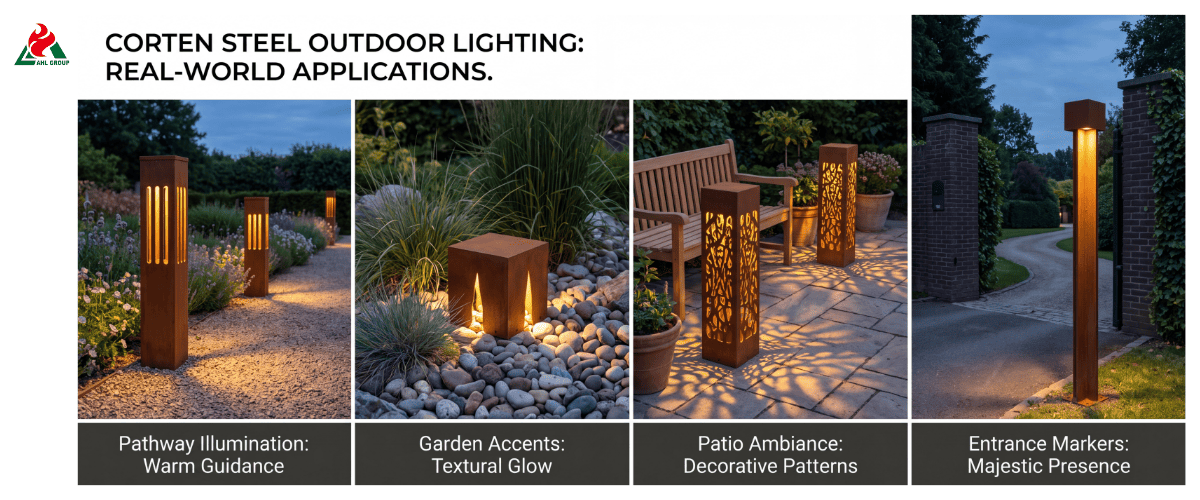
This guide will explain in detail how to plan the layout, prepare the bases, run low-voltage cables, control voltage drops, prevent damage to Corten steel due to drainage issues, and test the installed system. Electrical work involving mains voltage must always comply with local electrical codes and, where necessary, be performed by a licensed electrician.
1. Introduction
Why Choose Weathering Steel Outdoor Lights
Corten steel outdoor lights perfectly blend rugged durability with rich, natural aesthetics. Unlike standard aluminum or painted steel fixtures, which are prone to peeling and corrosion over time, weathering steel develops a protective, self-healing patina when exposed to the elements. This oxide layer not only protects the underlying metal from structural corrosion but also creates a warm, rustic texture that blends naturally and harmoniously with modern landscapes, stone hardscapes, and lush garden vegetation.
What This Installation Guide Covers
This comprehensive guide provides a detailed breakdown of the complete installation process for residential and commercial weathering steel outdoor lighting. It covers layout planning, voltage specification selection, structural anchoring techniques, cable routing, and rust water management specific to weathering steel. By following these instructions, you can build a durable and safe landscape lighting system tailored specifically for weathering steel fixtures.
Can You Install Corten Outdoor Fixtures Yourself
Most residential Corten landscape lighting systems operate on low voltage (12V–15V AC/DC), making this a safe and straightforward DIY project for homeowners with basic hand tools. As long as you follow direct-burial wiring codes, correctly calculate voltage drops, and use the appropriate mounting bases, you can complete the low-voltage portion of the installation on your own in a single weekend.
When to Hire a Licensed Electrician
A licensed electrician must be hired for any work involving 120V or 240V line voltage. This includes installing dedicated outdoor ground-fault circuit interrupter (GFCI) outlets, hardwiring high-wattage commercial Corten steel bollards, or connecting a landscape transformer directly to the main electrical panel. Be sure to verify local electrical codes before working on high-voltage connections.
2. Understand Corten Outdoor Light Types
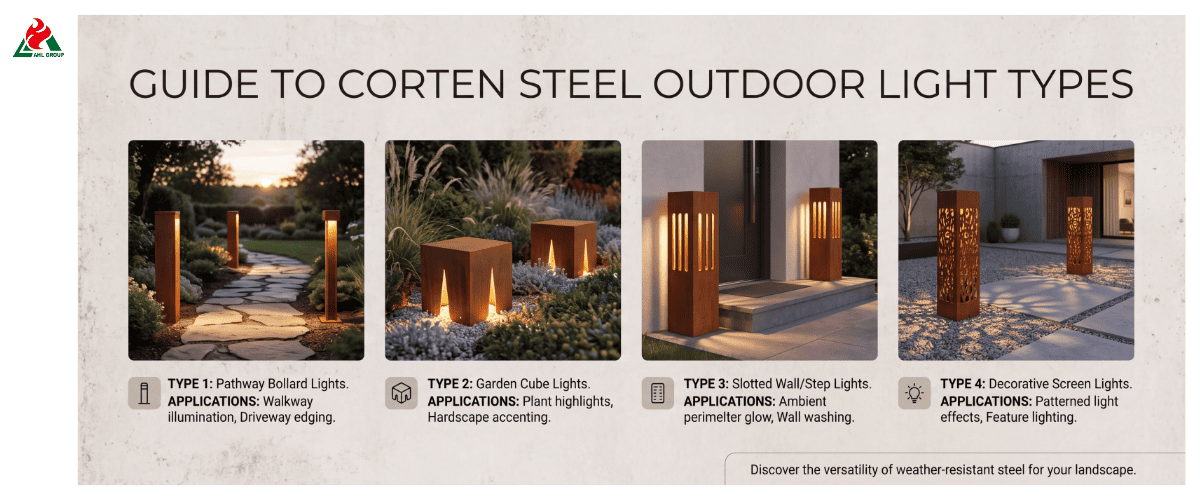
Corten Steel Pathway Lights
Pathway lights are compact fixtures designed to cast downward light along sidewalks, garden borders, and patio edges. Because weathering steel pathway lights are installed close to the ground in damp environments, their poles and ground stakes must have robust corrosion protection to withstand continuous exposure to moisture.
Corten Steel Bollard Lights
Bollard lights are sturdy, vertical post-style fixtures that provide low-intensity ambient lighting while also serving to physically demarcate spaces. Corten steel bollard lights are significantly heavier than standard aluminum fixtures and therefore require secure ground anchoring to remain upright and level during strong winds or accidental impacts.
Corten Steel Pole Lights
Pole lights are mounted atop elevated structures, stone columns, or dedicated wooden and metal posts. They serve as focal point lighting for driveways, entrance gates, and the perimeter walls of outdoor living areas.
Corten Steel Wall Lights
Corten steel wall lights and surface-mounted lights are installed directly on building exterior walls, retaining walls, or building facades. Installation requires the use of a weatherproof mounting plate to prevent moisture from penetrating the wall cavity and to manage iron oxide deposits that run down the exterior walls.
Weathering Steel Spotlights and Floodlights
Spotlights can highlight specific landscape elements, such as mature trees, sculptures, or weathering steel architectural panels with unique textures. These directional fixtures require flexible ground stakes, sturdy swivel mounts, and heat-resistant glass components.
Solar Weathering Steel Lights vs. Low-Voltage Weathering Steel Lights
► Solar Corten Steel Lights: Equipped with built-in solar panels and lithium-ion batteries. They are easy to install and require no wiring, but they have lower light output, and their performance may decline in winter.
► Low-Voltage (12V–15V) Corten Lights: Require connection to a central landscape transformer. They provide reliable, bright, year-round lighting and support precise dimming and smart automation controls.
3. Plan Your Outdoor Lighting Layout
Define the Purpose of Each Light
Determine whether a light fixture is intended for functional task lighting (such as illuminating stair treads), safe navigation along paths, perimeter security, or decorative accent lighting for plants and architecture.
Identify Paths, Stairs, Entrances, and Visual Focal Points
Walk through your property with a flashlight at dusk and mark key areas. Prioritize areas with elevation changes, dimly lit turns on sidewalks, main building entrances, and distinctive landscaping features.
Distinguish Between Accent Lighting, Pathway Lighting, and Security Lighting
Balance the lighting effects across different levels. Use low-glare downlights along pathways, soft uplights on weathering steel panels or trees, and install streetlight poles with higher lumen output near driveway entrances or high-traffic intersections.
Determine Fixture Spacing
Overlapping light cones can create glaring hotspots and cause visual fatigue. Based on beam angle and lumen output, space path lights approximately 6 to 10 feet apart. Streetlight poles typically require spacing of 8 to 14 feet to maintain a balanced illumination of dark areas.
Avoiding Glare and Excessive Light Overlap
When arranging light sources, ensure that the lens angle is directed away from the direct line of sight of patio seating, windows, and main walkways. Use fixtures with integrated shades or louvers to control light spill.
4. Check the Product Specifications
Confirm the Operating Voltage
Please confirm whether your Corten lights require 12V AC/DC low voltage, 24V DC, or operate directly on 120V line voltage. Mixing lights with incompatible voltage specifications can cause LED modules to burn out or result in system-wide failure.
Check the Light Fixture Power Rating
Please record the exact power and volt-ampere (VA) ratings for each light fixture in your design. You will need these values to select a properly rated transformer and prevent circuit overloads.
Confirm Outdoor or IP Rating
Ensure that luminaires installed in outdoor flower beds have a minimum IP65 rating (dust-tight and resistant to high-pressure water jets). For spotlights installed close to the ground or exposed to heavy splashing, an IP67 rating is recommended.
Review Installation and Anchoring Methods
Check whether the light fixture uses an ABS ground plug, a surface-mount flange, or a J-bolt concrete anchoring assembly. Heavy-duty weather-resistant steel light poles require sturdy anchoring to withstand heavy wind loads at the top.
Verify Cable and Connector Compatibility
Check the gauge of the leads connected to the light fixture (typically 16 or 18 gauge) and ensure they are a perfect match for your 12 or 10 gauge low-voltage landscape lighting main cable.
Read the Manufacturer’s Installation Instructions
Before unpacking and assembling the components, carefully review all internal wiring diagrams, temperature limits, gasket installation procedures, and warranty terms provided by the manufacturer.
5. Prepare Tools and Materials
Basic Hand Tools
► Shovels, trenching shovels, and hand trowels
► Wire strippers and wire cutters
► Levels and tape measures
► Screwdrivers and adjustable wrenches
► Rubber mallets (for driving stakes)
Low-Voltage Landscape Lighting Cable
Choose 12/2 or 10/2 AWG direct-burial, UV-resistant landscape lighting cable. The thicker 10 AWG cable minimizes voltage drop over long runs.
Waterproof Outdoor Connectors
Never use standard wire caps outdoors. Use gel-filled twist-on connectors, silicone-filled wire caps, or mechanical clamp-type junction boxes specifically designed for direct burial.
Transformers, Timers, or Light Sensors
Select a landscape transformer with multi-step voltage adjustment (12V–15V), made of stainless steel or heavy-duty plastic, featuring weatherproof sealing, and equipped with an integrated light sensor or digital timer.
Gravel, Concrete, Ground Stakes, or Mounting Hardware
Have pea gravel on hand for the drainage layer, quick-setting concrete mix for the bases of ground stakes, and 316 stainless steel mounting screws to prevent electrochemical corrosion when installing fixtures.
Conduit and Cable Protection
Prepare Schedule 40 PVC conduit or flexible non-metallic conduit to protect wiring in high-risk locations, such as where cables exit flower beds or run beneath lawn paths.
6. Prepare the Installation Site
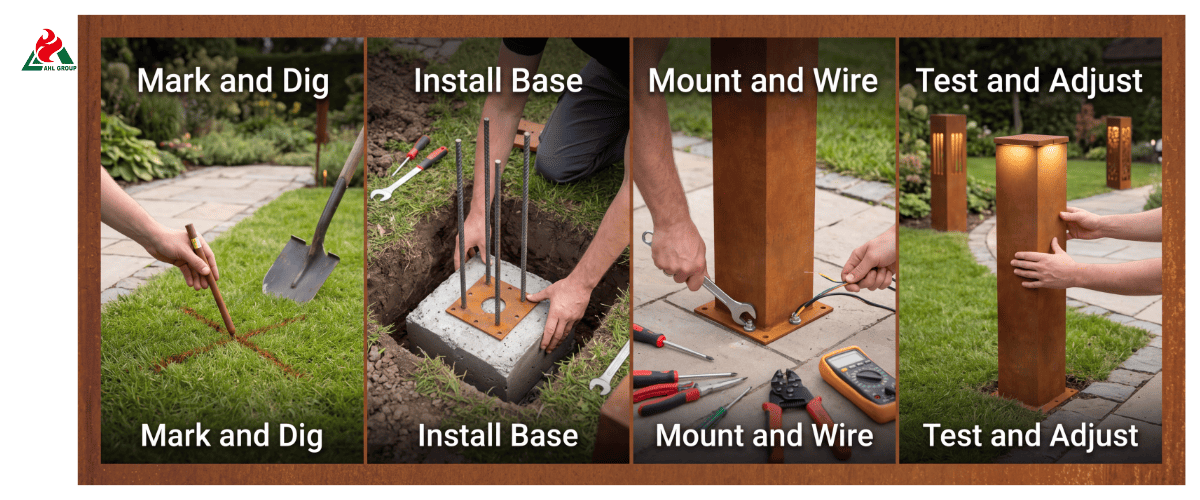
Mark the Location of Each Light Fixture
Place flags or stakes at each planned installation location in the landscape layout to verify visual balance and cable routing before construction begins.
Check for Underground Utilities
Before digging, call your local utility line-locating service (e.g., 811 in the U.S.) to have underground gas, electrical, fiber-optic, and water lines marked.
Remove Rocks, Tree Roots, and Debris
Clear sharp rocks, aggressive tree roots, and organic garden waste along the cable trench and around the light fixture installation bases.
Create a Stable, Level Base
Compact the native soil at each garden light installation location. Lay a 2-inch-thick layer of compacted crushed stone or coarse sand as a base to form a solid, settled foundation.
Improve Drainage in Clay or Compacted Soil
In dense clay, dig pilot holes 4 inches deeper than actually required and backfill the excess depth with coarse gravel. This prevents standing water from accumulating directly around the buried cables and base plates.
Ensure the Light Fixture Base Is Above the Water Level
Position the light fixture mounting flange and cable entry port 1 to 2 inches above the adjacent ground level to prevent ground moisture from seeping into the internal component housings.
Protect Adjacent Paving Surfaces from Rust Runoff
Weathering steel sheds fine rust particles during the initial weathering phase (the first 6 to 18 months). A protective gravel barrier can be laid over adjacent light-colored stone paving surfaces, or a concrete sealer can be applied, to prevent them from being permanently stained by orange-colored oxides.
7. Install Corten Steel Lights
Assembling the Light Fixture
Following the product diagram, screw the Corten steel pole into the lamp head housing. Tighten all internal seals and rubber O-rings by hand to prevent water ingress.
Installing the Ground Stake
Screw a heavy-duty composite or metal ground stake into the base of the Corten steel pole. Ensure the cable passage groove remains unobstructed.
Prepare the Soil or Pre-drill a Hole
Never hammer Corten steel lights directly into dry ground. First, use a metal rod or hand trowel to pre-drill a narrow guide hole in the soil.
Avoid Damaging the Fixture When Inserting the Ground Anchor
Hold the ground anchor by its collar (not the decorative weathering steel cap) and gently push it into the pre-drilled guide hole to prevent the component from bending or breaking.
Check Height and Vertical Alignment
Place a torpedo level against the side of the pole and verify that the path light is vertical from both the front and side angles.
Ensure the Streetlight is Kept Away from Lawn Mowing Equipment
Position the streetlight pole at least 6 to 12 inches from the edge of the lawn to prevent the blades of lawn mowers and edgers from striking the Corten steel surface.
Confirm the Beam Direction
Rotate the adjustable streetlight shade so that the light illuminates the walking surface rather than shining directly into the eyes of oncoming pedestrians.
8. Route the Low-Voltage Cable
Measuring the Cable Route
Use a tape measure to plan the main cable route along the edge of the bed. To account for trench contours, obstacles, and connection loops, add 10% to 15% to the calculated length.
Choose a Daisy-Chain or Hub-and-Spoke Layout
► Daisy-Chain Layout: A single, continuous cable runs from one light fixture to the next. Installation is simple, but voltage drops can occur during long-distance wiring.
► Hub/T-Configuration: Run a single, thick main line to a central underground junction box, then branch off equal-length lines to each lighting group to ensure even voltage distribution.
Leave Extra Cable at Each Light Fixture
At each metal light, bury 12 to 18 inches of excess cable underground. This extra length allows you to easily adjust the position of the fixtures if you redesign your garden in the future.
Avoid Cable Contact with Sharp Metal Edges
Wrap contact points with split conduit sleeves to prevent the cable jacket from being scratched by sharp edges of weathering steel or stone borders.
Protect Wires at Crossings and Entry Points
When wires pass under paved walkways, cross garden cart paths, or run near lawn edges, route them through rigid PVC conduit.
Use Waterproof Wire Connectors
Use silicone-filled wire caps or gel-filled snap-on connectors to join the ends of the wires. Before crimping, clean any dirt from the copper wire strands to ensure good electrical contact.
Label Each Cable Run
► Mark cable branches with weather-resistant labels on the transformer housing to facilitate future circuit tracing and system troubleshooting.
► Bury or conceal cables underground according to local requirements
► Bury the main cable lines in loose subsoil at a depth of 6 to 8 inches. Cover the trench with clean backfill soil, avoiding sharp stones that could cut through the cable insulation over time.
9. Connect the Lights to the Transformer
Turn Off the Transformer Power
Before performing any wiring work, unplug the transformer from the GFCI outlet and ensure that the main switch is in the off position.
Prepare the Cable Ends
Use precision wire strippers to strip 1/2 inch of the outer insulation from the main direct-burial power cable, taking care not to damage the inner copper strands.
Connecting the Common Terminal
Insert one conductor from the main cable into the transformer’s “COM” (common) terminal block and tighten the screw connector with a torque wrench.
Selecting the Correct Voltage Tap
Insert the corresponding cable conductor into the appropriate output voltage terminal:
► For lines less than 50 feet in length, use the 12V tap.
► For lines longer than 80 feet, use the 13V or 14V tap to compensate for the calculated voltage drop.
Tighten the Terminals Securely
Loose terminal connections can cause sparks, build up heat, and lead to voltage spikes. Pull on each wire to ensure the terminal clamps securely grip the exposed copper wire.
Protect Cable Entrances
Route cables through the rubber grommets or pressure-reducing bushings at the bottom of the transformer cabinet to prevent rain, insects, and dust from entering.
Close the Transformer Cabinet Door
Lock or secure the transformer cabinet door to ensure a weatherproof seal.
Ensure Easy Access to the Transformer
Keep the area around the transformer clear to allow for seasonal timer adjustments and voltage tests. Do not bury the equipment under thick coverings or hide it behind dense shrubs.
10. Corten-Specific Installation Considerations
Allow Rust to Form Naturally
Weathering steel is shipped from the factory either unweathered (retaining its original steel-gray color) or partially pre-oxidized. Its distinctive dark brown rust requires 6 to 18 months of alternating wet and dry weather cycles to fully form a protective surface barrier.
Install Drainage Around the Light Fixture Base
Weathering steel relies on alternating dry and wet atmospheric cycles to form a stable oxide film. If the Corten garden light base remains submerged in standing water for extended periods, the steel will continue to rust, eventually leading to surface pitting or structural failure. Be sure to install a well-drained gravel base.
Prevent Rust Water from Running onto Concrete and Paving Stones
During the first 6 to 12 months, rainwater will wash away active iron oxide particles from the surface of new Corten light fixtures. To avoid permanent staining of light-colored concrete, stone pavers, or wooden decks:
► Lay a 4- to 6-inch-wide border of dark granite gravel around the base of the Corten post to collect flowing rust water.
► Before installation, pre-weather the Corten surface using a chemical rust accelerator.
► Apply a penetrating masonry sealer to adjacent concrete surfaces to prevent rust stains from seeping into open pores.
Use Compatible Stainless Steel or Coated Fasteners
When installing Corten steel light fixtures, be sure to use 304 or 316 grade stainless steel screws, washers, and anchor bolts. Galvanized or low-carbon steel fasteners in contact with Corten steel can cause electrochemical corrosion, leading to fastener failure and instability of the light fixture.
11. Troubleshoot Corten Outdoor Lights
One Light Won’t Turn On
► Check the LED bulb or light module to see if it’s burned out.
► Expose the direct-buried cable joint leading to that specific light fixture and check for loose wires or water damage.
► Use a multimeter to test the voltage on the leads to confirm that power is reaching the branch circuit for that light fixture.
Multiple Lights Are Not Working
► Inspect the main run between the last working light and the first one that isn’t working for any breaks caused by recent digging or lawn edging.
► Check for any underground shifts that may have caused loose connections in intermediate junction boxes or wire caps.
The Last Light Is Too Dim
► Measure the line voltage at the last light—it has likely dropped below 10.5 V AC.
► Switch the transformer's main power supply line to a higher output setting (for example, from 12 V to 14 V).
► Use thicker No. 10 wire to split the long single-wire run into two parallel circuits.
Lamps Experience Intermittent Flickering
► Check the transformer’s screw terminals to ensure the main line conductors are securely clamped.
► Replace damaged cable connectors with gel-filled screw-on nuts.
► Verify that the total power load does not exceed the transformer’s rated capacity.
Frequent Tripping of the Ground Fault Circuit Interrupter (GFCI) Outlet
► Unplug the transformer. If the outlet still trips, it indicates that the GFCI outlet itself is faulty or has water inside.
► If the outlet trips only when the transformer is plugged in, inspect the main circuit for a short circuit in the underground cable, exposed copper wires coming into contact with damp soil, or water inside the junction box.
Water Seeping into Cable Connections
► Cut off the damp end of the copper wire until clean, shiny copper is exposed.
► Strip the insulation from the wire again and install a new gel-sealed, direct-burial cable connector.
Post Lights or Pole Lights Becoming Unstable
► Check the hex nuts on the anchor plate to see if the threads have loosened due to wind-induced vibration.
► Use 316 stainless steel lock washers to retighten the base fasteners.
► If the underlying ground has settled, fill the area beneath the edges of the concrete base with crushed stone to restore level alignment.
Rust Stains on Nearby Surfaces
► Scrub the affected light-colored concrete or stone pavers with a specialized oxalic acid masonry cleaner or rust remover.
► Lay a 4-inch-wide ring of gravel around the weathering steel base to collect runoff containing airborne oxides, then seal the adjacent pavers with a penetrating silane-siloxane concrete sealer.
12. Maintain Corten Outdoor Lights
Remove Fallen Leaves and Dirt from the Fixtures
Each spring and fall, remove fallen leaves, mud splatters, and wet soil from the Corten steel lamp bases to promote the natural cycle of drying and wetting and to maintain the protective rust layer.
Clean the Lenses and LED Shades
Use a soft microfiber cloth dampened with warm water and mild dish soap to wipe down glass and acrylic lamp lenses to remove mineral deposits and maintain clear light output.
Inspect Cables and Connectors
Annually inspect the shallow cable runs buried along the perimeter of flower beds and re-cover any exposed wires that have shifted due to frost heave or soil erosion.
Inspect Mounting Hardware
Before the onset of severe winter, retighten all stainless steel mounting bolts, fastening screws, and ground stake connectors to prevent the fixtures from becoming loose due to wind.
Keep Bases and Drainage Areas Clear
Use a rake to remove thick layers of debris around Corten steel lamp posts and from the drainage holes in streetlight poles to maintain airflow around the metal bases.
Test Timers or Photocells
Clean dust from the photocell sensors every six months, and reset digital timers after seasonal daylight saving time adjustments.
Check for Abnormal Corrosion
Look for signs of flaking black rust scales or localized pitting at the joints, as these indicate that the area has been exposed to water for an extended period. Gently brush away the flaking rust with a wire brush to expose the fresh metal surface, allowing a healthy layer of rust to naturally reform.
Prepare Lighting Fixtures for Severe Winter Weather
In extremely cold weather, clear snow from around light poles to prevent melting snow from flooding low-lying lamp heads or causing ice to form inside electrical connections.
Replace Damaged Electrical Components Promptly
Immediately replace cracked glass lenses, damaged rubber gaskets, or worn leads to prevent moisture from entering the internal LED driver components.
.png)
13. Frequently Asked Questions
Q1: Is It Difficult to Install Corten Outdoor Lights?
For DIY enthusiasts who are familiar with basic tools, can dig shallow trenches, and know how to make waterproof wire connections, installing low-voltage (12V) Corten lights is very simple. Only the 120V mains connection requires a licensed electrician.
Q2: Can Corten Garden Lights Be Installed Directly in the Soil?
Small path lights equipped with composite or stainless steel ground stakes can be inserted directly into the soil. Heavier Corten pathway lights, however, must be installed on a gravel base or a poured concrete foundation to maintain vertical stability and prevent the structure from sinking.
Q3: Can Corten Lights Be Used with a 12V Landscape Lighting System?
Yes. Most modern Corten landscape lights feature built-in 12V AC/DC LED drivers, making them compatible with standard low-voltage landscape transformers and 12/2 in-ground wiring.
Q4: Do Corten Post Lights Require a Concrete Foundation?
Tall or heavy Corten column lights (typically those over 18 inches in height or weighing more than 15 pounds) require a concrete base with anchored J-bolts to withstand wind loads, impacts from lawn mowers, and soil settlement.
Q5: How Deep Should Low-Voltage Lighting Cables Be Buried?
In landscape flower beds, low-voltage cables should be buried at least 6 inches deep. When cables cross open lawn paths or high-traffic garden areas, they should be buried 8–12 inches deep and protected by placing them inside rigid PVC conduit.
Q6: How Can Rust Runoff Be Prevented?
Rust runoff can be prevented by using pre-weathered weathering steel lamps, laying a dark-colored gravel border around the lamp base to absorb the runoff, or applying a penetrating masonry sealer to adjacent concrete surfaces.
Q7: Do Corten Steel Outdoor Lighting Fixtures Require Special Maintenance?
No painting or chemical rust-proofing is required. Maintenance consists solely of cleaning the lampshades, removing dirt and debris from the drainage holes, and inspecting the mounting hardware once a year.
Conclusion: Review of Key Installation Steps
The key to successfully installing Corten outdoor lights lies in thorough planning: layout design, precise transformer load calculations, solid site preparation, neat cable routing, and proper voltage management.
Use lightweight path lights in combination with ground stakes driven into well-drained soil, and secure tall Corten post lights to stable concrete bases equipped with PVC conduit.
Be sure to plug the transformer into a ground-fault circuit interrupter (GFCI) outlet with a protective cover when in use, use gel-filled, direct-burial connectors for all wire joints, and comply with local electrical codes.

