


Freestanding Corten steel privacy screens are an excellent way to enhance the aesthetic appeal of your outdoor space while ensuring privacy, defining areas, blocking unwanted views, and adding architectural character to gardens and patios. Unlike wall-mounted screens, they do not rely on existing structures or fences for structural support, so the design of the foundation and posts is critical.
Freestanding screens also offer exceptional flexibility. They can separate a dining area from the lawn, provide screening for an outdoor kitchen to conceal equipment, or create a visual boundary without the need to build a permanent masonry wall.
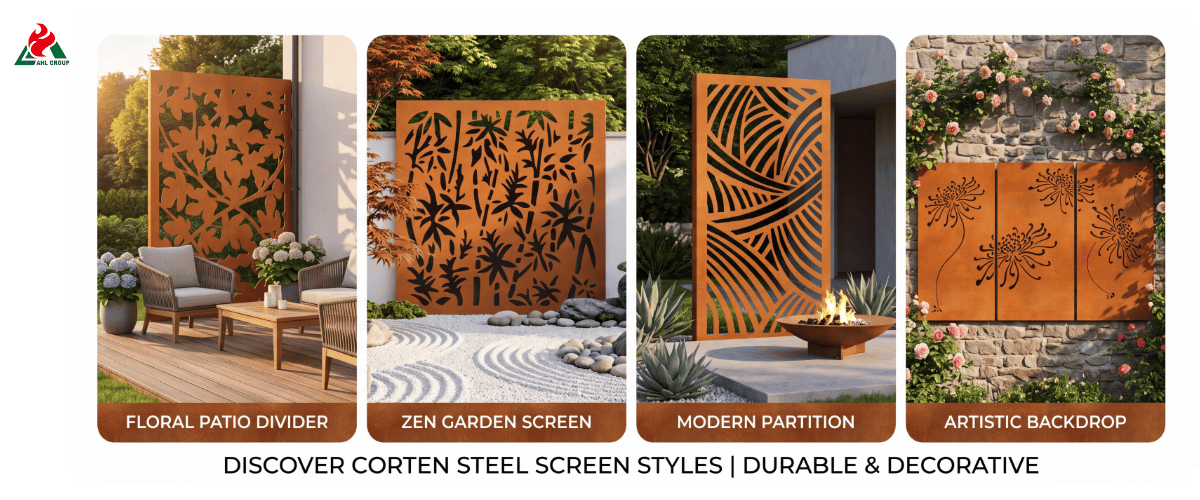
Freestanding screens also offer exceptional flexibility. They can separate a dining area from the lawn, provide screening for an outdoor kitchen to conceal equipment, or create a visual boundary without the need to build a permanent masonry wall.
1. Introduction
Why Freestanding Weathering Steel Screens Are So Popular
Freestanding Corten screens have become an integral part of modern architectural landscape design. Property owners choose weathering steel not only for its unique and warm rust-colored aesthetic but also for its structural rigidity and exceptionally long service life—all without relying on chemical coatings. Unlike traditional wooden fences or composite latticework, weathering steel screens serve as both a maintenance-free privacy barrier and a highly artistic architectural feature.
What This Guide Will Help You Achieve
This installation manual provides a step-by-step guide for erecting freestanding, non-structural weathering steel privacy screen systems. Whether you are installing decorative laser-cut panels above soil-filled planters, anchoring them to a concrete patio, or mounting them on a wooden deck, this guide covers topics such as foundation depth, post reinforcement, wind load management, and fastening sequences.
2. Planning Your Freestanding Corten Privacy Screen
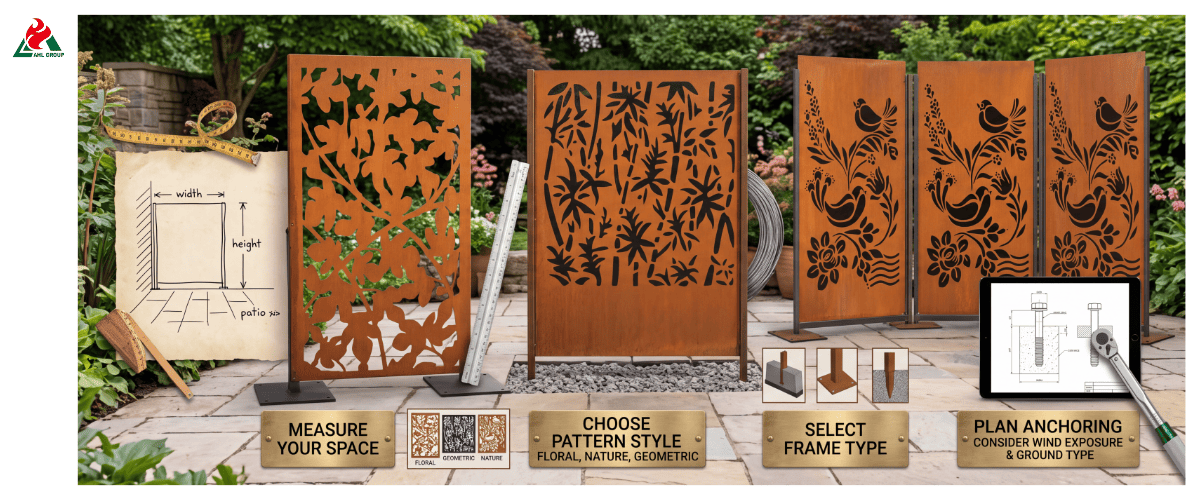
Measure the Installation Area
Use a steel tape measure to accurately map out the installation path. Use a mason’s line strung between wooden stakes to establish a straight baseline. Measure the total length, and note any changes in slope, underground utilities, or transitions in the ground surface (e.g., the transition from soil to concrete).
Select the Screen Height (1.5 M, 1.8 M, 2.2 M or Taller)
Choose the appropriate height based on the screen’s privacy function and wind exposure:
► 1.5 meters (5 feet): Suitable for low patio dividers, garden partitions, or decorative boundary fences.
► 1.8 meters (6 feet): Suitable for visual privacy around outdoor seating areas, hot tubs, and pool decks; this is the standard height.
► 2.2 meters or higher (7 feet or higher): Used as tall barriers to block views from multi-story neighboring buildings (requires reinforced posts and deeper footings).
Calculate the Total Amount of Materials Required
Before starting construction, prepare a detailed materials list:
► Corten steel sheets: Total length divided by the width of a single steel sheet.
► Support posts: Total number of steel panels plus one end post (add corner posts if there are corners).
► Concrete bags: Each post hole requires 2 to 3 bags of standard 20-kilogram ready-mix concrete.
► Stainless steel fasteners: Each steel panel requires 8 to 12 structural bolts or screws.
Check Local Regulations and Property Lines
Please consult your local municipal building codes to understand regulations regarding fence height, setbacks from property lines, and safety clearances from underground utilities. Before digging foundation holes for fence posts, please call your local utility locator service.
3. Tools and Materials Required
Essential Tools: Shovel, Level, Tape Measure, Electric Drill
Prepare the following primary hand and power tools: post-hole digger/shovel, 120-centimeter level, 10-meter steel tape measure, heavy-duty cordless drill/screwdriver equipped with masonry and metal drill bits, chalk line, and rubber mallet.
Materials: Weathering Steel Plate, Structural Posts, Concrete
Ensure that all steel plates are genuine weathering steel compliant with ASTM A588 or A242 standards. Use matching weathering steel or heavy-duty powder-coated steel square tubing posts (50 × 50 × 3.0 mm or 75 × 75 × 3.0 mm). Use fast-setting structural concrete (with a compressive strength of at least 25 MPa).
Fasteners: Stainless Steel Screws and Brackets
Use 304 or 316 grade stainless steel self-tapping screws, or M8 hex head bolts with neoprene isolation washers. The neoprene washers prevent direct contact between the stainless steel and the weathering steel, thereby eliminating electrochemical corrosion.
Safety Equipment: Gloves, Safety Goggles, Knee Pads
The edges of laser-cut Corten steel panels are sharp, and the sheets are heavy (15 to 35 kilograms each). Please wear thick leather work gloves, ANSI-compliant safety goggles, steel-toed boots, and knee pads.
Optional: Post-hole digger, wheelbarrow, mixing tools
For projects requiring the installation of three or more posts, we recommend renting an electric post-hole digger (with a drill bit diameter of 150 to 200 millimeters) to speed up the digging process. A 90-liter wheelbarrow and a shovel can be used to mix the concrete efficiently.
4. Foundation Options for Freestanding Screens
Concrete Foundation Method (Most Stable)
The underground concrete foundation method is the industry standard for freestanding garden screens. The posts are embedded directly into wet concrete below the frost line, providing maximum resistance to wind loads and ground movement.
Ground-Embedded Posts (Suitable for Soil/Lawn)
For natural soil, lawns, or flower beds, a poured concrete foundation prevents the heavier upper section of the screen from tilting over time due to soil moisture fluctuations.
Surface-Mounted Base Plate (Suitable for Patios/Balconies)
When installing on an existing concrete slab, use steel posts equipped with a welded base plate (150 × 150 × 8 mm). These base plates can be secured to cured concrete using expansion anchors or chemical anchors.
Anchor Method (Suitable for Existing Concrete)
When installing on existing concrete slabs, use structural anchors (such as M10 or M12 stainless steel expansion anchors or epoxy anchors) driven at least 80 mm into solid concrete.
Counterweight Base Solution (Suitable for Temporary Installations)
For courtyard displays, trade shows, or temporary privacy screens, Corten steel panels can be mounted on wide planters or counterweight base trays. Such systems rely on ballast (soil, gravel, or stones) rather than ground anchors for stability.
5. Step-by-Step: Installing Concrete Footings
Mark the Post Holes with a String Line
Drive wooden stakes into the ground 50 centimeters outward from each end of the planned privacy screen line. Stretch a high-tension mason’s string line tightly between the stakes to establish a reference line. Use brightly colored spray paint to mark the exact center points of the post holes along the string line.
Dig the Holes: 60–80 Centimeters Deep (1/3 of the Screen’s Height)
Use an auger or a hand-held post hole digger to dig the post holes. For a 1.8-meter-tall privacy screen panel, the hole should be at least 60 centimeters deep. In cold climates, extend the foundation below the local frost line to prevent frost heave.
Hole Diameter: 3×Post Width (Typically 50×50 Centimeters)
The diameter of the foundation hole should be approximately three times the width of the post. For 50 × 50 mm square posts, dig a hole with a diameter of at least 15 to 20 centimeters (or a square foundation pit measuring 30 × 30 centimeters).
Lay a 5–8-centimeter Layer of Crushed Stone for Drainage
Lay a 5- to 8-centimeter-thick layer of coarse crushed stone (20-millimeter aggregate) at the bottom of each foundation pit. Compact the crushed stone using the end of the post. This drainage layer allows groundwater to drain away from the base of the steel column, preventing internal rust.
Position the Column and Check Verticality with a Level
Place the column on the crushed stone base. Use a column level or a standard two-way level, resting against both sides of the column, to ensure it is vertical (90°). Clamp the steel column with wooden braces to temporarily secure it.
6. Pouring and Curing Concrete
Mix the Concrete to the Proper Consistency
Mix structural concrete with clean water in a wheelbarrow or portable mixer. The concrete should be mixed to a consistency that is firm and easy to work with—similar to thick oatmeal. Avoid making the concrete too wet, as excess water will reduce the final compressive strength.
Fill the Void Around the Post Evenly
Scoop the concrete evenly into the space around the reinforced post. Use scrap rebar or wooden stakes to tamp the wet concrete repeatedly to remove air pockets and ensure the concrete is in full contact with the steel post.
Slope the Concrete Surface Away from the Post to Ensure Drainage
Use a trowel to level the top of the wet concrete base, raising it 2 to 3 centimeters above the ground. Slope the surface downward and toward the outside of the column in all directions. This sloped “protective ring” directs rainwater away from the base of the column, preventing water accumulation that could cause the steel to rust.
Reinforce the Column During Curing (24–48 Hours)
Keep all temporary wooden supports securely fastened for at least 24 to 48 hours. Avoid bumping or moving the column while the concrete is setting.
Full Curing Time Before Panel Installation (7 Days)
Although fast-setting concrete hardens within a few hours, allow the foundation to cure for at least 3 to 7 days before hanging heavy weathering steel screen panels. Hanging heavy metal panels too early may cause the curing concrete to crack and cause the columns to become misaligned.
7. Installing Screen Panels to Posts
How to Handle Panels with a Partner
When handling laser-cut Corten outdoor screens, be sure to work with a partner. When lifting, grip the solid edges of the panel—not the decorative cut-out patterns—and keep your back straight to prevent injury.
Align Pre-drilled Holes with Brackets
Place the panel between the cured posts. Use heavy-duty F-clamps or C-clamps fitted with rubber pads to temporarily secure the panel to the posts, protecting the weathering steel surface.
Use Shims to Maintain an Even Ground Clearance (2–5 cm)
Place wooden or plastic shims (2 to 5 centimeters thick) on the ground beneath the panel. Placing the panels on these shims ensures a consistent gap along the entire bottom edge of the screen.
Leave a 3–5 mm Expansion Joint Between Panels
Weathering steel expands and contracts with changes in ambient temperature. Maintain a 3 mm to 5 mm gap between the edges of adjacent panels and the support posts to prevent warping during hot summers.
Start at One End and Proceed Methodically
Begin installing the panels at a fixed end post or corner post. Secure the first panel completely before installing the second one, then continue installing the panels sequentially downward along the guide line to avoid cumulative alignment errors.
8. Securing Panels with Fasteners
Use Stainless Steel Screws (Every 30–40 Centimeters)
Insert 316 stainless steel self-tapping screws or M8 structural bolts through the mounting holes in the screen panel and into the steel column. Along the two vertical edges, space the fasteners 30 to 40 centimeters apart.
Bottom-to-Top Installation Sequence
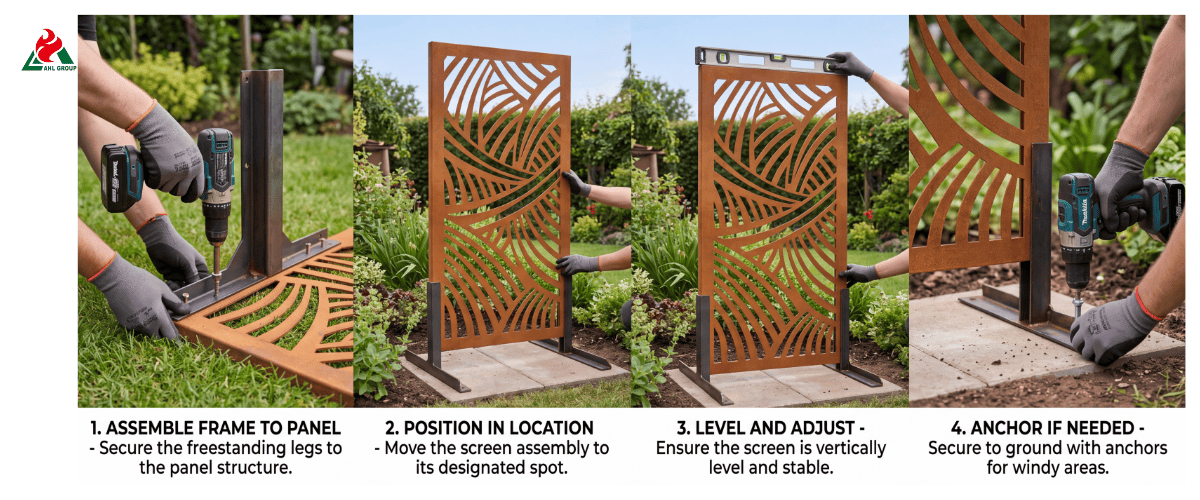
Tighten the fasteners in a bottom-to-top sequence. First, tighten the bolts at the bottom corners to secure the clearance from the floor, then work your way up the panel while checking for vertical alignment.
Avoid Over-Tightening to Prevent Deformation
Tighten the screws just enough to lightly press the neoprene spacer washers against the steel. Never use an impact wrench to apply excessive torque to the fasteners, as excessive force can cause metal deformation or damage to the rubber washers.
Check Panel Alignment After Tightening Each Screw
After tightening each pair of screws, place a level against the edge of the panel to confirm that it remains vertical. Make minor adjustments before tightening the remaining fasteners.
Ensure All Panels Are Level and Vertical
Periodically step back 5 meters and visually inspect the top edge of the partition. The tops of all panels should form a neat, continuous horizontal line across the entire installation section.
9. Ensuring Stability and Wind Resistance
Verify the Burying Depth of Posts (at least 60 centimeters)
Strong winds can exert significant lateral forces on solid or low-porosity laser-cut screen panels. Ensure that all structural posts are embedded in a solid concrete foundation to a depth of at least 60 centimeters (24 inches).
Add Cross-Bracing for Tall Screens (Over 2 Meters)
For privacy outdoor screens taller than 2.0 meters, add diagonal rear braces (40 × 40 × 3 mm steel profiles) that extend downward at a 45° angle from the top third of the posts to the auxiliary foundation.
Use Ground Anchors in High-Wind Areas
In open coastal areas or exposed mountaintop environments, heavy-duty ground anchors or deep concrete piles should be installed to secure the rear diagonal braces.
Install a Counterweight Base to Enhance Stability
If your landscape screen relies on a ground base plate rather than posts embedded in the ground, increase the base plate’s footprint (200 × 200 × 10 mm steel plate) and secure it using M12 chemical anchors, which must be embedded 120 mm into structural concrete.
Test the partition by gently shaking it after installation
After installation, apply steady pressure by hand to the center of each panel and the top of each upright. The frame should remain rigid, with no noticeable deflection in the uprights and no looseness at the joints.
10. Special Considerations for Different Surfaces
Installation on Soil and Lawn Areas
When installing on soil or lawn areas, be sure to use the wet-pour concrete foundation method. Never backfill post holes with soil alone; uncompacted soil will quickly become loose when exposed to water, causing the fence to tilt.
Installation on an Existing Concrete Deck
Ensure that your concrete deck is at least 100 millimeters (4 inches) thick and structurally sound. Use a drill to create anchor holes, and install the post base plates using M10 stainless steel expansion anchors or two-component epoxy masonry anchors.
Installation on a Wooden Deck
Do not anchor freestanding decorative screen posts solely to the surface decking boards. The post anchors should penetrate the decking boards and be secured directly to the underlying joists using M10 or M12 stainless steel through-bolts (with backing plates at the bottom).
Installation on Paving Stones or Stone Surfaces
Do not anchor the base plate directly to thin, decorative patio pavers. Lift the pavers at the column installation location, dig a foundation pit in the underlying soil, pour concrete to the level of the paver base, then reinstall the cut pavers around the column and anchor them to the concealed concrete base.
Adapting to Slopes or Uneven Ground
On sloped ground, you can choose either a stepped layout (keeping the panels level while gradually lowering the height at each post) or a sloped layout (matching the bottom clearance to the natural slope of the ground).
11. Finishing Touches and Drainage
Ensure a 2–5 cm Gap from the Ground
A gap of 2 to 5 centimeters (1 to 2 inches) should be maintained below the lower edge of all panels. Preventing Corten steel from coming into contact with mud and soil helps avoid prolonged exposure to moisture, thereby ensuring the proper formation of the protective rust layer.
Check That Rainwater Runs Away from the Posts
Ensure that rainwater runs away from the bases of the posts. If necessary, re-level the surrounding flower beds to prevent water from pooling around the post bases.
Lay Gravel or Mulch Around the Bases (Optional)
Lay a 5-centimeter-thick layer of decorative aggregate, river pebbles, or bark mulch beneath the screen gaps. This both suppresses weed growth and prevents soil from splashing onto the weathering steel panels during heavy rain.
Install Post Caps as Needed
Install welded weathering steel or UV-resistant plastic post caps on top of the open-box posts. Post caps prevent rainwater from accumulating inside the hollow posts, thereby protecting them from internal corrosion and winter freeze damage.
Clean the Panels After Installation
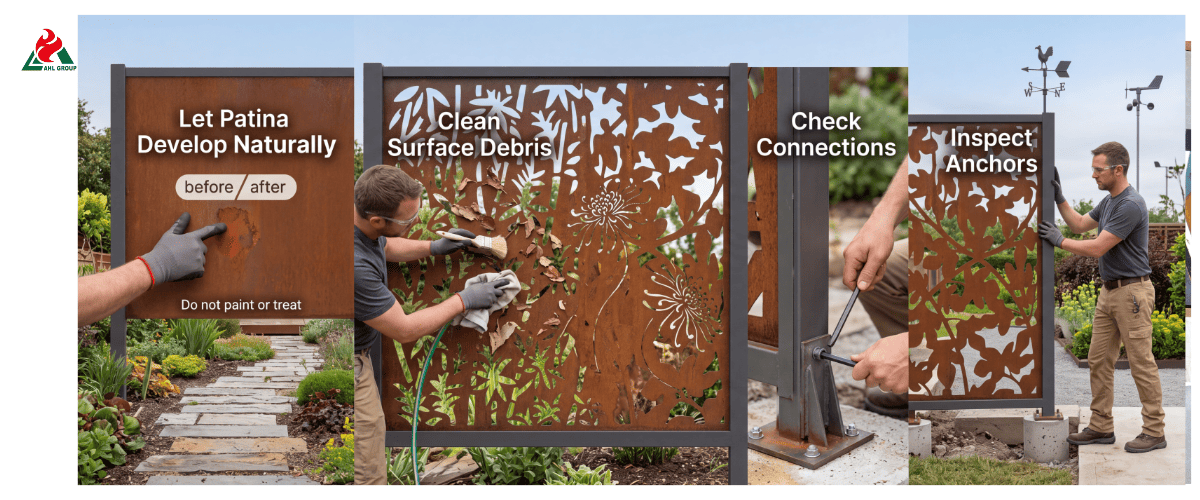
Wipe the panels with clean water and a soft-bristled brush to remove oil stains, dirt, and fingerprints left during installation. A clean surface helps ensure that the natural rust patina forms evenly across the entire outdoor screen.
12. Maintenance After Installation
Annual Inspection of Posts and Fasteners
Inspect your Corten privacy screen every spring. Check all structural post joints, mounting brackets, and stainless steel fasteners to ensure that all components are secure and stable.
Post-Storm Inspection for Looseness
After a severe storm, visually inspect the screen to ensure it remains vertical. Check the base plate, foundation, and structural bracket connections for any displacement.
Clearing Debris from Panel Gaps
Remove leaves, twigs, and garden debris trapped in the bottom gaps or expansion joints. Clearing away damp organic matter allows the steel to dry thoroughly between rainstorms, thereby preserving its protective rust layer.
Monitor Concrete for Cracks or Settlement
Inspect exposed concrete bases for surface cracks or ground settlement. Seal fine capillary cracks in the concrete using exterior-grade polyurethane masonry sealant.
Retighten Fasteners as Needed
Gently retighten any loose mounting screws using a hand wrench. Avoid over-tightening to protect the rubber isolation washers.
13. FAQs
Q1: How Deep Should the Posts for Freestanding Weathering Steel Screens Be Embedded?
The posts for freestanding weathering steel screens should be embedded in a concrete foundation to a depth of at least one-third of their above-ground height. For screens with a standard height of 1.8 meters (6 feet), the foundation pit for the posts should be at least 60 centimeters (24 inches) deep. In areas with a deep frost line or frequent strong winds, the foundation depth should be increased to 75 centimeters to 90 centimeters.
Q2: Can a Freestanding Screen Be Installed on Concrete?
Yes. You can install a freestanding privacy screen on an existing concrete patio or slab using posts with a pre-welded base plate (150 × 150 × 8 mm). Secure the base plate firmly to the concrete slab (at least 100 mm thick) using M10 or M12 stainless steel expansion bolts or structural epoxy anchors.
Q3: Does a 1.5-meter Privacy Screen Require a Concrete Foundation?
Yes. Even a 1.5-meter privacy screen acts like a sail in strong winds and is subjected to immense wind pressure. A concrete foundation securely anchors the support posts, preventing the screen from tilting, sagging, or being blown over during winter storms.
Q4: What Should Be the Spacing Between Weathering Steel Privacy Screen Posts?
The spacing depends on the specific dimensions of each screen panel. The distance between the centerlines of the posts should equal “screen panel width + post width + expansion gap (2 × 3–5 mm).” For standard 1.0-meter-wide screen panels mounted on 50-millimeter posts, the center-to-center spacing between posts is approximately 1,058 millimeters.
Q5: Can Freestanding Weathering Steel Screens Be Blown Over by the Wind?
If proper engineering controls are implemented during installation, they will not be blown over. These screens feature a column-and-base design, with the base embedded in concrete to a depth of one-third of the screen’s height. Combined with structural steel columns (3.0 mm wall thickness) and stainless steel fasteners, they can easily withstand strong wind loads. The laser-cut patterns also allow air to circulate freely, effectively alleviating wind pressure.
Conclusion: Final Recommendations for Building a Stable, Durable Privacy Screen
To successfully construct a freestanding Corten privacy screen panel, simply securing the steel panels to the posts is far from sufficient. First, measure the site dimensions, select appropriate panel heights and post spacing, and assess wind loads. Next, install a structurally sound foundation, carefully align the posts, secure the steel panels with compatible fasteners, and ensure adequate drainage and ground clearance.
For most permanent residential projects, a professionally designed concrete foundation, structurally adequate posts, corrosion-resistant fasteners, controlled panel spacing, and a good drainage system are the foundation for ensuring the screen’s long-term performance.
If the screen exceeds approximately 2 meters in height, is installed in an exposed location, or uses large solid panels, do not rely solely on general installation guidelines. The posts and foundation system should be verified based on local wind conditions and the manufacturer’s structural specifications.
Most importantly, freestanding weathering steel screens should be treated as outdoor structural components, not merely decorative panels. When the foundation, drainage, connections, and wind resistance are properly designed, the weathering steel will naturally develop a patina, while the screen provides the building with years of privacy and a distinctive architectural style.