


Corten steel garden edging has become a popular choice among homeowners, landscape designers, and architects due to its durability, minimalist design, and natural weathered appearance. Unlike traditional plastic, wood, or painted metal edging, Corten steel develops a protective rust patina that changes over time while helping to protect the steel beneath.
The warm, orange-brown appearance of weathering steel pairs particularly well with natural materials such as stone, wood, gravel, and greenery. This makes it suitable for both modern-style gardens and more natural-looking landscapes.
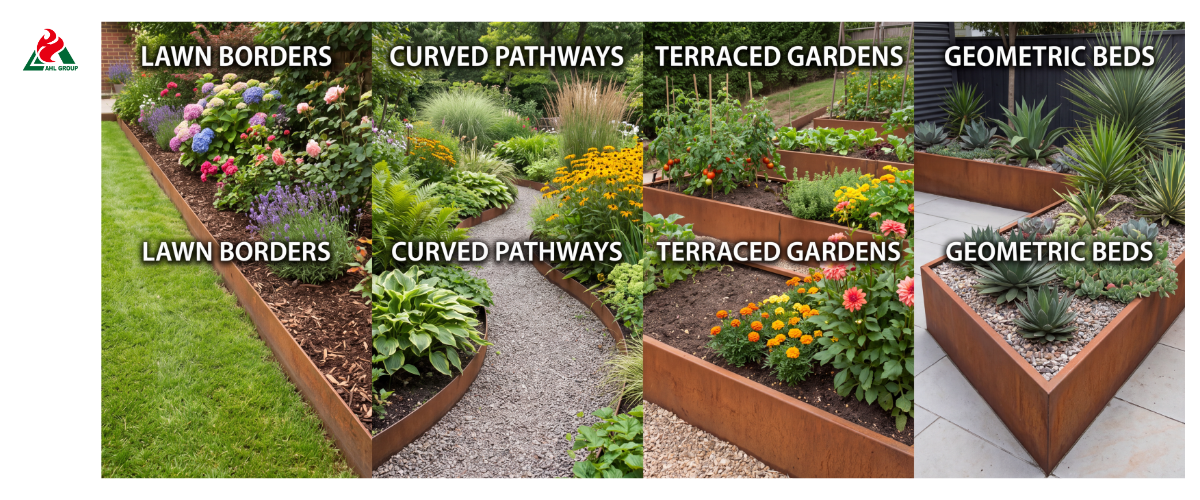
The warm, orange-brown appearance of weathering steel pairs particularly well with natural materials such as stone, wood, gravel, and greenery. This makes it suitable for both modern-style gardens and more natural-looking landscapes.
1. Introduction
Why Corten Steel Edging Is So Popular in Gardens
Landscape designers and home gardeners have long favored Corten steel landscape edging for its sturdy construction and ability to create clean, attractive visual boundaries. Corten steel features a slim, flexible profile and naturally develops a warm, protective rust-brown patina. Unlike plastic edging that cracks in cold weather or wooden edging that rots when in contact with soil, Corten steel not only outlines flower beds, gravel paths, and lawn areas but also forms a sturdy barrier that effectively prevents lawn grass roots from encroaching.
This Guide Will Walk You Through the Following Installation Steps
This installation manual provides step-by-step technical guidance on laying straight sections, creating smooth curves, connecting sections, and backfilling around Corten steel garden edging. Whether you are installing a 100-millimeter (4-inch) residential edging or a 200-millimeter (8-inch) retaining edging, this guide covers the proper trenching, staking, and leveling techniques needed to achieve a neat, long-lasting installation.
Tools and Materials Overview
Before beginning installation, please have the following tools and materials ready:
► Materials: Corten steel edging strips, interlocking joints, ground anchors, and crushed stone/gravel (for soft soil).
► Tools: String line, wooden stakes, rubber mallet, flat shovel/trenching shovel, level (1200 mm), tape measure, marking spray paint, and safety gloves/goggles.
2. Planning Your Layout
Determine the Placement of the Edging
Assess the garden layout to determine how the garden edging will divide soil areas, secure mulch, or separate the lawn from gravel paths. Ensure the top edge of the edging strips is 12 to 25 millimeters (0.5 to 1 inch) above the final level of the lawn or gravel to prevent grass roots from spreading outward, while allowing lawn mower wheels to pass safely over the adjacent lawn.
Mark Straight Lines with String and Stakes
To create a clear, straight border alongside a driveway or rectangular planting bed, drive stakes into the ground at both endpoints. Tighten a masonry string between the two stakes, positioning it 50 millimeters above the ground to serve as a visual guide for trenching and edge alignment.
Use a Hose or Spray Paint to Mark Curves
To create flowing, natural garden borders, lay a heavy-duty garden hose or flexible rope along the ground to form a smooth curve. Once the curve’s outline looks balanced, spray high-visibility landscape marking paint directly alongside the hose to guide your digging.
Measure the Total Perimeter and Allow for Extra Material
Use a flexible tape measure to measure the total perimeter of the planned layout. Calculate the required length of Corten edging and allow for an extra 5% to 8% to account for overlapping joints, corner folds, and end cuts.
Check for Underground Utilities and Obstacles
Before driving a shovel or wooden stake into the ground, contact your local utility locator to determine if there are any underground power lines, gas lines, or irrigation mains. Check the trench route for tree roots, large rocks, or underground concrete foundations, which may require manual removal or layout adjustments.
3. Choosing the Right Corten Edging
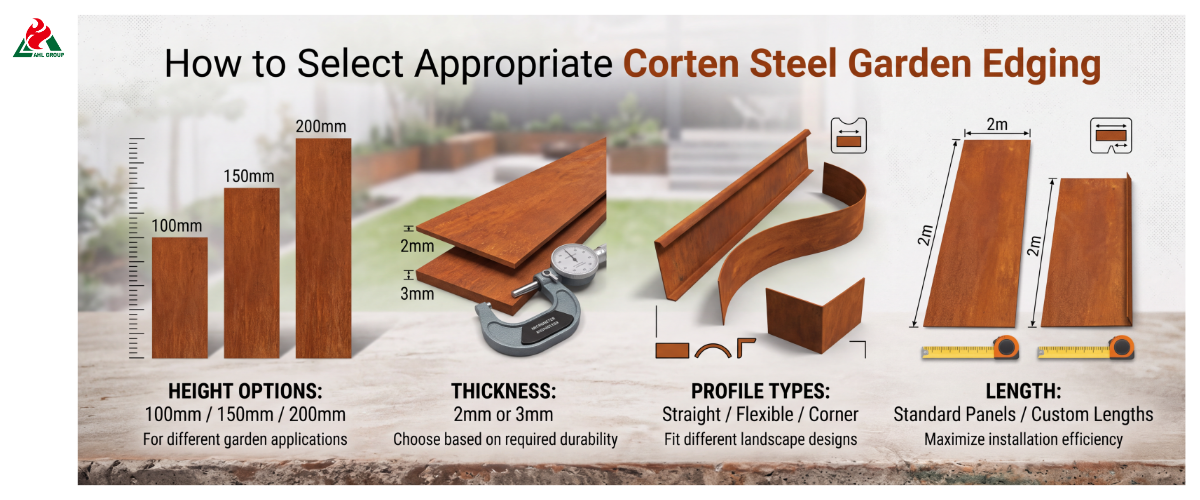
Straight Sections VS. Flexible Edging for Curves
► Edge strips 1.5 mm to 2 mm wide: Extremely flexible; can be easily bent by hand into tight, smooth curves without heating or special tools.
► Thicknesses of 3 mm and above: Provide exceptional rigidity along long straight sections, resisting bending deformation caused by the pressure of heavy soil or gravel.
Pre-weathered vs. Natural Weathering Steel
Unweathered natural weathering steel arrives in deep gray with an oily, mill-finished surface. It requires 3 to 12 months of exposure to outdoor rain and air to develop its distinctive, rich espresso-brown patina. Pre-weathered weathering steel undergoes an accelerated acid passivation process and is delivered with an amber-orange patina.
Connection Systems and Anchor Types
Modern weathering steel edging systems utilize continuous snap-fit interlocking joints, flush-overlapping sleeves, or perforated connection plates. Anchors include flat steel wedges, ribbed rebar pins, or one-piece snap-fit brackets designed to hold the edging in place securely.
Combining Edging with Lawns, Flower Beds, and Pathways
Using 150-millimeter-deep edging in conjunction with fine gravel pathways helps securely hold the aggregate in place. A 100-millimeter low-profile edging creates a neat boundary between lawns and bark-covered flower beds while preventing tripping hazards.
4. Preparing the Ground
Remove Weeds, Sod, and Debris
Along the marked installation line, remove a 150-millimeter-wide strip of sod, weeds, grass roots, and loose stones. Removing vegetation ensures the trench is level and prevents organic matter buried underground from decomposing later, which could erode the base of the edging.
Level and Compact the Soil
Scrape down any mounds of soil along the path and fill in any low spots. Use a hand tamper to compact the soil layer, creating a solid foundation to prevent uneven settling of the metal edging after installation.
Dig a Shallow Trench Along the Layout Line
Using a straight-edged trenching shovel, dig a narrow, vertical trench directly along the spray-painted line or masonry line. Keep the trench width between 30 and 50 millimeters and maintain a consistent width throughout.
Recommended Trench Depth (1/3 to 1/2 of the Board Height)
Bury 33% to 50% of the board’s total height underground. For a standard 150-millimeter (6-inch) edging, dig a trench 50 to 75 millimeters deep. Proper burial depth prevents frost heave in cold climates and counteracts ground movement.
Adjustments for Slopes and Elevation Differences
When installing on sloped terrain, the bottom of the trench should be graded downward in discrete, incremental levels rather than angling the edging strip diagonally. This creates a stepped boundary, ensuring that the top edge remains level despite elevation changes.
5. Step-by-Step Installation Process
Lay the First Section and Check Alignment
Place the first section of Corten metal edging into the trench. Align its top edge with the taut masonry line; if minor adjustments are needed, use wooden wedges under the bottom to adjust the height.
Install the Garden Edging in the Trench at the Correct Height
Place a 1,200-millimeter level across the top edge of the metal strip. Adjust the depth by adding or removing soil from below until the metal edging is level and at the target height above ground.
Connecting Sections: Butt Joints, Lap Joints, and Connectors
Slide the male connector of the second metal border into the female groove of the first section, or align it with the flush lap sleeve. Clamp the joint with clamps, and use a flathead screwdriver and hammer to gently tap the integrated locking tab downward to secure the connection.
Creating Crease-Free Corners and Curves
► 90-Degree Corners: Using an angle grinder fitted with a thin cutting disc (cutting depth approximately 50% of the steel strip’s thickness), score a clean, vertical line on the back of the steel strip, then bend it firmly against a straight wooden block.
► Gentle Curves: Work along the length of the thin steel strip (1.6 mm to 2 mm), applying even pressure with your hand or knee to form a smooth, flowing curve and avoid sharp creases.
Use a level to keep the top edge straight
As you lay the steel strips, continuously place the level across adjacent sections. Adjust the height immediately to ensure the top edge forms a smooth, continuous line, avoiding unsightly dips or bulges.
6. Securing the Edging
Installing Wooden Posts or Ground Anchors
Corten steel garden borders require ground anchors to resist soil movement and maintain vertical alignment. Place the steel posts behind the frame (on the side facing the flower bed or mulch, away from the lawn mower).
Typical Post Spacing (Every 24–36 Inches)
Drive anchor posts into the ground every 600 to 900 millimeters (24 to 36 inches) along straight sections. Secure each post to the boundary panel using self-tapping screws or integrated locking clips.
Reduce Spacing at Curves and in Loose Soil
At sharp turns, in loose sandy soil, or along retaining edges subject to significant soil pressure, reduce the spacing of the ground anchors to 300 to 450 millimeters (12 to 18 inches).
Avoid damaging the edges when driving ground anchors
Use a rubber mallet or a recoil-free hammer to drive the ground anchors into the ground. If using a steel sledgehammer, place a wooden block on top of the stake to absorb the impact and prevent the metal head from deforming or bending.
Install Covers or Clips at Joints
Install decorative, weather-resistant steel covers or sliding clips at open joints. These covers reinforce vulnerable areas against ground movement and provide a neat, uniform appearance along the boundary.
7. Backfilling and Finishing
Backfill Soil on Both Sides of the Frame
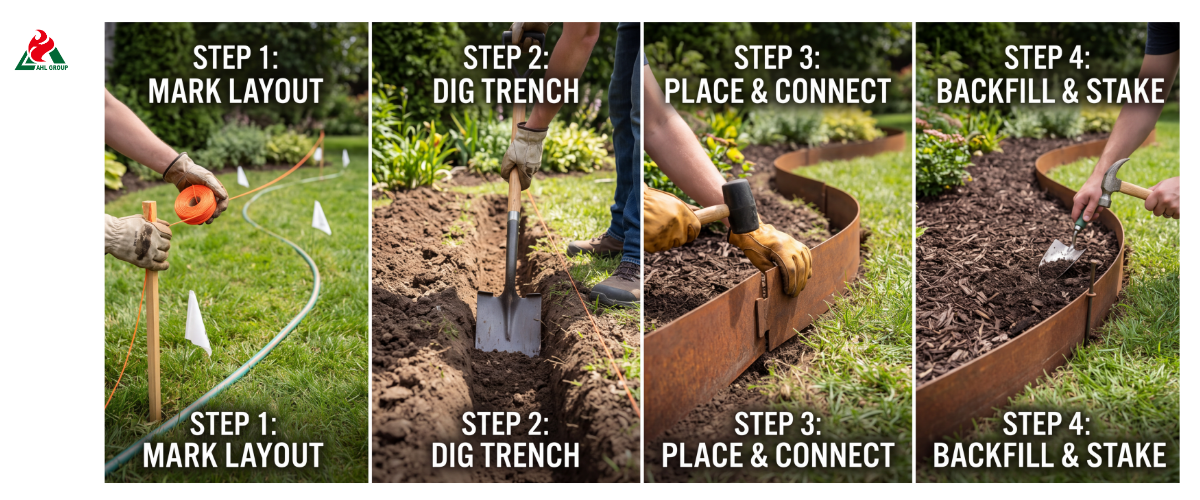
Use a shovel to backfill native topsoil, sand, or crushed stone into the trenches on both sides of the installed Corten steel border, working in layers 50 millimeters thick.
Gently compact the soil to secure the edging
Use the blunt end of a 2x4 board or a hand tamper to compact each layer of backfill. Compaction eliminates air pockets, secures the metal landscape edging and anchor stakes in place, and prevents future displacement.
Re-check Leveling and Alignment After Backfilling
Before adding the topsoil, perform a final check along the top of the edging strips using a level. If necessary, lightly tap high spots with a rubber mallet to lower them, or use a pry bar to lift low spots for fine-tuning.
Trim Excess Soil and Neaten the Edges
Use a rake to clear excess loose soil from the edges. Level the surrounding ground to prepare for laying sod, seeding, or spreading gravel.
Lay mulch, gravel, or plant along the edges
Lay the selected surface material up to the edge of the Corten steel retaining wall—for example, decorative river stones, bark mulch, crushed granite, or sod.
8. Special Situations
Installation on Slopes and Terraced Terrain
On steep slopes, install the Corten steel edging in staggered layers to form terraces. Use heavy-duty profiles that are 3 millimeters thick and 200 millimeters high, and connect the vertical brackets at 90-degree angles to create neat, terraced planting beds.
Installing Around Trees and Existing Plants
When installing landscape edging near mature trees, avoid cutting through major structural roots (diameter > 25 mm). You can lay the border in an arc around the root collars, or place the steel strips above the shallow root system and raise the height of the surrounding flower beds with organic compost.
Connecting Edging to Paths, Driveways, and Decks
When joining a weathering steel border to concrete driveways, stone pavers, or wooden decks, notches should be cut into the ends of the metal strips to ensure a tight fit against the hard surface. Fill any remaining gaps with outdoor polyurethane masonry sealant.
Transition Between the Lawn and Flower Beds
Ensure that the upper edge of the Corten steel garden border is approximately 12 millimeters (0.5 inches) higher than the adjacent soil line. This height both secures the flower bed edging and allows you to trim the lawn edges neatly and attractively using a standard lawn mower.
Installation of Long Sections and Handling of Expansion Joints
Steel expands and contracts with temperature fluctuations. For straight sections longer than 15 meters (50 feet), avoid completely rigid welding joints. Instead, use overlapping sliding joints that allow for 3 millimeters of lateral displacement for each panel section.
9. Common Mistakes to Avoid
Edge Board Buried Too Shallow or Too Deep
► Buried too shallow (<1/3 of height): This results in insufficient support for the edge board; over time, under the pressure of the soil, the retaining wall panels will gradually tilt.
► Buried too deep (>2/3 of height): This wastes vertical space and may cause grass roots to grow directly through the top edge.
Excessive Spacing Between Anchoring Posts
If the spacing between anchoring posts exceeds 900 millimeters (3 feet), the metal edging will arch outward once the flower bed becomes compacted due to rainwater saturation or filling with heavy gravel.
Failure to Level Results in Wavy Edges
Failing to use a string line during installation or neglecting to check the level will result in an uneven, wavy top edge, thereby compromising the aesthetic appeal of the landscape.
Forcing Bends Without Proper Technique
Forcing a 90-degree sharp bend without first marking the back of the metal strip will cause the corner to form a rounded arc or warp. Be sure to mark the bend first and use a sturdy wooden block to assist in bending.
Omitting Trench Preparation on Uneven Ground
Laying weathering steel garden edging directly on untreated, uncompacted soil will create uneven areas along the boundary, making it impossible to neatly join adjacent sections together.
10. Maintenance and Long-Term Care
Managing Initial Rust Runoff During the Curing Period
During the first 3 to 10 months of the active oxidation period, rainwater runoff will carry loose iron oxide particles. To prevent rust stains on nearby porous stone or concrete pavers:
► Pre-weather the Corten garden edging before installation.
► Maintain a 50-millimeter-wide buffer zone of dark-colored gravel or mulch between the metal edging strips and light-colored paving.
► During installation, apply a penetrating sealer to adjacent concrete or stone surfaces.
Inspecting Posts and Joints After Heavy Rainfall
After the first heavy rainfall, inspect the newly installed edging lawns. Check the anchoring posts and joint connectors; tap any loose posts back into the ground, and replenish any backfill that has settled.
Cleaning Debris and Accumulated Soil
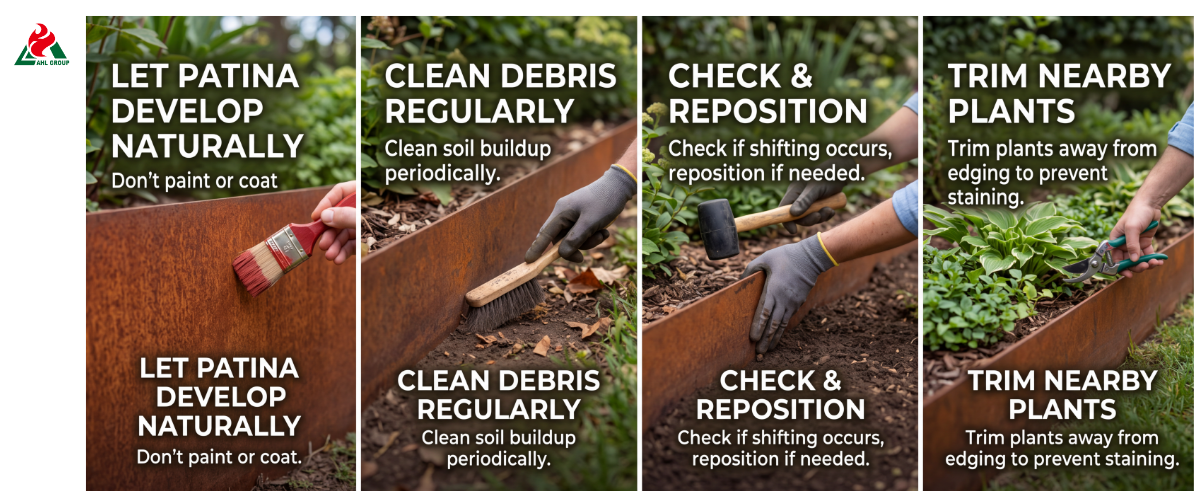
Once a year, use a rake to remove organic leaves and soil from exposed metal surfaces. If moist organic debris is allowed to accumulate on steel surfaces for extended periods, it can deprive the steel of oxygen, leading to localized flaking.
Handling Contact with Lawn Mowers and Trimmers
Corten steel’s high structural hardness can withstand impacts from nylon trimmer blades and lawn mower wheels. Minor surface scratches will heal naturally, as moisture in the atmosphere restores its protective rust layer.
Expected Service Life and Rust Layer Formation
When installed in well-drained soil, weathering steel edging with a thickness of 2 to 3 millimeters can provide a service life of 30 to 50 years or more without the need for chemical coatings, rust inhibitors, or ongoing wood preservatives.
11. FAQs
Q1: How Deep Should Weathering Steel Edge Strips Be Embedded?
Corten steel edging should be embedded to a depth of one-third to one-half of its total height. For example, a 150-millimeter (6-inch) wide edge strip requires a groove depth of 50 to 75 millimeters (2 to 3 inches) to remain stable.
Q2: Can Corten Steel Edging Be Used in Curved Areas?
Yes. Thin-gauge weathering steel edging (1.5 mm to 2.0 mm) can be easily bent into smooth, flowing curves by hand, without the need for heat bending or specialized metalworking tools.
Q3: Will Weathering Steel Edging Stain Nearby Surfaces?
During the initial weathering phase, which lasts 3 to 10 months, rainwater runoff may transfer iron oxide to adjacent light-colored stone or concrete. To minimize staining, create a small buffer zone of gravel or mulch, or use pre-weathered steel.
Q4: Does Installing Weathering Steel Landscape Edging Require Digging a Trench?
Yes. Dig a shallow, flat-bottomed trench to provide a solid foundation for the horizontal installation of the metal edging and ensure sufficient burial depth to prevent tilting or displacement.
Q5: How Often Should a Support Post Be Installed?
Along straight sections, install a support post every 600 to 900 millimeters (24 to 36 inches). At sharp turns or in soft soil, reduce the spacing to every 300 to 450 millimeters (12 to 18 inches).
Conclusion: Final Recommendations for Creating a Durable Corten Steel Garden Edging
Use thick Corten steel edging (2 to 3 millimeters thick), ensure the base has good drainage, and leave a slight gap above the edge of the lawn. This will create a well-defined, maintenance-free garden edging that will last for decades.

