
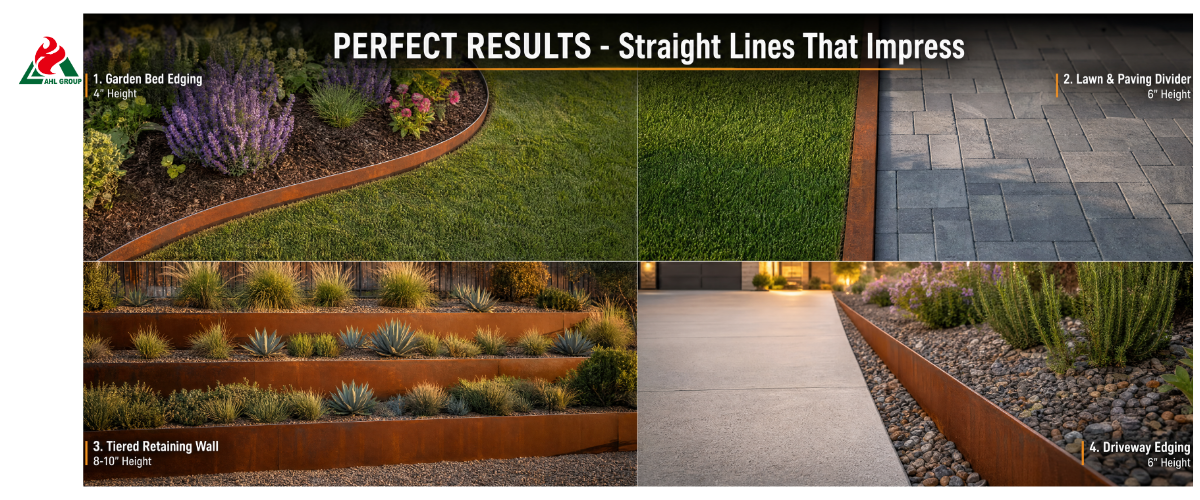
Creating lines as straight as laser-cut edges using Corten steel edging is a hallmark of professional landscape construction. Although the “rust-stained” aesthetic of weathering steel creates a rugged, natural look, its application in modern design typically requires architectural-grade precision. Wavy edging lines not only compromise aesthetics but also indicate poor structural anchoring—a problem that only worsens as the soil shifts with the changing seasons.
The challenge lies in the material itself. While weathering steel is hard, it is susceptible to temperature fluctuations and soil pressure. Without a firm grasp of layout planning and the installation guidelines for the “first edging strip,” you’ll spend the entire weekend wrestling with the metal. This guide breaks down the challenging task of precise edging installation into three professional steps, ensuring your border lines are as sharp and defined as those on a high-end architectural blueprint.
The challenge lies in the material itself. While weathering steel is hard, it is susceptible to temperature fluctuations and soil pressure. Without a firm grasp of layout planning and the installation guidelines for the “first edging strip,” you’ll spend the entire weekend wrestling with the metal. This guide breaks down the challenging task of precise edging installation into three professional steps, ensuring your border lines are as sharp and defined as those on a high-end architectural blueprint.
1. Tools You NEED for Laser-Straight Lines
Before you pick up a shovel, you must understand this: precision depends on your tools. When working with 3-millimeter-thick steel, you must never rely solely on the naked eye to “eyeball” a straight line. Professional contractors rely on a specialized set of alignment and installation tools to ensure that every millimeter of the installation strictly follows the reference points.
Essential Precision Layout Tools
The most common mistake is using a cheap nylon string that stretches or sags. What you need is a high-tension masonry string. Unlike ordinary twine, masonry string can be pulled extremely tight without breaking, providing perfect horizontal and vertical reference lines. Use it in conjunction with steel landscape stakes (rather than wooden stakes, which can rotate in soft soil) and a 60-centimeter (2-foot) spirit level. For projects exceeding 10 meters, a self-leveling rotating laser level is no longer a luxury—it is an essential tool for verifying whether your reference lines have shifted vertically across the terrain.
Specialized Installation Equipment for Corten Steel
Installing weathering steel edging requires specialized impact tools. Ordinary chisel hammers generate vibration in the hand and may damage the metal surface before a rust layer has formed. Professionals typically use a T-bar hammer or a 3-pound recoil-free mallet. Recoil-free mallets are filled with steel shot, which eliminates recoil and ensures that 100% of the impact force is converted into the power needed to drive the edging into the trench. Additionally, have a heavy-duty straightedge (preferably aluminum) at least 2 meters long on hand to check for minor undulations between sections.
Professional Tool Kit
To achieve a perfect installation, your work area should be equipped with:
► Groover or edging trowel: Used to create neat, vertical cuts in the lawn.
► Chalk marking powder: Used to mark lines on the ground before the initial cut.
► Corner clamps: Used to securely hold the joint in place before fixing it.
► Angle grinder (with diamond blade): For making precise cuts at the ends of the installed sections.
► Personal Protective Equipment (PPE): Weathering steel may have sharp edges; non-slip gloves and safety goggles must be worn.
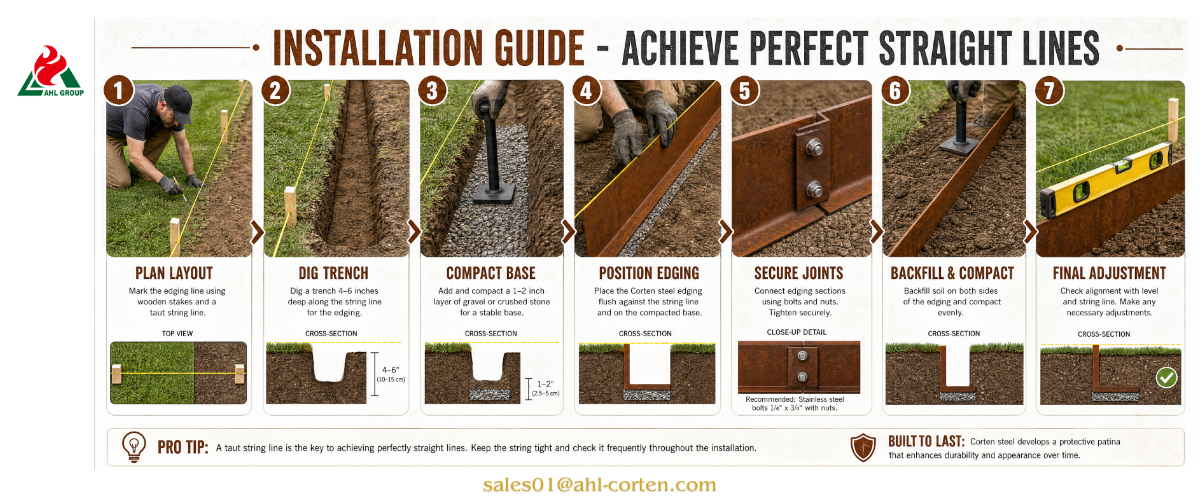
2. Step 1: Perfect Layout (90% of Success)
In landscape design, construction is simply the process of bringing the layout plan to life. If the initial layout is off by just 1%, that deviation will grow to 10% by the time the project is completed. This is precisely the key to overcoming the “wavy line” problem.
Precision String-Line Technique
The foundation of straight lines lies in the “bricklayer’s string-line method.” You must establish two fixed reference points (typically the corners of a patio or the edges of a house) and pull the line so taut that it buzzes when plucked.
► Corner Clamps: Use clamps to secure the string to steel stakes. This prevents the string from sliding up or down.
► Chalk Markings: Once the string is secured, use chalk or spray paint to “trace” the line onto the lawn. This provides a permanent reference mark, even if the string is accidentally bumped during digging.
► 3-4-5 Triangle: To ensure that the line is perfectly perpendicular to the house or patio, apply the Pythagorean theorem. Measure 3 meters on one side and 4 meters on the adjacent side; the diagonal (hypotenuse) must then be exactly 5 meters.
Trench Preparation Standards
The trench acts as a “track” for the weathering steel. A common mistake made by most DIYers is digging a V-shaped trench. This can cause “wavy distortion” because the edging will naturally tilt to one side.
► Vertical Walls: The walls of the trench must be perfectly vertical. Use an edging chisel to cut downward.
► Depth Calculation: The ideal depth is (frame width / 2) + 1 inch. For example, if using a 6-inch-wide frame, dig a 4-inch-deep groove. The extra 1 inch is for laying a layer of loose soil or sand at the bottom to allow for fine-tuning.
► Flat-bottomed trench: The bottom must be level and compacted. Any unevenness will cause the garden border to “cupple” upward, ruining the straight-line effect at the top.
3. Step 2: Install FIRST Strip Perfectly
The “Golden Rule” of landscaping: The installation of the first section of landscape edging determines the success or failure of every subsequent section. If the first section is even half a degree out of plumb, this error will accumulate along the entire length of the garden.
Golden Rule: The First One Perfect = Everything Perfect
Never rush the installation of the first section. Place it in the trench and perform a dry fit. Does it fit snugly against the vertical walls of the trench? Is the height consistent with your string line?
► Align Both Ends: Align both ends of the first section with the masonry line. The margin of error should be within ±0.1 inches.
► Midpoint Check: Use a 2x4 board or an aluminum straightedge to check the midpoint of the steel strip. Even steel strips that are straight when they leave the factory may develop a slight “memory” bend during shipping.
► Installation Order: Do not drive the stakes all the way in immediately. Start in the middle, then work on the ends, and finally address the remaining points. This prevents the steel strip from “shifting” or moving forward during the hammering process.
Locking the Reference
Once the first strip has been leveled and aligned, backfill a small amount of soil at its base to secure it in place. This strip will now serve as the “anchor point” for the entire project. If it shifts, pause work, realign it, and then proceed to Step 3.

4. Step 3: Perfect Section Joins (Invisible Lines)
A straight installation line is often disrupted at the seams. Poorly joined sections create a “zigzag” effect, a flaw that is highly noticeable. Our goal is to create such seamless transitions that the material appears to be a single, continuous piece of steel.
Tips for Professional Joining
► 4–6-inch Overlap: Never use a “butt joint” (where the ends simply touch). This type of joint is structurally weak and will inevitably crack during freeze-thaw cycles. Professional installation must use a 4–6-inch overlap joint.
► Connecting Clamps: Use double-sided clamping connectors designed specifically for weathering steel. These clamps pull the two sections of steel tightly together, ensuring the joint thickness matches the steel’s thickness.
► Laying Principles: Offset the joints. When installing a double-height edging or using support posts, never allow the joints to align perfectly with the support posts. Offsetting them by 12 inches significantly enhances lateral stability against soil pressure.
Hidden Installation
To ensure that the metal edging looks straight and has a clean, architectural appearance, install the clamps on the “inside” (i.e., the side that will be covered by soil or mulch). This keeps the “exposed” side of the edging neat and unobstructed, allowing the eye to follow the straight line naturally without any interruptions.
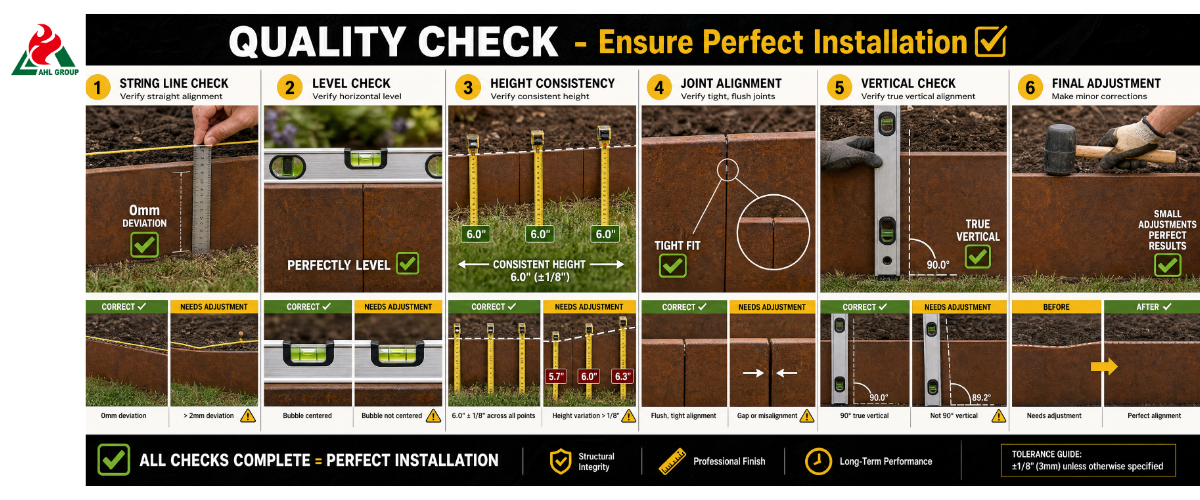
5. Straight Line Quality Checklist
Before final backfilling:
► Verify laser alignment
► Inspect all joints
► Confirm stake spacing
► Check elevation consistency
► Inspect trench compaction
Inspect the alignment from multiple angles:
► Observe from a standing position
► Observe from a low angle
► Observe from a distance
Many defects can only be detected from specific angles.
6. Corten-Specific Straightness Tips
Weathering steel is a specialized material with unique thermal and physical properties. Professionals handle it differently than plastic or aluminum trim.
Temperature Control
Steel expands and contracts. If weathering steel is installed and compressed at high temperatures (100°F/38°C), it will “warp” as the temperature drops.
► Optimal Installation Temperature: The most suitable installation temperature range is 40–77°F (5–25°C).
► Expansion Joints: If the installation length exceeds 20 meters, leave a small 2-millimeter gap at one of the joints to accommodate thermal expansion and contraction.
Installation Tips
► T-bar mallet: Avoid using small hammers. The wide striking surface of a T-bar mallet or a large recoil-free sledgehammer ensures even force distribution, preventing the top edge of the weathering steel from curling or creasing.
► Loosen Hard Soil in Advance: If you encounter rock or hard clay, do not force the garden edging strip into the ground. This will only cause the steel to bend. Use a pickaxe or masonry drill bit to loosen the soil to a depth of 3 inches greater than the intended burial depth.
7. Troubleshooting Wavy Lines
If you look along the wire and notice a “wavy” bend, don’t panic.
► Check for “Springback”: Sometimes the steel is under tension. Loosen the stakes securing the wavy section to allow the steel to “relax” and return to its natural position.
► Pry Bar Technique: Gently push the frame back into alignment with the guideline using a pry bar from behind, then immediately drive in a support stake on the other side to secure it.
► Soil Compaction: Typically, wavy deformation is caused by uneven soil pressure during backfilling. Ensure that the soil on both sides of the frame is compacted evenly.
8. Pro Equipment Investment
Professional tools may seem expensive at first, but they can significantly improve:
► Speed
► Accuracy
► Long-term durability
Cost-effective investments include:
► Rotating laser levels
► Steel tape measures
► Compactors
► Professional-grade fasteners
Cheap tools almost always result in:
► Slower installation
► Visible defects
► Future repairs
9. Professional vs. Amateur Results
| Feature | Amateur Results | Professional Results (AHL Standard) |
| Alignment | Visible "meandering" (±1.5") | Laser-straight (±0.1") |
| Joints | Gaps or "lips" at connections | Seamless overlaps |
| Verticality | Leaning into the garden bed | Perfectly 90° plumb |
| Stability | Heaves after the first winter | Remains anchored for 20+ years |
10. 30-Day Straightness Guarantee Checklist
After installation:
► Inspect the system after the first rainfall
► Check for soil settlement
► Ensure there is no displacement at the edges
► Check the stability of the support posts
► Re-check the alignment at the corners
The first 30 days will determine:
► Long-term stability
► Drainage performance
► Thermal expansion and contraction behavior
Making minor adjustments early on can prevent serious deformation later on.
11. Common DIY Mistakes (Avoid These!)
► Use the curb to “cut” the trench: Be sure to dig the trench first. Forcing steel bars into hard ground is the primary cause of curb deformation.
► Ignoring the “reference side”: Always work along the same side of the string line during installation.
► Piles too short: Using piles that are not long enough. Piles should be at least twice the height of the visible curb to prevent the curb from tilting over time.
Conclusion: Get Your Straight Corten Edging
Installing a Corten landscape border so that it is perfectly straight requires both patience and thorough preparation. By mastering the “3-4-5” layout method, securing the first frame with extreme precision, and employing professional connection techniques, you will create a border that serves both as a landscape edging and a permanent architectural landmark. Weathering steel has a design life spanning decades; ensure that the quality of your installation matches the durability of this metal.
