


Installing Corten metal cladding is not simply a matter of attaching weathering steel panels to an exterior wall. Successful installation depends on drainage, ventilation, corrosion resistance, thermal expansion and contraction, flashing, and rust water management.
Corten steel forms a protective rust layer through repeated wet-dry cycles. However, during the initial weathering phase, rust runoff may contain iron oxide, which can stain concrete, stone, masonry, and other light-colored surfaces. At the same time, improper fastening methods or poorly ventilated cavities can lead to moisture retention, causing problems on the backside of the metal exterior panels.
This guide outlines the key requirements for installing weathering steel exterior wall panels and provides practical, detailed information on planning, framing, fastening, drainage, and long-term maintenance.
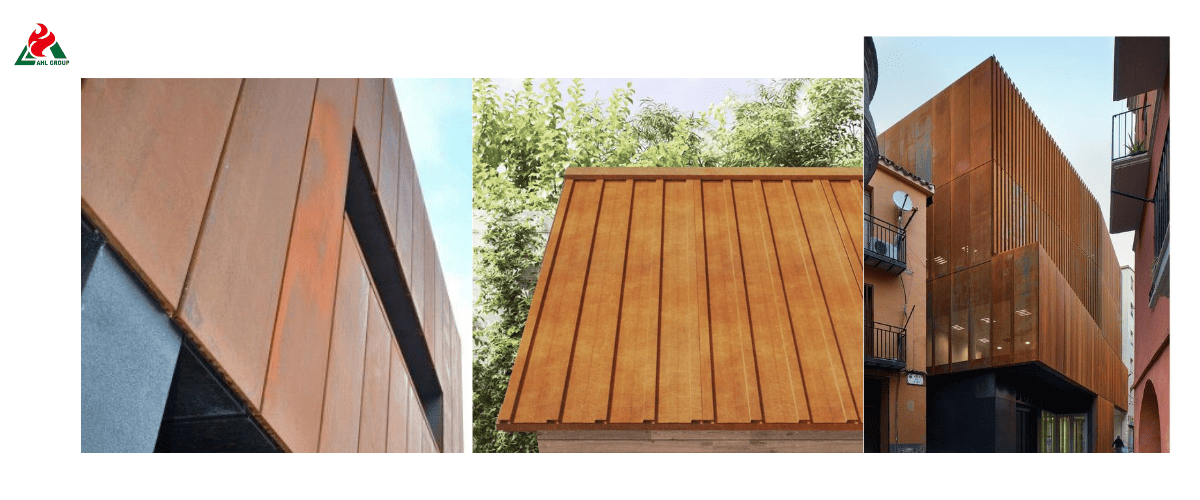
Corten steel forms a protective rust layer through repeated wet-dry cycles. However, during the initial weathering phase, rust runoff may contain iron oxide, which can stain concrete, stone, masonry, and other light-colored surfaces. At the same time, improper fastening methods or poorly ventilated cavities can lead to moisture retention, causing problems on the backside of the metal exterior panels.
This guide outlines the key requirements for installing weathering steel exterior wall panels and provides practical, detailed information on planning, framing, fastening, drainage, and long-term maintenance.
1. Quick Answer
Key Requirements
The installation of Corten steel exterior wall panels (weathering steel conforming to ASTM A606-4 or ASTM A588) requires a ventilated, weather-resistant building envelope system, 316-grade stainless steel fasteners, thermal expansion joints, and a continuous waterproofing membrane (WRB). Since Corten steel relies on the alternating cycles of wet and dry conditions in the atmosphere to form its protective iron oxide rust layer, the wall structure must allow for adequate air circulation behind the panels to prevent trapped moisture from causing internal rust penetration.
Key Design Considerations
Key design priorities include: managing initial rust runoff during the 1- to 2-year weathering phase; selecting compatible and material-consistent flashing materials; and establishing a 20- to 50-millimeter ventilated air cavity. Installers must also prevent direct contact between Corten steel panels and porous hardscaping, concrete foundations, and dissimilar metals such as copper, zinc, or galvanized steel to avoid exacerbating electrochemical corrosion.
Common Mistakes to Avoid
The most serious installation errors include: fastening panels directly to solid wall cladding without creating a rain screen cavity; using standard carbon steel or galvanized steel screws; over-tightening fasteners (which restricts natural thermal expansion movement); and finishing panels flush with the ground or concrete without allowing for the required 50-millimeter to 75-millimeter slope gap.
2. Understand Corten Metal Siding
The Process of Rust Formation
Weathering steel is an alloy composed of copper, chromium, nickel, and phosphorus. When exposed to the natural environment, a dense, non-porous layer of iron oxide forms on its surface—known as a passivated rust layer.
Unlike the rust found on ordinary carbon steel—which flakes off and corrodes the steel plate—this stable oxide layer seals the underlying steel substrate, preventing the penetration of oxygen and deep-seated moisture.
Why Drainage and Ventilation Are Important
If the steel remains damp for extended periods, the passivated rust layer cannot form stably. Moisture accumulating behind the exterior wall panels deprives the metal of oxygen, forcing it into a state of continuous active oxidation, which eventually corrodes through the panel walls. An air gap behind the exterior wall panels that allows for free drainage enables moisture to evaporate, thereby ensuring the wet-dry cycle necessary for a healthy rust layer.
Typical Panel Profiles
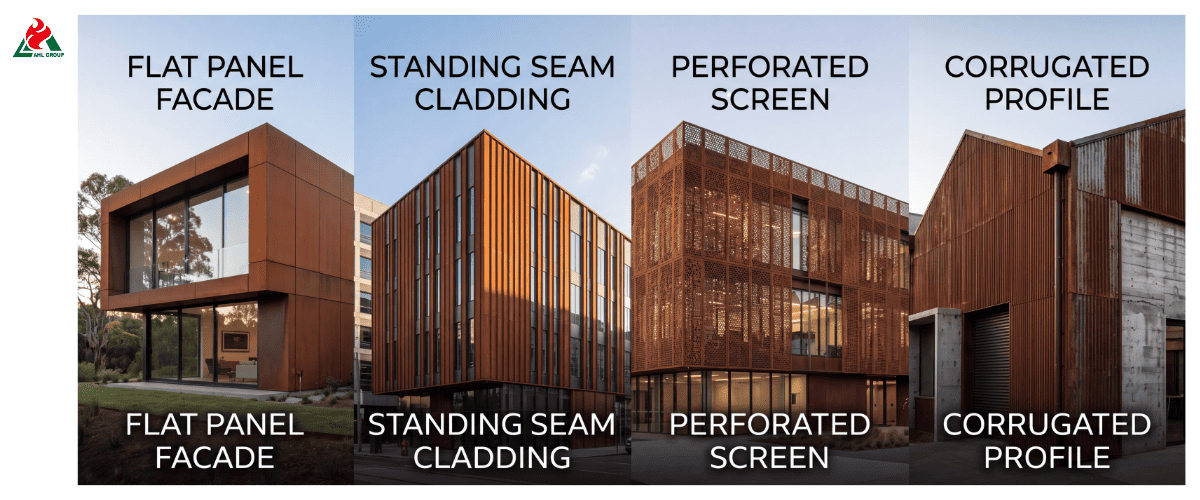
Corten steel cladding panels are available in a variety of standard architectural profiles:
► Corrugated Panels: Classic 7/8-inch or 1/2-inch sine wave corrugations that provide high structural rigidity and create natural airflow channels.
► Standing Seam Panels: Feature a concealed fastener system that creates clean, vertical architectural lines and provides high airtightness.
► Flat Wall Panels/Interlocking Panels: Modular flush or grooved panels, ideal for modern commercial building facades, requiring precise internal reinforcement to prevent the “tank effect” (surface warping).
3. Plan the Installation
Assessing Climate and Orientation
Atmospheric conditions determine the rate at which the rust layer stabilizes. Coastal environments with high salt content in the air and sea fog, or areas with severe environmental pollution, require the use of higher-grade alloys and frequent rainwater rinsing. Walls facing prevailing storms dry at a different rate than shaded north-facing walls, which can cause temporary color variations on the surface of the building envelope.
Identifying Susceptible Adjacent Materials
During the first 6 to 24 months of outdoor exposure, unpassivated weathering steel will release free iron oxide particles through rainwater runoff. Materials located beneath or adjacent to exterior wall panels that are susceptible to staining—such as light-colored concrete, limestone, silicone sealant, and painted wood trim—should be identified so that appropriate protective measures can be designed in the detail drawings.
Plan Drainage Pathways
Trace the flow of rainwater from the top edge of the parapet wall through panel joints, drip edges of flashings, and lower drainage holes. Ensure that all rainwater is directed away from the building’s foundation into dedicated gravel catch basins or non-staining drainage channels, rather than flowing across exposed walkways.
4. Prepare the Substrate
Installing a Moisture Barrier
Since Corten exterior walls are designed as open or drainage-type rain screen systems, the substrate behind them must serve as the primary vapor and water barrier. Install a high-performance, UV-resistant waterproofing membrane (WRB)—such as a commercial-grade vapor barrier or self-adhesive rubber-asphalt membrane—over the exterior wall cladding, and ensure it is completely sealed at all penetrations, windows, and structural corners.
Ensure a Level Surface
Corten panels are highly rigid; installing them on a warped or uneven wall frame will result in noticeable surface distortion and panel jamming. Use a laser level to check the frame alignment and adjust the substrate furring strips with shims until the planar deviation is within 3 millimeters over a 3,000-millimeter span.
Mark the Panel Layout
Use chalk lines or a laser level to mark vertical and horizontal control lines (grid lines). When planning the panel layout, arrange the panels symmetrically around window and door openings and structural corners to avoid narrow strips of cut panels less than 100 millimeters wide at the ends of the building.
5. Design the Framing and Cavity
Use Corrosion-Resistant Furring Strips
Do not install Corten steel panels directly on untreated wooden furring strips or standard galvanized steel channel sections. Use heavy-gauge powder-coated aluminum, 316-grade stainless steel, or heavy-gauge hot-dip galvanized steel (with a coating thickness of at least Z275/G90) as furring strips, and include rubber isolation spacers to prevent electrochemical corrosion.
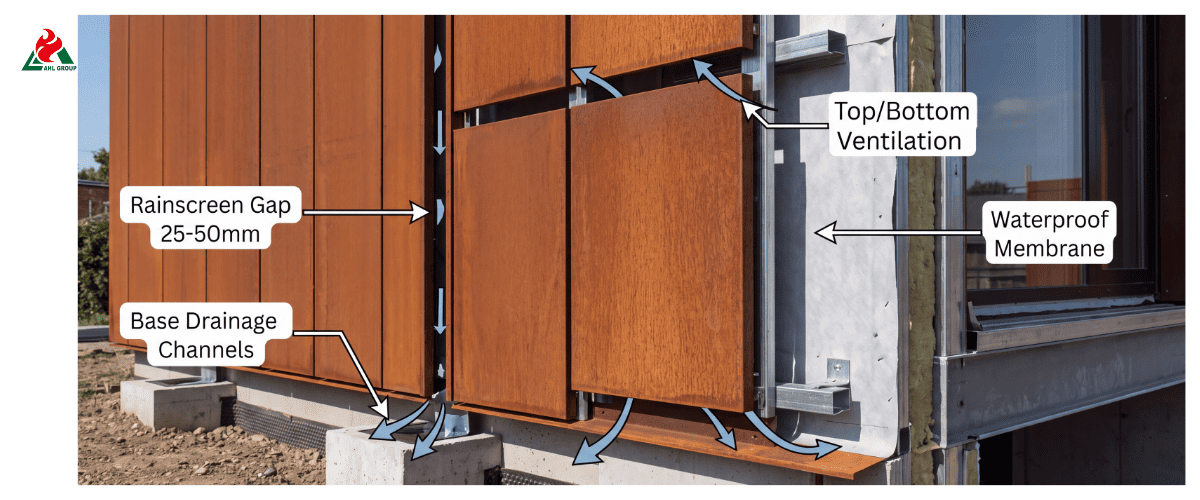
Maintain a 20–50 mm Air Gap
Create an unobstructed ventilation cavity between the back of the Corten exterior cladding walls and the surface of the waterproof barrier (WRB). For residential walls no taller than 3 meters, the ventilation cavity must be at least 20 millimeters deep; taller commercial building facades require a gap of 38 to 50 millimeters to promote strong convective ventilation (the chimney effect).
Creating a Ventilated Rain Screen
Install continuous air intake channels at the base of the wall and continuous exhaust vents at the eaves or parapet line. All vents should be covered with 3mm stainless steel insect screens to prevent pests, fallen leaves, and debris from entering, while allowing unobstructed airflow.
6. Select Compatible Fasteners
Stainless Steel (Grade 316)
The selection of fasteners is a common point of failure for metal exterior wall panels. When installing weathering steel cladding panels, be sure to use Grade 316 (A4) stainless steel fasteners. Grade 316 stainless steel offers excellent resistance to chlorides and acids, enabling it to withstand the acidic corrosion environments generated during the active oxidation of steel.
EPDM or Neoprene Gaskets
Every exposed fastener must be equipped with an integrated EPDM (ethylene propylene diene monomer) or neoprene sealing gasket. These elastic gaskets cushion the panels, seal the screw holes to prevent liquid water intrusion, and physically isolate the screw heads to prevent direct contact with the weathering steel panels.
Avoid Using Galvanized or Carbon Steel
Never use standard galvanized, electrogalvanized, or carbon steel screws with weathering steel. The higher noble metal potential of weathering steel will rapidly erode the thin zinc coating on ordinary screws through electrochemical corrosion, causing the fastener heads to fracture under thermal stress within 2 to 5 years.
Do Not Over-Tighten
Screw the fastener perpendicular to the panel surface until the EPDM washer is compressed flush with the edge of the screw. Do not over-tighten, as this may cause the rubber washer to deform, bulge outward, or crack, which will compromise its sealing ability and restrict the natural expansion movement of the metal panel.
7. Manage Thermal Expansion
Maintain a 1–3 mm Gap
Weathering steel expands and contracts with fluctuations in atmospheric temperature. Within a temperature range of 50°C, allow approximately 1.2 mm of linear thermal expansion per meter. At horizontal panel overlaps and vertically aligned joints, explicitly provide an expansion gap of 1 mm to 3 mm.
Use Slotted Holes or Floating Clips
When securing long weathering steel panels (>3 meters), drill oversized or vertically slotted screw holes into the substructure frame on-site. Position the fastener shank in the center of the slot to ensure the panel does not jam or buckle when moving vertically.
Allow for Edge Movement
Never weld, wedge, or rigidly fasten the top and bottom edges of Corten wall panels simultaneously. Establish a “fixed anchor point” near the top or center of the panel, and treat all remaining connection points as “floating points,” using slotted clips or expansion sleeves.
8. Design Drainage and Ventilation
Continuous Drainage Path
Each horizontal framing member, window lintel, and floor flashing must be designed with a forward slope (minimum slope of 1:12 or 5 degrees) to direct rainwater outward. Internal protrusions should be avoided to prevent the accumulation of wind-driven rain or condensation within the wall cavity.
Drip Edges and Flashings
At all wall terminations and horizontal panel joints, thick-gauge weathering steel (Corten) or 316-grade stainless steel drip edges and flashings that match the weathering steel material should be installed. Drip edges should project outward, maintaining a distance of at least 15 millimeters from the underlying finish to ensure that rainwater flows away from the lower portions of the building’s walls.
Gravel Trough or Drainage Channel
At the base of the weathering steel wall cladding, construct a dedicated drainage channel 100 to 150 millimeters wide, filled with dark-colored granite gravel, crushed basalt, or volcanic rock. This channel will collect iron-rich rainwater runoff, allowing it to infiltrate the underground stormwater drainage system while preventing orange pigment from splashing back onto the wall foundation.
50–75-Millimeter Gap Above Ground Level
A gap of at least 50 to 75 millimeters must be maintained between the lower edge of the Corten steel panels and the finished soft landscaping, soil, or paved surface. If the steel panels come into direct contact with damp ground, standing water, or a lawn, airflow will be impeded, causing the bottom panel to rust through rapidly.
9. Manage Rust Runoff
Leaching May Occur Within the First 1–2 Years After Installation
Leaching is a natural byproduct of the rusting process. Before the alloying elements (copper and chromium) bond to form a dense, non-porous layer, rainwater dissolves loose iron particles on the surface. Within 6 to 24 months after installation, noticeable orange leaching may occur during rainfall.
Pre-weathering Is Recommended Whenever Possible
To minimize staining at the construction site, Corten exterior siding panels should be pre-weathered in an off-site storage area prior to final installation. Spraying untreated panels with a mild solution of water, hydrogen peroxide, and salt or vinegar can accelerate the natural oxidation process, forming a semi-stable rust layer before the steel is installed into the building envelope.
Protect Vulnerable Surfaces
During construction and the initial weathering phase, cover all surrounding sidewalks, glass elements, light-colored concrete, and building masonry with thick plastic sheeting or temporary sacrificial plywood.
Direct Runoff into the Drainage System
Install internal stainless steel drip channels beneath key architectural recesses to direct rust-colored water directly into underground storm drains, preventing it from flowing onto visible sidewalks.
10. Install Flashing and Trim
Compatible Flashing Materials
Flashing materials must be compatible with the service life and chemical properties of Corten metal siding. Standard zinc, galvanized steel, and bare aluminum flashing materials will suffer severe electrochemical corrosion if they come into direct contact with damp weathering steel.
► Recommended: Custom-bent weathering steel flashings (1.5 mm to 2.0 mm thick) or 316-grade stainless steel flashings.
► Acceptable with isolation measures: High-grade anodized aluminum separated by non-conductive EPDM rubber tape.
Properly Seal Joints
In Corten wall systems, never rely on silicone sealant as the primary waterproofing layer. Standard silicone sealant adheres poorly to loose iron oxide dust and leaves oily residues, resulting in permanent discoloration streaks on the rust patina. At concealed wall transitions, use small amounts of neutral-curing polyurethane or MS polymer sealant.
Maintain a Separation Gap
Leave a gap of 6 to 10 mm between the ends of the Corten panels and vertical flashings or window frames to prevent capillary water absorption and ensure free air circulation.
11. Install the Panels
1. Substrate and Layout Inspection
Verify the integrity of the waterproofing membrane (WRB), the air gap framework, and the control grid lines.
Inspect the installed waterproofing membrane (WRB) for tears or unsealed penetration points. Confirm that the verticality deviation of the secondary furring strips is within 3 millimeters and that the grid lines are clearly marked on the wall surfaces.
2. Installation of Bottom Edge Trim and Drip Edges
Install the starting trim, bottom drip edge, and insect screen
Install 316-grade stainless steel bottom drip edges along the foundation wall, ensuring a gap of 50 to 75 millimeters between them and the final floor surface. Install a 3-millimeter insect screen at the bottom air intake channel.
3. Panel Installation and Fastening
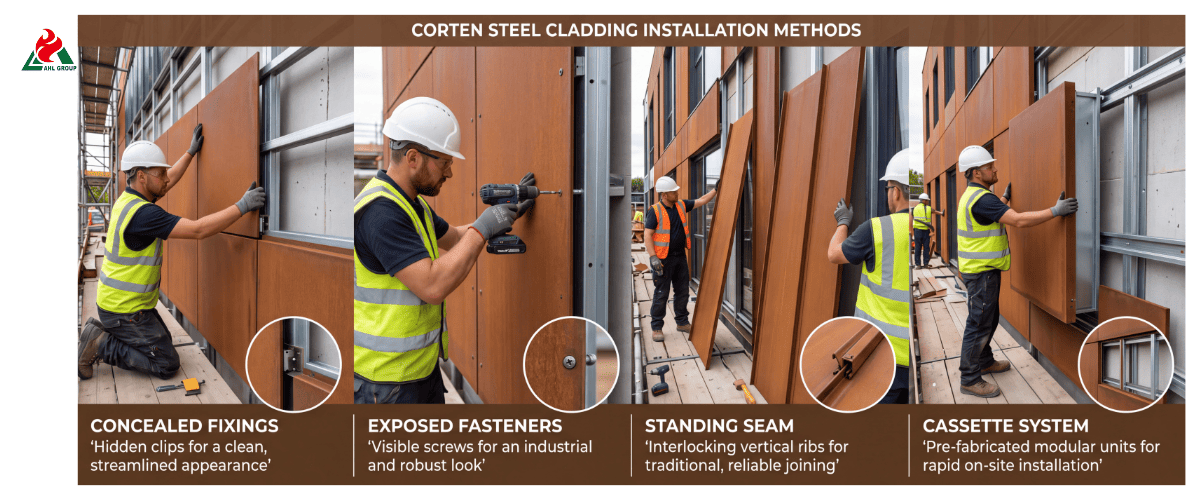
Screw 316-grade stainless steel screws with EPDM washers into the slot holes
Lift the first weathering steel panel into position, starting from the bottom corner. Use 316-grade stainless steel screws, inserting them centrally into the pre-drilled slot holes to secure the panel. Tighten until the EPDM washers lie flat and show no deformation.
4. Joint Offset and Alignment Check
For every 3 panels installed, leave a 1–3 mm expansion joint and verify alignment.
Install panels upward or horizontally along the grid, maintaining a 1–3 mm gap at panel overlaps to accommodate thermal expansion and contraction. After installing every 3 layers, use a laser level to check the panels’ levelness and the module dimensions.
12. Detail Corners and Transitions
Use Corner Covers or Folded Edges
Form exterior corners using factory-pre-folded weathering steel corner profiles (2.0 mm thick) or custom beveled panel edges with internal joint plates. Corner trim should overlap adjacent wall panels by at least 50 mm to prevent wind-driven rain from penetrating.
Maintain Ventilation
Ensure that corner trim does not block airflow within the lower rain screen cavity. Maintain a continuous vertical ventilation path behind the corner trim to allow internal moisture to escape to the eave vents at the top.
Prevent Water Accumulation
All folded trim should be designed with open folds or internal drainage holes. Avoid using upward-sloping “U-shaped” channel profiles to prevent the accumulation of fallen leaves, wind-blown debris, and standing water.
13. Protect Adjacent Materials
Identifying Surfaces Prone to Stains
Unsealed cast-in-place concrete, light-colored limestone pavers, light-colored stucco, sand-lime bricks, and clear glass are highly susceptible to absorbing iron oxide pigments.
Use a Gravel or Mulch Buffer Strip
Lay a 150-millimeter-wide buffer strip along the entire base of the Corten steel facade. Materials may include dark volcanic rock, slate chippings, or dark wood chip mulch. When raindrops strike the surface, the water will dissipate into the gaps in the gravel, preventing rust-stained slurry from splashing back onto the wall base.
Maintain an Air Gap
When Corten steel panels adjoin non-steel materials (such as stone cladding or glass curtain walls), maintain an air gap of at least 10 millimeters and install an EPDM rubber gasket behind the gap to prevent moisture retention due to capillary action and electrochemical reactions.
14. Maintenance
Allow for Natural Weathering
A key advantage of Corten exterior panels is their maintenance-free nature. Do not apply varnish, oil-based sealants, or rust-proof paint to the surface. These surface treatments will degrade when exposed to outdoor UV radiation, causing the coating to peel unevenly and interfering with the natural self-healing oxidation process.
Inspect Drainage Channels
Inspect the bottom drainage holes, drip edges, and eave vents annually. Remove bird nests, spider webs, wind-blown leaves, and accumulated airborne dust to prevent obstruction of airflow within the rain screen cavity.
Remove Debris
Use low-pressure fresh water to rinse panels in shaded areas, removing accumulated dirt, salt deposits, or heavy dust buildup. Severe dirt buildup can trap moisture on the metal surface, causing localized pitting.
Inspect Fasteners and Seals
Inspect the building facade every 3 to 5 years for loose fasteners, damaged EPDM gaskets, or compromised flashing sealant joints around window openings, and replace worn components with 316-grade stainless steel hardware.
15. FAQs
Q1: Which Fasteners Are Recommended?
Grade 316 (A4) stainless steel screws with integrated EPDM gaskets are the industry standard for installing Corten exterior wall panels. In dry, non-coastal inland areas, Grade 304 stainless steel may also be used.
Q2: How Large Should the Ventilation Gap Be?
Standard residential exterior walls require an air gap of at least 20 millimeters. Tall commercial building facades (>2 stories) require a cavity of 38 to 50 millimeters to create chimney-effect ventilation.
Q3: Is a Rain Barrier Required?
Yes. Weathering steel requires a ventilated rain barrier system to ensure the panels alternate between wet and dry conditions. Without rear ventilation, accumulated moisture will hinder the formation of a passivated oxide layer and lead to corrosion on the inner side of the panels.
Q4: How Can Rust Spots Be Prevented?
Manage rainwater runoff by pre-weathering the panels off-site, installing dark-colored gravel drainage channels at the base of the wall, using stainless steel drip edges, and keeping panels that have not yet formed a passivation layer away from light-colored concrete pavers.
Q5: How Much Clearance Should Be Left Above Ground Level?
Maintain a clearance of at least 50 to 75 millimeters between the lower edge of the Corten steel panels and the soil, lawn, or finished paving surface to prevent the absorption of ground moisture.
Q6: How Should Thermal Expansion Be Addressed?
Drill oversized or slotted screw holes on-site, center the fasteners within the slots, use floating panel clips, incorporate flexible EPDM washers, and leave a 1-millimeter to 3-millimeter gap at panel lap joints.
Conclusion: Summary of Key Requirements
The successful installation of weathering steel metal exterior wall panels depends on proper ventilation, the selection of hardware, and moisture management. By combining a ventilated rain screen system, a high-performance waterproofing barrier (WRB), 316-grade stainless steel fasteners, and expansion joints, installers can construct a durable, weather-resistant building envelope with a service life of several decades.
Weathering steel is a self-protecting material, but it functions only when it has the opportunity to dry between rainstorms. A specifically designed 20-millimeter to 50-millimeter rain screen air gap provides the continuous flow of oxygen necessary to form and maintain its protective rust layer, thereby protecting the building envelope from moisture damage.
To ensure long-term reliability and architectural value, weathering steel sheets with a thickness of at least 1.5 mm to 2.0 mm (ASTM A606-4) should be selected; for road construction projects prone to staining, the surface should be pre-weathered off-site; and the manufacturer’s curtain wall installation guidelines should be followed to ensure maintenance-free exterior wall performance.