


How do you clean a rusty plancha grill and bring its food-contact surface back to a slick, non-stick finish? To restore a rusty carbon steel plancha cooking plate (10mm flat-top griddle ring), first preheat the plate for 15–20 minutes to dry out trapped moisture and loosen flaky scale, let it cool until warm (~50°C–65°C), scrape off loose crust at a 30° angle, and scrub away all orange iron oxide down to bright bare steel using coarse kosher salt and oil (for light flash rust), a pumice grill brick (for moderate rust patches), or 80- to 120-grit sandpaper (for heavy winter rust). Once a clean, oiled paper towel wipes the metal with zero gray or orange residue, heat the plate to 200°C–230°C (400°F–450°F) and bake 3 to 4 ultra-thin coats of high-smoke-point oil (such as avocado oil at ~270°C or grapeseed oil at ~215°C) until the ring turns a hard, glass-smooth obsidian black.
Equally important: if you own a Corten steel plancha BBQ grill, never sand, wire-brush, or oil the reddish-brown rust on the lower Corten steel fire bowl or pedestal base. That exterior rust is a self-healing weathering steel patina (α-FeOOH goethite) engineered to protect the structural body for decades. Only strip and season the top food-contact cooking ring (10mm carbon steel on models like BG2, BG4, and BG8, or 8mm stainless steel on BG12).
Whether you accidentally left your plancha uncovered through a rainy winter or noticed black seasoning flakes peeling off alongside orange spots, this step-by-step metallurgical restoration guide walks you through diagnosing, stripping, re-seasoning, and permanently rust-proofing your plancha grill.
Equally important: if you own a Corten steel plancha BBQ grill, never sand, wire-brush, or oil the reddish-brown rust on the lower Corten steel fire bowl or pedestal base. That exterior rust is a self-healing weathering steel patina (α-FeOOH goethite) engineered to protect the structural body for decades. Only strip and season the top food-contact cooking ring (10mm carbon steel on models like BG2, BG4, and BG8, or 8mm stainless steel on BG12).
Whether you accidentally left your plancha uncovered through a rainy winter or noticed black seasoning flakes peeling off alongside orange spots, this step-by-step metallurgical restoration guide walks you through diagnosing, stripping, re-seasoning, and permanently rust-proofing your plancha grill.
1. Crucial Rule 1: Good Rust vs. Bad Rust on a Corten Steel Plancha Grill
Before you touch your grill with sandpaper, a pumice stone, or vinegar, you must distinguish between the two completely different steel alloys that make up an architectural plancha barbecue. Mixing up their cleaning rules is the single most common mistake new owners make.
The Top Cooking Ring (10mm Carbon Steel or 8mm Stainless Steel) vs. The Lower Corten Shell (2mm–4mm)
As explained in our Corten Steel Plancha BBQ Grill Engineering Guide (10mm Plate, Airflow & Ash) and our general 7-Step Corten BBQ Grill Cleaning Guide, a wood- or charcoal-fired plancha grill is a dual-zone metallurgical system:
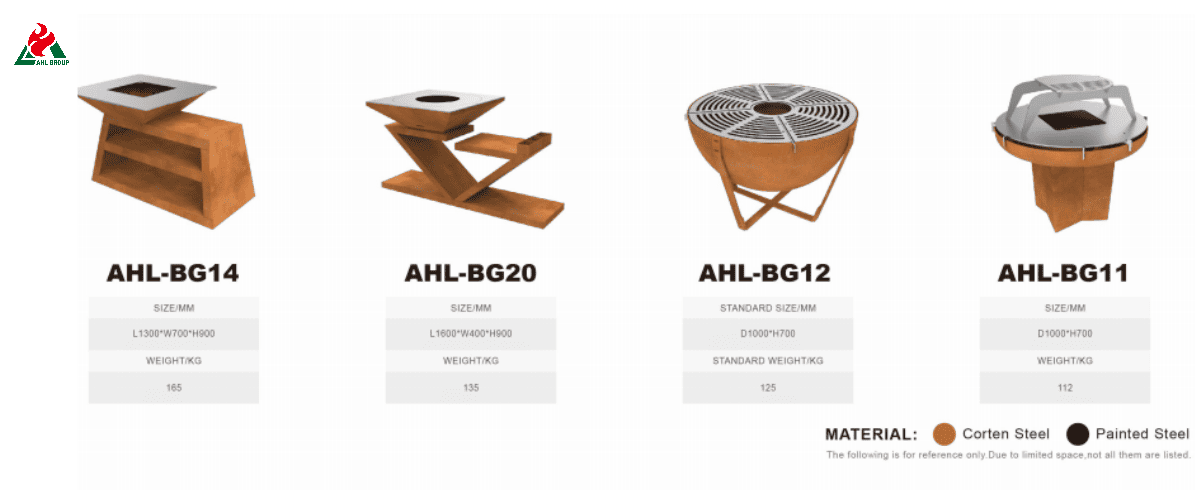
1. Zone A — The Top Food-Contact Plancha Ring (Zero Rust Allowed): Across the AHL Corten BBQ lineup (note: model parameters below are based on current factory specification tables; please refer to the latest official product page for custom project measurements), the circular or rectangular flat-top cooking ring is precision-cut from either 10mm (3/8") high-density food-grade carbon steel (standard on models BG1 through BG11 and BG13 through BG20) or 8mm food-grade stainless steel (featured on model BG12, 100(D) × 70(H) cm, and hybrid carbon/stainless unit BG16).
► Because bare carbon steel contains iron without chromium passivation, any exposure to rain, morning dew, or unscraped acidic food marinades after the protective oil film wears thin will produce reddish-orange hydrated ferric oxide.
► Unlike weathering steel patina, rust on a carbon steel cooking plate is porous, flaky, metallic-tasting, and causes food to stick violently. Mechanically strip it and replace it with a thermally polymerized oil layer (seasoning).
2. Zone B — The Lower Weathering Steel Fire Bowl & Pedestal Base (Rust Patina Must Be Preserved): Beneath the cooking ring sits the conical fire bowl (4mm Corten steel on low-profile models like BG12, BG13, and BG17) and the structural pedestal cabinet (2mm Corten steel on BG2, BG4, BG8, BG18, BG19, BG20, or heavy 10mm Corten plate on BG6).
► On unpainted Rust finish models (such as BG2, BG4, and BG8), the warm orange-to-chestnut-brown oxide layer on the exterior shell is protective patina.
► Never sand, acid-wash, wire-wheel, or smear cooking oil onto the Corten steel exterior. Sanding leaves ugly bright scars that take months to re-weather, and cooking oil turns rancid and sticky in UV sunlight.
(Exception for Black Painted Models: If you own a High Temperature Black Painted Corten model—such as BG1, BG3, BG7, BG9, BG14, or BG16—clean the painted exterior only with a soft sponge and mild soapy water; if deep scratches on the exterior body ever expose bare metal, touch them up only with 600°C-rated high-temperature matte black stove paint, never cooking oil.)
Diagnostic Test: Is Your Plancha Actually Rusted, or Is Old Black Seasoning Just Flaking
Many backyard chefs panic in spring when they lift their grill cover and see rough patches on the 10mm cooking plate, assuming the steel is ruined. Before you grind the entire plate down to raw metal, perform the 10-Second Dry White Paper Towel Test on the cold griddle ring:
Symptom 1 — Orange or reddish-brown powder adhering to a towel (true surface rust): If wiping a dinner plate with a dry paper towel leaves rust-orange or brick-red marks, this indicates that moisture has penetrated the oil film barrier and caused the iron surface to oxidize. Please proceed to Section 2 to select a Level 1, Level 2, or Level 3 repair solution based on the depth of the rust.
Symptom 2 — Hard, brittle black flakes peeling off (searing layer peeling—not rust): If black, paint-like flakes peel off and stick to the spatula, exposing a smooth, dark gray or silver steel surface underneath (and no orange powder), this indicates that your skillet is not rusted. This is typically caused by a previous seasoning layer that was applied too thickly, or by high-sugar marinades (barbecue sauce, teriyaki sauce, honey syrup) that have carbonized into brittle char and are now peeling away from the metal surface. Simply scrape off the loose debris with a steel spatula, gently buff the transition edges with a pumice stone, and then apply two thin coats of seasoning.
Symptom 3—Amber or brown, gel-like, sticky patches (unpolymerized, rancid oil): If brownish-orange patches appear on the griddle but feel sticky and tacky—like dried varnish under your fingernails—it’s not rust. Instead, it’s excess cooking oil applied too thickly after your last cooking session, which never reached its smoke point (205°C–270°C) to fully polymerize. Scrape off this sticky residue while the skillet is still hot, wipe it down with warm water and a degreaser, then blot it with paper towels until it’s nearly dry before re-oiling it.
2. Rust Severity Diagnostic Matrix: Choosing the Right Restoration Method (Level 1 to Level 3)
Even a heavily neglected 10mm (3/8") solid carbon steel plancha plate is virtually indestructible. Because the plate is 10 mm thick (10,000 microns), a winter of surface rust typically affects only the top 20 to 100 microns (0.02 to 0.10 mm) of metal—meaning 99% of your structural cooking plate is still pristine steel waiting underneath.
Use the diagnostic matrix below to pick the least aggressive method that completely clears the oxidation:
| Rust Severity Level |
Visual & Tactile Symptoms on the Plancha Ring | Typical Cause | Recommended Restoration Method | Required Abrasive / Tool | Strip to 100% Bare Steel? | Estimated Recovery Time (Excl. Re-Seasoning) |
| Level 1: Light Flash Rust (Superficial Oxidation) |
Powdery yellow-orange haze or thin surface spots; smooth to the touch; zero metal pitting; wipes off partially with an oiled cloth | Left uncovered in humid air or light rain for 1–5 days after cooking; thin seasoning film wore off in the high-heat inner zone | Method A: Thermal Oil + Coarse Kosher Salt Slurry Scrub (or Half-Onion / Potato Steam Rub) | Bevel-edged stainless steel scraper + coarse kosher salt + high-heat oil + folded cotton towel | No (Spot-clean & blend into surrounding intact seasoning) | 10–15 Minutes |
| Level 2: Moderate Patchy Rust (Crusty Oxidation + Flaking Seasoning) |
Distinct rough orange-brown islands mixed with peeling black carbon crust; catches a fingernail slightly but no deep craters | Exposed to rain/snow for 2–8 weeks; wet food residue or acidic marinade left sitting under a non-breathable cover | Method B: Oil-Lubricated Pumice Grill Brick or 100–120 Grit Wet/Dry Sanding | Commercial pumice Grill Stone (or 100–120 grit silicon-carbide paper / Scotch-Brite heavy-duty pad) + mineral/cooking oil | Partial to Full (Sand affected zones flush; feather edges smooth) | 25–40 Minutes |
| Level 3: Heavy Winter Neglect (Thick Flaky Scale & Minor Pitting) |
Entire 10mm ring covered in crusty dark-orange/red scale, standing-water ring marks, or shallow surface pits | Left outdoors uncovered (or trapped under a sweaty tarp) all winter without a protective oil coat | Method C: Power Orbital Sanding (80 → → 120 Grit) + Optional Vinegar Acid-Lift |
Random orbital sander with 80-grit & 120-grit zirconia/alumina discs (or drill nylon-abrasive cup wheel) + baking soda wash | Yes — 100% Bare Silver Steel (Rebuild 4-coat base seasoning from scratch) | 45–75 Minutes |
[BBQ OEM & CAD SPEC PACK] Sourcing Commercial Corten Steel Plancha BBQ Grills or Custom Fire Pit Grills?
Get our complete OEM/Wholesale package (2D/3D CAD drawings for 10mm/12mm carbon steel cooking plates, double-wall airflow schematics, food-contact steel Mill Test Certificates & FOB wholesale price list):
>> WhatsApp BBQ Engineer (+1 213-729-4677) >> View Plancha BBQ Models >> Request Wholesale Catalog & Quote
3. Tools & Supplies Needed to Restore a Rusted Plancha Plate (And 5 Tools to Ban)
Gathering the right food-safe abrasives and high-smoke-point oils before you light the fire makes plancha restoration fast, clean, and safe.
The Approved Plancha Restoration Toolkit
► Heavy-Duty Beveled Stainless Steel Skillet Spatula (Blade Width 100 mm–150 mm): A sturdy skillet spatula with a 30°–45° beveled edge designed to scrape away flaky rust and carbonized food residue.
► Commercial Pumice Baking Sheet Cleaning Bricks (Baking Sheet Stones): Porous foam glass bricks designed specifically for restaurant baking sheets. They quickly grind away rust and carbonized residue while gently crumbling, ensuring they never scratch 10-millimeter-thick carbon steel.
► Silicon Carbide or Zirconia Sandpaper (80-grit and 120-grit): Suitable for Grade 2–3 rust; can be wrapped around a flat-headed cork sanding block or mounted on a 125-millimeter (5-inch) random-orbit sander.
► Coarse kosher salt or sea salt (500-gram box): A food-grade, non-scratching crystalline abrasive used to remove Grade 1 surface rust and absorb the exfoliated iron oxide sludge.
► Distilled white vinegar (5% acetic acid) and baking soda (sodium bicarbonate): Optional chemical rust removers for stubborn microscopic pits in Level 3 restoration (use baking soda immediately after treatment to neutralize residual acid and prevent flash rust from recurring).
► Heat-resistant welding/barbecue gloves (heat resistance: 350°C or higher), long-handled locking pliers, and lint-free cotton workshop towels or heavy-duty paper towels.
► Refined, high-smoke-point flavored oils (smoke point >205°C / 400°F): refined avocado oil (approx. 270°C), grapeseed oil (approx. 215°C), refined canola oil (approx. 205°C), or high-oleic sunflower oil.
5 Dangerous Cleaners & Tools That Ruin Plancha Grills (Never Use These)
To protect both your food safety and the structural integrity of your Corten steel BBQ grill, strictly ban the following five items:
1. Cheap Loose-Bristle Wire BBQ Brushes: Metal bristles snapped off during aggressive rust scrubbing can embed in the oil film on a flat plancha and end up in a burger or steak—a documented medical hazard. Use a solid steel blade scraper, coiled stainless chainmail scrubber, or pumice stone instead.
2. Caustic Lye Oven Cleaners (Sodium Hydroxide Aerosol Sprays) on Installed Plates: Spraying caustic oven cleaner onto a plancha ring mounted above a Corten fire bowl causes alkaline chemical runoff to drip down onto the weathering steel exterior, bleaching hideous white streaks into the natural Corten patina and contaminating the inner firebox.
3. Industrial Rust Removers (Naval Jelly, Phosphoric/Hydrochloric Acid, or WD-40): Petroleum lubricants and industrial pickling acids are toxic and not food-contact safe. Never use any liquid on the cooking ring that you would not put on a cast-iron skillet in your kitchen.
4. Hard Metal Grinding Discs or 36-Grit Flap Wheels Held on Edge: While a flat random orbital sander with 80–120 grit paper leaves a uniform satin finish, attacking a plancha plate with the sharp edge of a rigid angle-grinder masonry wheel will carve permanent divots where grease pools.
5. Dumping Buckets of Ice Water into the Fire Bowl or onto a 350°C Plate: As noted in our Corten Steel Plancha Maintenance Guide, while splashing a few tablespoons of warm water onto a hot 10mm plate to steam-lift food residue (deglazing) is fine, dumping gallons of cold hose water across a roaring fire bowl causes violent thermal shock that can warp metal or stress firebox welds.
4. Step-by-Step Restoration Protocol: How to Strip Rust from a Carbon Steel Plancha (10mm Plate)
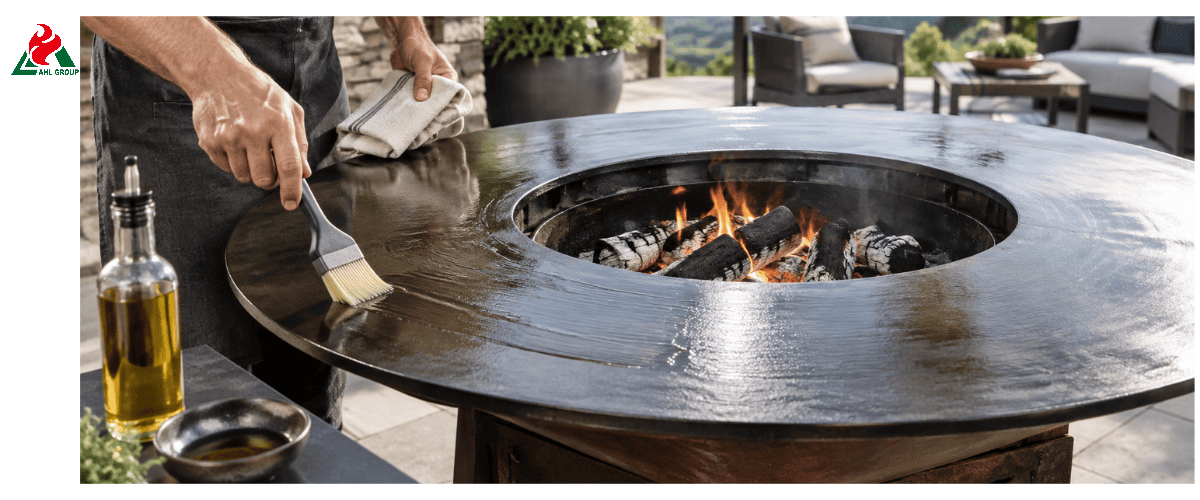
Whether you are restoring a classic conical BG2 (100D × 100H cm, 10mm plate), a wood-storage BG4 (100D × 130L × 100H cm, 10mm plate), or a BG8 (100D × 90H cm, 10mm plate), follow this four-step mechanical restoration workflow.
Step 1 — Dry-Fire Thermal Loosening (15–20 Minutes) & Controlled Cooling to ~50°C–65°C
Never sand directly on a cold, damp, greasy, or rusty baking sheet—sticky, aged grease and morning moisture will cause sandpaper or pumice stones to become sticky within 30 seconds:
► First, remove old ash: Before lighting the fire, scoop out any damp wood ash from the fire basin or ash tray (wet potassium carbonate ash is alkaline and will trap moisture at the bottom of the grill).
► Light a small pile of dry firewood in the center: Burn dry hardwood kindling for 15 to 20 minutes, until the 10-millimeter-thick carbon steel plate reaches 180°C–220°C. This heating cycle evaporates all moisture from the pores, dries out the viscous grease into brittle carbon deposits, and causes the steel to expand slightly due to heat (approximately 1.2 mm within a 1,000-millimeter circular area), thereby breaking the bond between the flaky rust layer and the base material.
► Allow the baking sheet to cool to a warm state (approximately 50°C–65°C / 120°F–150°F): Wait until the flames have died down and the steel plate is warm (rather than scorching hot) before applying oil or sanding. If the steel plate is hotter than 200°C, the oil will immediately start to smoke; if the plate is slightly warm (about 55°C), the metal pores remain dry, and loose rust can be easily removed.
Step 2 — Heavy Mechanical Scraping at a 30°–45° Bevel Angle
Put on heat-resistant gloves and hold a sturdy stainless steel spatula with both hands, positioning it at a 30° to 45° angle to the pan’s surface:
► Work methodically in overlapping radial strokes along the circular ring area, pushing all bubbling black curing layer debris and clumped orange oxide deposits toward the central crater (or into the metal ash chute flush against the inner rim).
► Since the AHL cooking ring is made of 10-millimeter-thick solid structural carbon steel, vigorous scraping with the flat edge will not damage the pan. Continue scraping until the blade no longer picks up any loose debris or raised particles.
Step 3 — Abrasive Rust Removal by Severity (Methods A, B & C)
Now, based on the severity of the rust you diagnosed in Section 2, select the appropriate sanding method:
Method A — For Level 1 Light Flash Rust (Kosher Salt + Oil Slurry Scrub)
If only a thin, orange haze remains after scraping:
1. Pour 3 to 4 tablespoons of cooking oil and 1/2 cup of coarse kosher salt directly onto the warm (approximately 60°C) rusted area.
2. Using long-handled pliers, grip a folded piece of thick cotton cloth or paper towel (or skewer a raw potato or onion cut in half onto a barbecue skewer), and vigorously rub the salt-oil mixture onto the orange spots using tight circular motions.
3. The sharp-edged salt crystals will scrape away the thin layer of iron oxide without stripping the intact black polymer protective layer beneath it. Wipe away the blackened salt paste with a clean paper towel.
Method B — For Level 2 Moderate Patchy Rust (Oil-Lubricated Pumice Grill Brick or 100–120 Grit Sanding)
If rough orange patches and uneven black pits remain:
1. Pour a generous amount of cooking oil (or food-grade mineral oil) over the rusted areas of the 10-millimeter-thick steel plate to serve as a lubricant for wet sanding (during wet sanding, the oil suspends iron particles in the liquid, preventing the inhalation of rust dust and avoiding clogging of the pumice).
2. Hold a pumice grill cleaning brick (or a sanding block wrapped in 100-grit wet/dry silicon carbide sandpaper) and scrub around the circular area in concentric circles.
3. Apply firm pressure to the rusted area and gradually sand outward from the boundary between the old black protective layer and the exposed steel until the surface feels completely flat and smooth to the touch.
Method C — For Level 3 Heavy Winter Neglect (80 → 120 Grit Random Orbital Sanding + Optional Vinegar Lift)
If the entire pan has been left uncovered all winter and the surface is covered with a thick, crusty layer of orange-brown rust:
1. Optional 15-minute white vinegar soak (for deeply pitted areas only): On a completely cooled baking sheet, soak a paper towel in food-grade 5% distilled white vinegar, lay it flat over areas with severe rust and deep pits, and let it sit for 15 to 20 minutes (do not allow the vinegar to drip onto the weathering steel rust layer below, and never let the vinegar remain on the carbon steel surface for hours). Remove the paper towel, scrub with a stiff nylon brush or chainmail pad, then immediately wash the steel plate with 2 tablespoons of baking soda dissolved in 1 liter of warm water to neutralize the acidity and prevent flash rust. Dry immediately.
2. Dry mechanical sanding (80-grit → 120-grit): Attach an 80-grit zirconia or aluminum oxide sanding disc to a random-orbit sander. Ensure the sanding pad lies 100% flat against the 10-millimeter-thick steel plate (never tilt the sander sideways), and sand evenly along the circular edge until all orange rust and old, flaking black crust are completely removed, revealing bright, uniform silver steel.
3. Final Satin Finish (120-grit): Switch to a 120-grit sanding pad and quickly perform a final pass along the entire ring. Never use sandpaper finer than 120 to 150 grit for polishing—the microscopic grit particles on the 120-grit pad provide maximum mechanical adhesion for the newly applied maintenance oil, ensuring it bonds firmly to the steel surface!
Step 4 — The "White Paper Towel Zero-Gray Test": Removing Microscopic Iron & Abrasive Grit
After sanding or scrubbing with a pumice stone, the pan’s surface will be covered with a dark gray paste consisting of fine iron filings, iron oxide, and pumice dust. If you begin seasoning directly on top of this layer of dust, the new coating will become rough and peel off:
1. Use a workbench scraper to remove most of the dark, oily metal mixture.
2. Dip a clean sponge in warm water with a drop of mild dish soap, and wipe the entire skillet clean (make sure the soapy water is applied only to the top cooking ring, avoiding contact with the weathering steel exterior).
3. Dry thoroughly with a lint-free towel, then lightly dab a layer of fresh cooking oil onto the exposed steel surface (this immediately seals the pores of the cast iron, blocking out oxygen and preventing flash rust from forming during use). Next, wipe the surface repeatedly with a clean white paper towel until the towel comes away completely clean, with no gray metallic stains or orange streaks.
5. How to Clean & Restore a Stainless Steel Plancha Plate (8mm SS Plate on BG12 & BG16)
While 10mm carbon steel is the classic choice for building a black polymerized patina, several commercial and coastal buyers select AHL's stainless steel plancha options—such as BG12 (8mm Stainless Steel cooking plate, 4mm Corten bowl, 100D × 70H cm, 125 kg) or BG16 (Carbon steel & Stainless steel, 35D × 70L × 90H cm, 62 kg).
Can a stainless steel plancha plate look "rusty"? Yes—for two specific reasons—and its restoration method is different from carbon steel.
Why Stainless Steel Plancha Plates Develop Tea-Staining or Heat Tint
Golden-brown to blue-purple thermal oxidation layers (thermal discoloration) and polymerized fats: When 304 or 430 food-grade stainless steel is heated between 250°C and 350°C, its chromium oxide passivation layer thickens slightly and reflects a straw-gold, bronze, or amber luster—while polymerized cooking oil forms a dark brown glaze. Many users mistake this amber-brown heat-induced discoloration and baked-on oil residue for rust.
Genuine Surface “Tea Stains” (Carbon Steel Cross-Contamination or Chloride Salts): If you scrape a stainless steel baking sheet with a regular carbon steel spatula or scrub it with a carbon steel scouring pad (such as a Brillo pad), tiny particles of free iron will become embedded in the stainless steel surface and oxidize into reddish-brown spots. Sea salt mist in coastal areas can also cause brown “tea stains” to appear on the surface if it remains on an unwashed stainless steel surface for an extended period.
Non-Scratch Restoration for Stainless Steel Plancha Rings
Unlike carbon steel (which turns black after polishing), stainless steel skillets can be restored to their shiny, bare metal state and re-passivated:
► Hot Water Removal (80°C–150°C): While an 8-millimeter-thick stainless steel pan is still warm after cooking, pour a small amount of warm water or soda water over the caramelized brown residue and scrape it off with a stainless steel spatula (never use a carbon steel wire brush).
► Scrubbing with Oxalic Acid Paste (Bar Keepers Friend or Baking Soda + Lemon Juice): Once the stainless steel surface has cooled to room temperature, sprinkle food-grade oxalic acid cleaner (Bar Keepers Friend) on any tea stains or burnt oil rings, or apply a paste made from baking soda and white vinegar.
► Scrub strictly along the metal grain: Use a blue or maroon nylon scrub pad that won’t scratch the surface, and scrub in the direction of the brushed stainless steel grain (if the ring is machined, scrub in a concentric circular motion). Oxalic acid chemically dissolves embedded free iron particles and restores the invisible chromium oxide passivation layer on the surface of the 8-millimeter stainless steel plate.
► Rinse and dry: Thoroughly rinse the stainless steel ring on top with clean water (taking care to prevent cleaning solution from dripping onto the 4-millimeter Corten steel bowl beneath the BG12), then dry it with a microfiber towel. Unlike carbon steel, stainless steel does not require multiple layers of polymer coating to prevent rust—simply apply cooking oil before frying food.
6. How to Re-Season a Restored Plancha Plate from Bare Steel to Obsidian Black
Once your 10mm carbon steel plancha plate has been stripped of orange rust and passed the White Paper Towel Zero-Gray Test (Section 4, Step 4), the bare silver steel is completely exposed to atmospheric oxygen. You must immediately lock that clean surface under a multi-layer thermally polymerized seasoning film.
The Chemistry of Thermal Oil Polymerization (Free-Radical Cross-Linking at 200°C–260°C)
As detailed in our Complete Corten BBQ Seasoning Guide, "seasoning" has nothing to do with salt or spices—it is surface polymer engineering:
► When chains of unsaturated fatty acids in vegetable oil uniformly coat a 10-millimeter-thick carbon steel surface as a micrometer-thick film and are heated to their smoke point (200°C to 270°C / 400°F to 520°F), thermal oxidation breaks the carbon-carbon double bonds (C=C).
► These free radicals cross-link with adjacent fatty acid molecules and, through mechanical action, bond to microscopic grooves on the steel surface with a 120-mesh finish, transforming the liquid fat into a hard, hydrophobic, plastic-like organic-metal polymer matrix that is tightly bonded to the carbon particles.
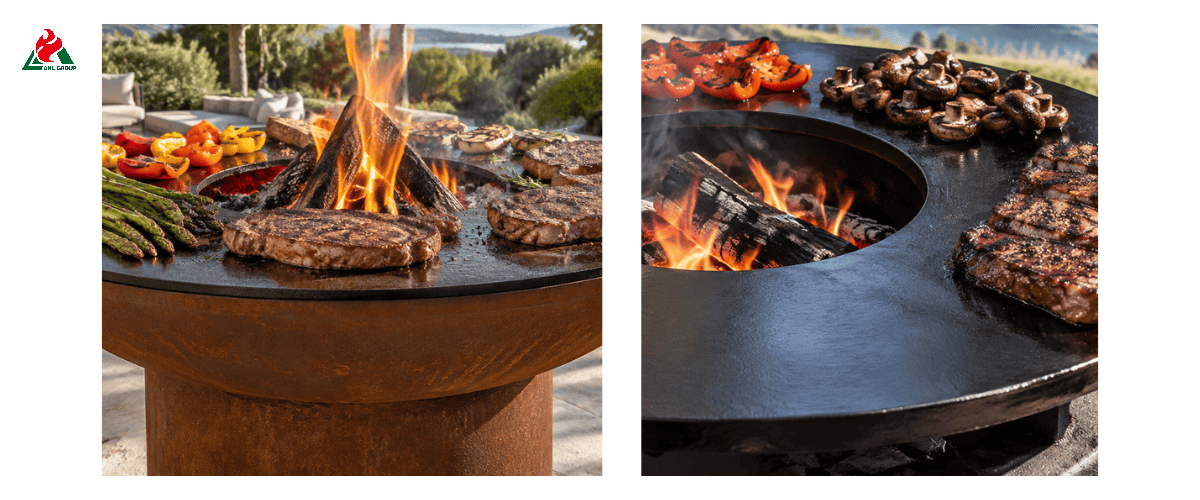
► This black polymer matrix not only protects the iron from rain and moisture but also creates a smooth, hydrophobic cooking surface that allows steaks, hamburgers, eggs, and delicate fish to slide off effortlessly.
Selecting the Right Re-Seasoning Oil (Smoke Point & Polymerization Stability Table)
Not all kitchen oils build a durable outdoor plancha seasoning layer. Compare the top options below before starting your re-seasoning fire:
| Cooking Oil Type |
Approximate Smoke Point (°C / °F) | Polymerization Hardness & Durability | Recommended for Plancha Re-Seasoning? | Engineering Notes for Outdoor Carbon Steel Plates |
| Refined Avocado Oil |
~270°C (520°F) | 10 / 10 — Ultra-Hard & Heat-Stable | Yes — Choice for High-Heat Inner Zones | Resists burning off near the 300°C center fire opening; zero odor; ideal for initial bare-steel restoration |
| Grapeseed Oil |
~215°C (420°F) | 9.5 / 10 — Hard, Flexible & Smooth | Yes — Best All-Around Chef's Choice | High polyunsaturated linoleic acid (~70%) cross-links rapidly into a jet-black, non-brittle satin finish |
| Refined Canola / Rapeseed Oil |
~205°C (400°F) | 9 / 10 — Reliable & Cost-Effective | Yes — Best Budget Daily Oil | Widely available, neutral flavor, and forms a tough, even protective coat across large 100cm rings |
| Food-Grade Flaxseed Oil |
~107°C (Unrefined) / ~225°C (Refined) | 6 / 10 — Extremely Hard but Brittle | Use with Caution Outdoors | High alpha-linolenic acid dries very hard, but often chips and flakes off (Symptom 2) under outdoor thermal expansion cycles |
| Extra-Virgin Olive Oil / Butter / Bacon Drippings |
160°C–190°C (320°F–375°F) | 2 / 10 — Soft, Smoky & Prone to Rancidity | No — Avoid for Base Re-Seasoning | Contains water, milk solids, salt, or unrefined organic compounds that carbonize prematurely, attract insects, and turn rancid between cooks |
The 4-Coat "Buff-It-Dry" Re-Seasoning Walkthrough (Avoiding the Sticky-Pool Mistake)
Why do 80% of DIY griddle re-seasoning attempts end up sticky, blotchy, or peeling? Because the user poured on too much oil. When oil pools in a thick layer, oxygen cannot penetrate evenly through the film; the top skin wrinkles while the bottom stays gummy.
Follow the "Wipe It On, Then Buff It Back Off Like You Made a Mistake" rule across 4 thin coats:
1. Build a Center Hardwood / Charcoal Fire (Target Plate Temp: 200°C–250°C): Light dry hardwood logs (<20% moisture oak, beech, ash, or fruitwood) or lump charcoal in the fire bowl of your Corten steel charcoal BBQ grill. Wait 20–25 minutes until the 10mm carbon steel ring heats evenly to 200°C–250°C (400°F–485°F).
2. Coat 1 — Apply & Buff Ultra-Thin: Pour 1 to 1.5 tablespoons of refined avocado, grapeseed, or canola oil onto the freshly sanded bare steel ring. Using a thick pad of lint-free cotton cloth held in long BBQ tongs, spread the oil across the entire top surface, the inner rim, and the outer edge. Immediately take a second dry paper towel in your tongs and buff the entire plate until it looks almost dry with only a faint satin sheen—zero visible puddles or streaks.
3. Bake Until Smoke Stops (12–15 Minutes): As the 10mm plate heats past the oil's smoke point, thin wisps of white-gray smoke will rise from the steel, and the bright silver metal will turn straw-gold, then bronze-amber. Wait 12 to 15 minutes until the smoking subsides and the surface feels bone-dry—not tacky—when tapped with a spatula tip.
4. Coats 2, 3 & 4 — Progressive Blackening: Without letting the grill cool down, repeat the same "wipe on a whisper-thin coat → buff off excess with a dry towel → let smoke for 12–15 minutes" cycle three more times:
► After Coat 2: The bronze steel deepens into rich mahogany brown.
► After Coat 3: The inner and middle zones turn dark espresso-charcoal.
► After Coat 4: The entire 10mm ring develops a hard, mirror-smooth obsidian-black polymer armor.
5. Final Cool-Down Maintenance Coat: Let the fire burn out and allow the 10mm plate to cool down to ~60°C–70°C (below the smoke point). Wipe on one final micro-thin maintenance coat of oil to seal out overnight humidity.
7. Post-Cook Routine: The 3-Minute Thermal Deglaze & Oiling Habit That Prevents Rust Forever
Once you have invested an hour restoring and re-seasoning your plancha plate, you never need to sand it again—provided you adopt the 3-Minute Post-Cook Habit after every barbecue session.
Can You Use Ice Cubes or Water to Steam-Clean a Hot Plancha? (Why 10mm Plate Thickness Matters)
One of the most debated issues among outdoor griddle users is whether it’s safe to pour water or drop ice cubes onto a scorching-hot griddle to remove caramelized residue and marinade (hot deglazing):
1. For stamped metal griddles 2 mm to 3 mm thick: Pouring cold water onto a 2 mm-thick metal griddle causes localized thermal contraction, leading to permanent deformation and warping of the thin sheet metal.
2. For 10 mm (3/8 inch) thick AHL carbon steel griddles (BG1 to BG20): Since 10-mm structural steel plates weigh between 50 kg and 75 kg or more, and their bending stiffness is 25 times that of 3.5-mm baking pans, using 2–3 tablespoons of warm water or a few ice cubes on the high-temperature cooking ring for localized temperature control to remove caramelization is both completely safe and highly effective.
3. The Golden Safety Rule for Thermal De-carbonization:
► Only when the temperature of the 10-millimeter cooking ring is around 150°C–200°C should you splash a small amount (30–60 milliliters) of lukewarm water or 2–3 ice cubes onto stubborn charred spots, and immediately scrape the bubbling char into the central fire trough.
► Never pour an entire bucket of cold water onto the baking tray, nor pour water into the 2-millimeter–4-millimeter-thick weathering steel fire basin below, or splash water onto high-temperature structural welds.
Between-Cook & Winter Storage Protection
► Take Advantage of the Built-in Concave Curve: High-quality 10-millimeter flat-bottomed grill rings form a slight concave curve when heated (a 2- to 4-millimeter curve toward the center fire hole), allowing excess grease and moisture to flow inward rather than dripping down the outer weathering steel cone. When scraping, always work toward the center opening.
► Use a metal fire-extinguishing cover on the grill ring: Once the grill has completely cooled and dried, place the dedicated steel fire-extinguishing cover (top plate) directly over the oiled 10-millimeter flat-bottomed grill ring. This prevents rain, bird droppings, and acidic leaves from contaminating the seasoned carbon steel cooking surface, while allowing the Corten steel BBQ grill base underneath to remain ventilated so that its rust patina can breathe and dry naturally.
► Never seal a damp grill under an airtight plastic tarp: If using a full-length winter cover, ensure the grill is completely cool and dry, and choose a breathable marine-grade polyester cover with ventilation holes—airtight PVC tarps act like a greenhouse, trapping ground-level condensation and causing Grade 3 winter rust on the cooking grate.
8. Engineering Reference Table: AHL Corten Plancha BBQ Models (BG1 to BG20 Plate Specs & Restoration Guide)
To help you identify the exact cooking plate material, thickness, base structure, and exterior finish on your grill, the reference table below summarizes verified factory specifications across the AHL BG1 through BG20 series (note: exact dimensions and weights are sourced from current AHL factory specification tables; custom project builds may vary—please verify against your model's spec sheet):
| AHL Model Number |
Cooking Plate Material & Thickness | Fire Bowl / Base Thickness | Standard Dimensions (cm) | Exterior Surface Finish | Total Unit Weight (kg) | Specific Cleaning & Rust-Restoration Protocol |
| BG2 (Flagship Pedestal) |
Carbon Steel (10mm) | Base: 2mm Corten (3–20mm custom) | 100(D) × 100(H) / 85(D) × 100(H) (or 100×170×90) | Natural Rust Patina | 105 kg / 73 kg | Top 10mm Ring: Strip rust & 4-coat oil seasoning at 220°C. Lower Corten Base: Warm water & soft nylon brush only; never oil or sand the patina. |
| BG4 (Wood-Storage Table) |
Carbon Steel (10mm) | Base: 2mm Corten | 100(D) × 130(L) × 100(H) / 85(D) × 130(L) × 100(H) | Natural Rust Patina | 152 kg / 112 kg | Top 10mm Ring: Scrape, pumice/sand rust & re-season. Wood Bin: Keep stacked firewood elevated slightly so wet bark does not trap moisture. |
| BG5, BG8, BG10, BG18 |
Carbon Steel (10mm) | Base: 2mm Corten | 100(D) × 90(H) | Natural Rust Patina | 115 kg (BG5/18) 125 kg (BG8/10) |
Top 10mm Ring: Salt/oil scrub (Level 1) or 80–120 grit sanding (Level 2–3) + 4-coat oil polymerization. |
9. Frequently Asked Questions (FAQ)
Q1: Is a rusty carbon steel plancha grill ruined, or is it still safe to cook on after cleaning?
A: It is 100% salvageable and completely safe to cook on once restored. Unlike thin Teflon-coated pans (which must be thrown away once the synthetic coating peels), an AHL 10mm (3/8") solid carbon steel plancha plate has 10,000 microns of solid homogeneous steel. Even ugly winter rust only penetrates the top 0.02 to 0.10 mm. Once you sand or pumice-scrub the orange iron oxide down to clean bare metal, pass the white paper towel wipe test, and bake on 3–4 coats of high-smoke-point oil at 200°C–250°C, the plate performs and looks like brand new.
Q2: How do I tell the difference between rust and flaking black seasoning on my plancha?
A: Rub the cold spot firmly with a dry white paper towel. True iron rust leaves a powdery orange or brick-red smudge on the paper towel and feels rough like fine sandpaper. Flaking seasoning detaches as hard, brittle black chips (like peeling paint) and reveals smooth dark-gray or silver metal underneath with zero orange powder—usually caused by applying flaxseed oil too thickly or letting sugary marinades carbonize without scraping.
Q3: Can I use an electric sander or angle grinder to remove heavy rust from a 10mm plancha plate?
A: Yes, with the right attachment: a 125 mm (5") random orbital sander fitted with 80-grit followed by 120-grit sanding discs held completely flat against the 10mm carbon steel ring is the fastest, safest way to strip Level 3 winter rust in under 30 minutes. If using an angle grinder, use only a non-woven nylon silicon-carbide stripping disc (poly strip wheel) held flat—never gouge the plate with the edge of a hard metal grinding wheel, and never use 80-grit power sanders on 8mm stainless steel plates (BG12).
Q4: Can I use vinegar or lemon juice to remove rust from a plancha grill?
A: Yes, on bare rusted carbon steel only—with two strict precautions:
► Only use food-grade 5% white vinegar or lemon juice on the top cooking ring for 15–20 minutes to loosen deep rust pits, and immediately neutralize the acid afterward with a baking soda + warm water rinse before drying and oiling (otherwise the acid will cause instant flash rust).
► Never let vinegar or lemon juice drip onto an already-seasoned black area (acid strips healthy seasoning) or onto the lower Corten steel exterior body (acid bleaches pale streaks into the natural weathering steel patina).
Q5: Should I oil the rusty Corten steel base of my BBQ grill when I oil the plancha plate?
A: No—never apply cooking oil, mineral oil, or wax to the Corten steel fire bowl or pedestal base (such as on BG2, BG4, BG8, or BG18). The reddish-brown rust on the lower body is a self-protecting weathering steel patina that needs natural rain-and-sun drying cycles to stay dense and matte. Smearing cooking oil onto the Corten body creates dark, blotchy grease stains that turn rancid, trap dust, and ruin the architectural patina.
Q6: How do I keep my plancha cooking plate from rusting over the winter when not in use?
A: Before winter storage: (1) empty all wood ash from the fire bowl and ash pan so moisture cannot wick upward; (2) scrape the 10mm cooking plate clean and bake on a fresh polymerized seasoning coat; (3) once the plate cools to room temperature, coat the top, inner rim, and outer edge of the 10mm carbon steel ring with a generous barrier layer of food-grade mineral oil (which never goes rancid like vegetable oil can over 6 months); and (4) cover the cooking ring with a fitted metal snuffer lid and a breathable, vented weather cover.
Conclusion: Built Thick Enough to Restore for a Lifetime of Outdoor Cooking
The beauty of owning a heavy-duty architectural plancha—crafted with a 10mm carbon steel or 8mm stainless steel cooking ring atop a self-protecting Corten weathering steel body—is that surface rust on the cooking plate is never a death sentence. With 30 to 60 minutes of mechanical scraping, pumice or orbital sanding, and four micro-thin coats of high-smoke-point oil baked at 220°C, even a winter-neglected griddle ring transforms right back into a glass-smooth, non-stick culinary centerpiece.
At AHL Group, we engineer and manufacture our complete Corten Steel BBQ Grill & 10mm Plancha Collection (BG1 to BG20)—including our flagship BG2 Pedestal Plancha, BG4 Wood-Storage Prep Grill, BG8 Conical Plancha, and Modern Outdoor Rusted BBQ Grills—for multi-decade residential and commercial hospitality service. Contact our engineering team today for custom project specifications, OEM/ODM branding, and factory-direct wholesale quotes.
Looking for a Custom Wood-Fired Corten Steel BBQ Grill?
Explore AHL Corten Group's heavy-duty weathering steel plancha grills with food-grade carbon steel cooking rings and integrated log storage.
» Browse All Corten BBQ Grills | BBQ Grates & Accessories | Get Wholesale Pricing
Explore AHL Corten Group's heavy-duty weathering steel plancha grills with food-grade carbon steel cooking rings and integrated log storage.
» Browse All Corten BBQ Grills | BBQ Grates & Accessories | Get Wholesale Pricing

